Get Started


Key Takeaways
Changing your domain name in WordPress requires careful consideration. Ensure you have a valid reason for the change and follow a structured process to avoid disruptions.
Updating your domain name involves adjusting settings in WordPress and setting up redirects. These steps are crucial to maintain SEO and user experience during the transition.
Consider the implications of changing your domain extension. Even a simple change like this requires registering a new domain and updating various platforms.
Preparation is key before changing your domain. Back up your website, familiarize yourself with FTP, and ensure your new domain is properly configured.
Changing a domain name in WordPress involves technical steps like editing the database via phpMyAdmin. This method is reserved for specific situations and requires caution.
Notify search engines and update URLs across platforms after changing your domain. Ensuring consistency and proper redirects is essential for maintaining online visibility and user trust.
Changing your website’s domain name has advantages and disadvantages, but it’s a decision that should be considered carefully, especially if you have an established WordPress site.
Having said that, there are valid reasons for changing a domain name, and if the need arises, it’s crucial to handle the process correctly.
The good news is that changing the primary WordPress URL is quite simple. You’ll need to adjust some WordPress settings in two different places, but both tasks are straightforward.
In this post, we’ll guide you through changing your existing domain name within WordPress, with essential tips to ensure a successful transition. Let’s begin!
Why Would You Want to Change Your Domain Name?
It’s worth exploring some of the reasons you might change your domain. Here are a few common examples:
- You’ve changed your business name. Of course, if you change the name of your company due to an acquisition or shift in focus, you’ll want your website to change, too. When your domain name matches your business name, it’s easier for customers to find you.
- You’re rebranding. When looking to attract new or different clientele, you might consider an updated domain name that better reflects your image. A new name that meshes with your brand voice can also help with marketing efforts.
- You want to change your domain extension. Even if you only want to change your domain extension, you need to register for a new name. For example, if you started as a .org website but want to shift to a .com site URL to instill confidence, this guide is for you.
Do You Have to Purchase a New Domain Name?
Before you can migrate your WordPress site away from your old domain, you’ll need to purchase a new domain name. This process can be easier said than done.
First, you need to reserve your new domain name through a domain name registrar. While the cost is negligible (often less than $20/year), choosing an effective—and available—domain name for your brand can be time-consuming.
What’s more, if you’ve entered into a lengthy contract for your original domain, you may end up paying for two domains for a period. However, having both domains for at least six months is advisable, as customers may still try to visit your original site. You can redirect them from your old address to your new one using a 301 redirect.
Eventually, you’ll want to delete your original domain by canceling your plan. Remember that you’ll also have to update your WordPress URL on all social media platforms, business cards, signs, and other websites.
Now that you understand the details behind changing a domain name, let’s look at the WordPress change URL function.
How Do You Change Your Domain Name in WordPress?
So, how do you change a domain name in WordPress? As we said, changing your WordPress website’s primary domain name is not something you should approach lightly. However, when you do find yourself in this situation, the process involves just a few steps:
- Access your WordPress dashboard, and change your website URL within the WordPress Settings > General screen.
- Update your wp-config.php file or wp config file to reflect the changes.
- Check that the domain change or domain rename has been correctly implemented.
The process itself is relatively simple, although there are some aspects that require a little technical knowledge. We’ll cover those in the next few sections, but don’t worry—we’ll walk you through each step.
Changing Your Domain in WordPress
Before you dive headfirst into changing your website’s primary domain name, you’ll want to keep a few considerations in mind. A little preparation is essential to make sure the process goes as smoothly as possible a simple mistake could bring down your entire site. Familiarizing yourself with the needed resources before you begin helps you avoid that scenario.
For instance, you’ll want to make sure you have a full backup of your website in place before lifting a finger. That way, if the worst happens, you can roll back your changes to a clean configuration and start over.
Also, you’ll need to use a File Transfer Protocol (FTP) client for some of these steps. This is a way to access your server directly from your desktop, and although it’s simple to use, there is a learning curve involved. As such, you’ll want to download a suitable client (we recommend FileZilla) and brush up on your FTP skills.
In addition, you’re going to need your server credentials to log in via FTP. These can usually be found within your hosting provider’s admin dashboard.
Finally, we’re assuming that you already have a custom domain name purchased, and you’ve gotten it ready by pointing it to the correct nameservers. If not, you’ll want to make sure this is sorted out before you do anything else.
How to Change Your Domain Name in WordPress
Now that the prep work is out of the way, let’s get down to business! Here are the three steps you’ll need to follow in order to change your WordPress site’s original domain name.
Step 1: Change Your URL Within WordPress
Your first task is to physically change your site’s URL within WordPress. However, this step comes with a word of warning. Once you save your changes, your site’s back end won’t be accessible until you’ve completed the rest of this procedure.
To begin, log into WordPress, and navigate to the General > Settings screen:
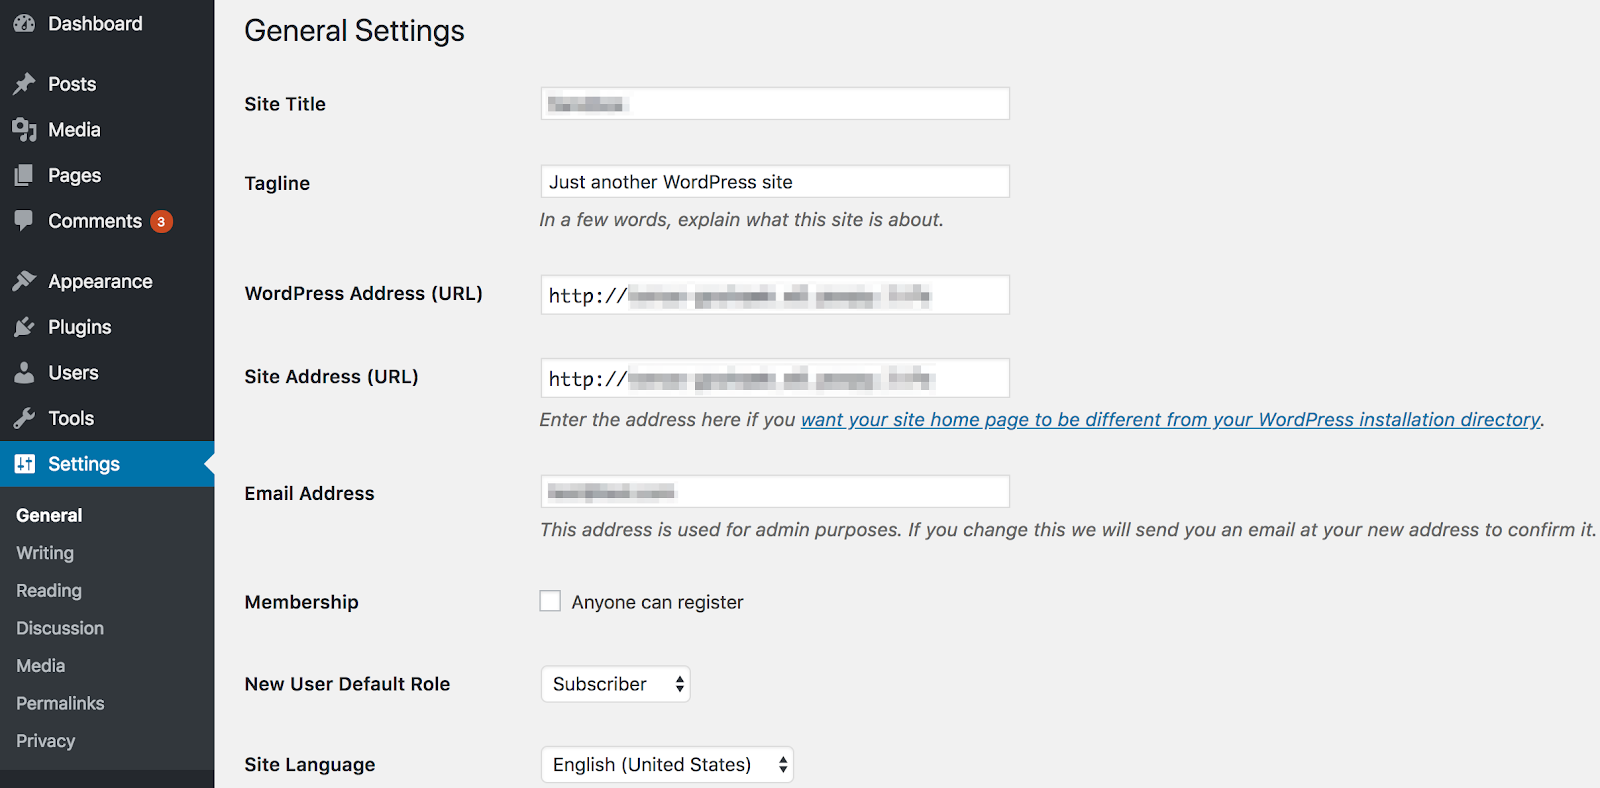
This screen contains global settings for your WordPress site. The fields we’re interested in are WordPress Address (URL) and Site Address (URL):

For a WordPress change URL, simply type the new address into both of these fields, and click on Save Changes. As we mentioned, this will make your site temporarily inaccessible.
Step 2: Set Up Permanent Redirects and Notify Search Engines of the Change
This final step is more of a “clean-up” job. Even once your domain is successfully changed, you’ll have a lot of links throughout your content and across the web that point back to your previous address. Fortunately, you can permanently redirect those links to your new domain.
To do this, you’ll need to once again access your site via FTP, and look for the .htaccess file. This is another WordPress configuration file (so it’s worth copying to your desktop as a backup before you tweak it). Within, you’ll want to add the following code:
#Options +FollowSymLinks
RewriteEngine on
RewriteRule ^(.*)$ http://www.example.COM/$1 [R=301,L]
Again, the placeholder WordPress URL address should be changed to reflect your new domain.
Once you’re done with that, the final task is to tell Google that you’ve updated your domain. The domain rename process is straightforward within Google Search Console, and will only take a few minutes.
Optional: Update URLs in the Database via phpMyAdmin
- Why and When: Directly editing the database to change your WordPress domain is a powerful method, typically reserved for situations where you cannot access your WordPress admin dashboard (e.g., after a faulty URL change locked you out) or if other methods to change your WordPress domain have failed. It allows you to correct the WordPress Address (URL) and Site Address (URL) at their source.
- Crucial First Step – Backup: Before making any database modifications, always create a complete backup of your WordPress database. A mistake here can render your site inaccessible.
- Accessing phpMyAdmin: Log in to your hosting control panel (e.g., cPanel, Plesk) and navigate to phpMyAdmin. Select your WordPress database from the list on the left.
- Locating
wp_optionsTable: Find thewp_optionstable (the prefixwp_might be different if you changed it during installation). Click on it to view its contents. - Editing `siteurl` and `home` Options:
- Look for the rows with `option_name` set to `siteurl` and `home`. These define your WordPress domain.
- Click “Edit” for the `siteurl` row. In the `option_value` field, replace the old URL with your new domain name (e.g., `https://www.newdomain.com`). Click “Go”.
- Repeat the process for the `home` row, ensuring it also reflects the new WordPress domain.
- Updating Internal Links (Search and Replace): Changing `siteurl` and `home` doesn’t update URLs embedded in your posts, pages, and theme settings. For this, you’ll need to perform a search and replace operation.
- Caution: Directly running SQL `UPDATE` queries can break serialized data (used by widgets, theme options, etc.).
- It’s highly recommended to use a tool that handles serialized data correctly, such as the “Better Search Replace” plugin (install it once you regain admin access) or a script like “Database Search and Replace Script in PHP” by interconnect/it. If you must use SQL, proceed with extreme caution and on specific tables like `wp_posts` for `post_content` only after thorough research on how to change WordPress domain links safely.
- Verification: After these changes, try accessing your WordPress site and admin area with the new domain. If you encounter issues, restore your database backup and seek expert help for your WordPress change domain task. Successfully updating these values is key to maintaining site functionality after a WordPress domain name change.
Optional: Change WordPress URL Using WP-CLI
For users comfortable with the command line, WP-CLI (WordPress Command Line Interface) offers a powerful and efficient alternative for tasks like a WordPress change domain. It’s particularly useful for developers and system administrators managing multiple sites or automating workflows. If you’re looking for how to change WordPress domain settings programmatically, WP-CLI is an excellent choice.
Here’s how you can update your WordPress URL using WP-CLI:
- Update Site URL and Home Options: First, connect to your server via SSH. Navigate to your WordPress installation directory. Then, execute the following commands, replacing
'https://newyourdomain.com'with your actual new WordPress domain and'https://oldyourdomain.com'with your old one:wp option update siteurl 'https://newyourdomain.com' wp option update home 'https://newyourdomain.com' - Run a Search and Replace: To update all instances of the old domain within your database content (posts, pages, meta data, etc.), use the search-replace command. This is crucial for a complete WordPress change URL. The
--all-tables-with-prefixflag targets all WordPress core tables, and--report-changed-onlyshows only what was changed.wp search-replace 'https://oldyourdomain.com' 'https://newyourdomain.com' --all-tables-with-prefix --report-changed-onlyFor a dry run to see what would be changed without actually making modifications, add the--dry-runflag. It’s always wise to run a dry run first when you change domain WordPress wide. - Flush Caches: If you use any caching plugins or server-side caching, flush the cache to ensure the changes are immediately visible:
wp cache flushThis command works with many popular WordPress object caching mechanisms.
Advantages and Cautions: WP-CLI is significantly faster for these operations, especially on large sites. It can be easily scripted for automation. However, as with any command-line tool, there’s a risk if commands are mistyped. Always ensure you have a recent backup before running WP-CLI commands, especially search-replace. While WP-CLI handles serialized data correctly, it’s crucial to be precise. Beginners should exercise caution or stick to GUI methods when they need to change WordPress domain settings.
Post-Migration SEO Checklist & Redirect Best Practices
- Implement 301 Redirects: This is paramount. Set up permanent (301) redirects from your old domain to your new WordPress domain for all pages. This tells search engines and browsers the content has permanently moved, helping to transfer link equity from your old WordPress domain. You can do this via your server’s
.htaccessfile (as shown earlier in this guide) or using a WordPress plugin like Redirection. Ensure both site-wide and specific page-level redirects are correctly configured if your URL structure also changed during the WordPress change domain process. - Update XML Sitemaps: Generate a new XML sitemap reflecting your new domain URLs. Submit this new sitemap to Google Search Console and other webmaster tools (e.g., Bing Webmaster Tools). Most SEO plugins like Yoast SEO will auto-generate this once the WordPress URL is updated in settings.
- Google Search Console – Change of Address: Add your new domain as a new property in Google Search Console. Then, use the “Change of Address” tool (found in the settings of your old domain’s property) to officially inform Google about the move. This helps Google process the change more efficiently when you change domain WordPress.
- Verify Canonical Tags: Double-check that all canonical tags (
rel="canonical") on your pages point to the new domain’s URLs. This prevents duplicate content issues. SEO plugins usually handle this automatically after a WordPress change domain process. - Update
robots.txt: If yourrobots.txtfile contains any absolute URLs pointing to the old domain (e.g., sitemap location), update them to reflect the new WordPress domain. - Refresh Important Backlinks: While 301 redirects handle most link equity transfer, it’s beneficial to manually update backlinks from high-authority websites or profiles you control (e.g., social media, guest posts). Contact webmasters of important linking sites to request updates if feasible after you change WordPress domain.
- Monitor Closely: After you change domain WordPress settings and go live, keep a close eye on Google Search Console for crawl errors (especially 404s on the old and new domain), indexing status, and any messages from Google. Monitor your organic traffic and keyword rankings using analytics tools for any significant drops. Address any issues promptly related to your new WordPress domain.
- Update Other Services: Don’t forget to update your new WordPress domain in any third-party services connected to your site, such as Google Analytics, email marketing platforms, advertising networks (e.g., Google Ads), and payment gateways. This is an important part of how to change WordPress domain successfully.
Get Support for More Common WordPress Questions from WP Engine
Of course, a task as major as changing your domain name requires you to have confidence in your site—as well as your hosting provider.
When you select WP Engine to host your WordPress site, you’re selecting the market leader in reliable, fully managed hosting for WordPress, and what’s more, our award-winning support team is always available to help! Speak with a representative now to find out more.