The Beginner’s Guide to CSS Specificity
Have you ever tried to override a CSS rule, only to find it not working as it should have? Or noticed when one element is targeted multiple times with different CSS selector combinations, only one rule is applied at a time? This is all because of CSS specificity rules.
CSS specificity rules can be one of the most confusing concepts to understand, especially for beginners.
If you are just starting out with CSS, as a standard order rule, you might think the latest CSS rule should override the old one. It seems simple, but it doesn’t always work out that way. It depends on CSS specificity, when and which CSS rule should apply.
So let’s break down what CSS specificity is and how to use it efficiently.
What is Specificity in CSS?
In simple words, if you have multiple CSS selectors for one element, the one with the higher specific value will be applied.
Different selectors have different weights and the browser will decide which one is the most relevant to that element.
How Does it Work?
The specificity of a selector can be categorized in the following four levels:
- Inline style or CSS
- IDs
- Classes, pseudo-classes, and attributes
- Elements or pseudo-elements
Inline styles or CSS, where CSS is applied directly on the HTML document, look like this <p style="margin-bottom: 0">. Inline styles will always have the highest specificity level.
Second in this order are IDs, like #content. So any selector using an ID will have the second highest specificity level.
Classes, pseudo-classes, and attributes are third in this order. They look like: .post, :hover, and [title], respectively.
Elements and pseudo-elements have the least value. li and :after are basic examples of an element and pseudo-element.

The Calculation
The specificity value can be calculated with the following guideline:
- Inline style or css: 1,0,0,0
- ID: 0,1,0,0
- Class or pseudo-class and attribute: 0,0,1,0
- Elements and pseudo-elements: 0,0,0,1
- Universal selector(*): 0
To check your selector’s specificity level, you can use the Specificity calculator.
Basic Rules of CSS Specificity
Now that you have an idea of how specificity is organized, let’s discuss some general rules and examples!
This is the base HTML I’ll use in my examples. Here I have a small list within a container with #content.
[css]
&amp;amp;lt;div id=&amp;quot;content&amp;quot;&amp;amp;gt;
&amp;amp;lt;ul class=&amp;quot;list&amp;quot;&amp;amp;gt;
&amp;amp;lt;li&amp;amp;gt;Item 1&amp;amp;lt;li&amp;amp;gt;
&amp;amp;lt;li&amp;amp;gt;Item 2&amp;amp;lt;/li&amp;amp;gt;
&amp;amp;lt;li&amp;amp;gt;Item 3&amp;amp;lt;/li&amp;amp;gt;
&amp;amp;lt;/ul&amp;amp;gt;
&amp;amp;lt;/div&amp;amp;gt;
[/css]Rule 1
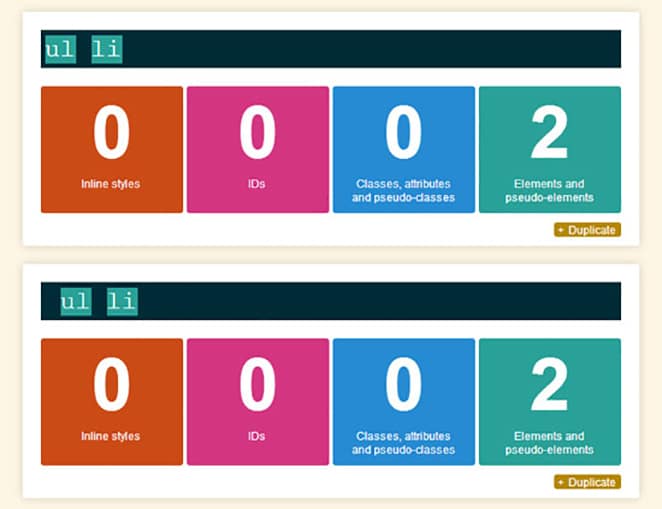
If you have two or more of the same selectors for an element, they will all have the same specificity value, hence the lower one or the last one will be applied.
In the following CSS snippet, both selectors have equal specificity, so the li color will be yellow, since it’s placed further down the line.
[css]

ul li{

color: green;

}

ul li{

color: yellow;

}

[/css]
Rule 2
If multiple selectors are used for one element, the selector with the higher specific value will be applied.
In the following example, li is targeted by two different selectors and both affect the font color. So, which rule should apply?
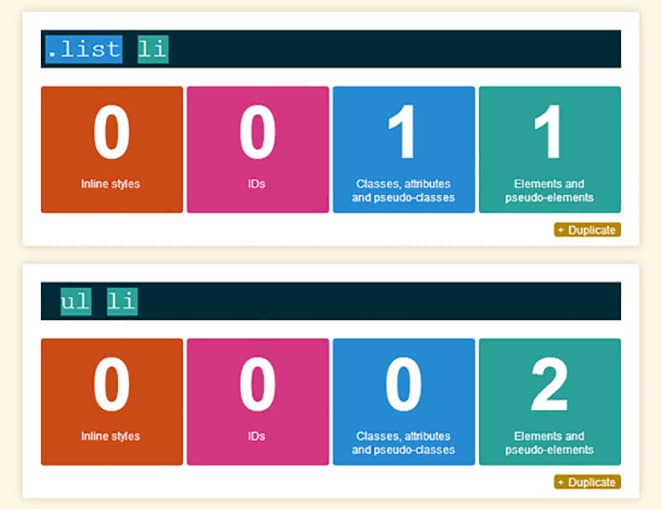
Like the previous instance, in CSS order concept the second one should apply (so the li color would be green) but because .list li has a higher specificity value than ul li, the color will remain red.
[css]

.list li{

color: red;

}

ul li{

color: green;

}
[/css]
Rule 3
We saw class outweigh elements in specificity level, now let’s see what happens with an ID.
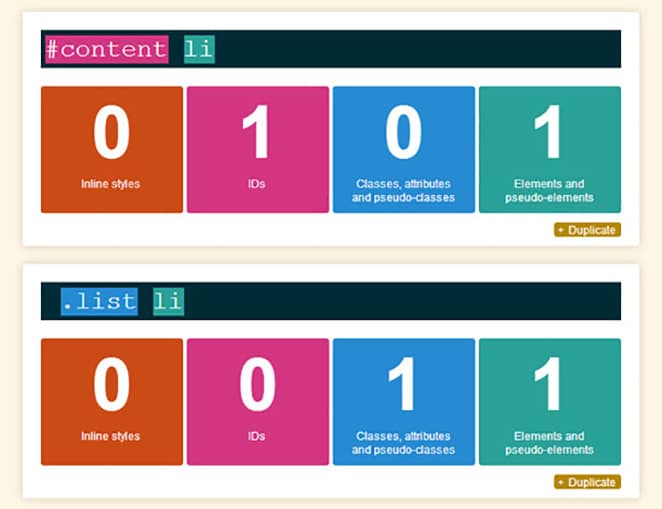
In the following example, we have a class and ID both targeting the same element and affecting the font color. Again the same question: which rule should apply?
[css]

.list li{

color: red;

}

ul li{

color: green;

}
[/css]
As mentioned before, ID has higher specificity value than class, attributes, and elements, so the color will be blue. Always target ID for higher specificity level.

Rule 4
!important will override any selector of any specificity value. But keep in mind that !important shouldn’t be overused, because it’s not considered a CSS best practice.
If you are the author of your CSS and not overriding an existing rule, you would hardly need to use !important.
Use !important only when you are trying to override someone else’s CSS and your specificity is not able to outweigh the previous selector, especially when you can’t control the placing order of your CSS in the HTML.
This will happen mostly while working in WordPress, where you will find many CSS files already added by different plugins and themes.
Generally, plugin CSS is specific to the plugin and use IDs, inline-css, or even !important for higher specificity, to avoid any CSS conflict. To override that CSS, you have to use even higher specificity; for these scenarios you can use !important.
In the following example, I’m recreating the previous scenarios, with li targeted with different CSS selectors, but you can see that !important overrides all rules and the color will be yellow.
[css]

#content li{

color: blue;

}

.list li{

color: red;

}

ul li{

color: green;

}

ul li{

color: yellow !important;

}

[/css]
!important will give you the power to enforce your CSS above any specificity level.
You need to be careful while using !important because you can’t override this rule. The only way to override an !important is to use another !important later in the CSS, so your CSS can easily look messy if you don’t understand the power of it.
A few exceptions
Elements and pseudo-elements have the least specificity, but there are a few interesting (and slightly confusing!) exceptions. (Confusing because they don’t seem to follow the rules we just saw.)
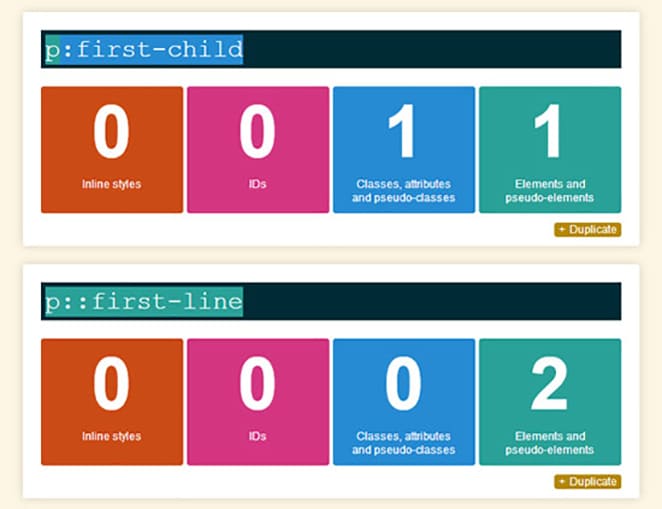
In this example, you’ll see :first-child (pseudo-class) and :first-line (pseudo-element). We just learned that pseudo-classes will have higher specificity than pseudo-elements, so according to that, the paragraph’s first line color should be green, but instead it will be pink.
[css]

p:first-child{

color: green;

}

p::first-line{

color

:pink

;

}

[/css]
You may think the ordering would be an issue here, but even switching the order won’t change the output. The specificity calculator shows a different picture than the outcome.

This is where specificity gets a bit confusing. I can only assume that the reason for this outcome is :first-line is closer to the element and probably treated as inline-style. You can check jsfiddle for another example.
How to use specificity efficiently?
If you understand the CSS specificity rules, you can use it very efficiently and make your CSS reusable.
Let’s say you want to use the same .button but with different background colors, so you set up a specific selector: .red-block .button.
[css]

.button{

background: #97bc2d;

font-size: 1em;

display: inline-block;

}

.button a{

display: block;

color: #fff;

padding: 1em 2em;

text-decoration: none;

}

.red-block .button{

background: red;

}

[/css]
If .button is wrapped in a .red-block container, then the default button background color will change to red.
CSS specificity is very useful when customizing WordPress themes, where you are trying to override the theme author’s CSS with your own.
Common mistakes to avoid
Some people use ultra-specific selectors, which is not a good practice. Be as specific as required only. For example, this code snippet targets the li but is too specific.
[css]

div#content ul.list li{

color: purple;

}

[/css]
If you are too specific with your CSS, it will become rigid and harder to re-use. You could easily write .list li instead of div#content ul.list li, which will make your CSS cleaner.
Additional resources
Conclusion
As you can see, CSS specificity is an important tool and every front-end developer should have it in their toolkit. A clear understanding of this concept can go a long way in making you a good front-end developer.
