Get Started


Key Takeaways
Google Search Console provides valuable insights for website owners. It helps track SERP standings, monitor errors, and optimize site appearance for better SEO.
Verifying a WordPress site on Google Search Console is essential for accessing search data. Methods include uploading HTML files, using plugins like Yoast SEO, or integrating with Google Analytics.
Improving search appearance data and optimizing HTML are key benefits of using Google Search Console. Backlink checking and internal link optimization also contribute to enhancing website performance.
Leaders should assess their current workflow to identify gaps in utilizing Google Search Console effectively. This evaluation can lead to better SEO strategies and improved search visibility.
When it comes to ranking high on Google, you’ll need all the SEO tools at your disposal. The way your website appears in search engines – particularly giants such as Google – can play a key role in its overall success, as well as how many hits it receives each month. However, many website owners don’t give this much thought.
Fortunately, tools such as Google Search Console make it possible to learn more about your website’s current standings. They also enable you to improve your site’s appearance on Search Engine Results Pages (SERPs), so you can stand out among the crowd.
In this post, we’ll introduce Google Search Console and its various uses and benefits. We’ll then show you several ways you can verify GSC, so you can use it alongside your WordPress website. Let’s get started!
What Is Google Search Console?
Google Search Console (formerly known as Google Webmaster Tools) is a free service that enables you to track your website’s presence on Search Engine Results Pages (SERPs). You can use it to quickly submit new content, and to track the progress of your existing content. The tool can also be used for Google site verification, specifically site ownership.
This is a tool that can benefit just about anyone with a website. It enables you to:
- Track current SERP standings
- Monitor website errors
- Uncover and resolve code markup errors
- Integrate your application with your website
Plus, you can use this service to find out where your site appears on SERPs, and understand how users interact with it. In turn, these details can be used to inform your Search Engine Optimization (SEO) efforts.
The Benefits of Using Google Search Console
There are many benefits to using Google Search Console on your website. This tool will not only enable you to improve your SEO techniques, but it will also offer you unique insight into your current setup.
Some of the most important advantages include the ability to improve your search appearance data, use structured data testing, and make improvements to your site’s HTML. You can even check on backlinks and optimize internal links.
When combined, these benefits mean you can improve both the look of your website on SERPs, and its overall performance.
You can also use Google Search Console for Google verification of domain ownership, provided that the domain name provider is included in the provider names list.
How to Verify a WordPress Site in Google Search Console
Before you can begin to reap the benefits offered by Google Search Console, you’ll need to verify your WordPress website. This will provide you with all the tools you need, and give you access to Google search data that’s relevant to your site.
Step 1: Go to Google Search Console
First, you’ll want to navigate to the Google Search Console home page. Then, sign in using your Google account.
Step 2: Add Property to Search Console
Next, click on the red ADD A PROPERTY button that’s located in the top right corner of the dashboard:

A box will appear, which will prompt you to paste in the URL of your website.
Step 3: Download the HTML Ownership Verification File
Under the Recommended method tab on the following screen, you’ll need to download the HTML verification file by clicking on the hyperlink provided:
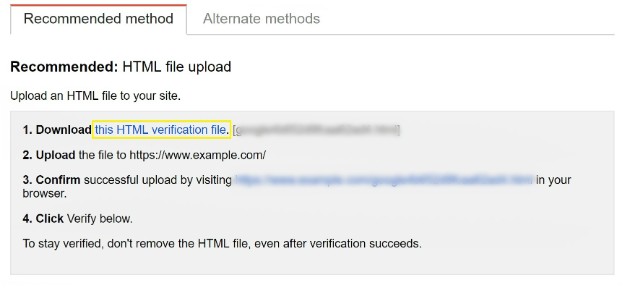
Don’t forget to save this file to your computer.
Step 4: Upload the File to Your Website via FTP
This step requires direct access to your website’s server, which you can obtain via File Transfer Protocol (FTP) or cPanel File Manager.
Using an FTP client such as FileZilla, enter your credentials and log into your server. You’ll then need to upload the file to your site’s root directory (which contains the wp-content folder, the wp-config.php file, etc.):

Click and drag the file from wherever you saved it on your computer to your site’s root folder.
Step 5: Go back to Search Console & Click “Verify”
Now, you can return to Google Search Console and click on Verify. This will complete the process!
Alternative Ways to Verify a WordPress Site in Google Search Console
If you can’t get direct access to your site’s server in order to upload the file, there are alternative ways to verify Google Search Console. Let’s take a look at each option.
We’ll assume that you’ve already added your site as a new property to your Google Search Console account, as described above.
HTML Tag
The easiest way to verify Google Search Console is by using a plugin such as Yoast SEO. After installing and activating the plugin, you can proceed with the following steps.
Step 1: Copy the Search Console Verification HTML Code
On the Google Search Console verification page, select the Alternate methods tab and choose HTML tag:

Copy only the code, which is located at the very end of the string provided.
Step 2: Log in to WordPress
Then, log in to your WordPress website, and navigate to SEO > Dashboard:

Choose the Webmaster tools tab from the top row on the next screen.
Step 3: Paste in the Search Console Verification Code
Here, paste the HTML code you copied a moment ago into the Google Search Console box:

Be sure to click on Save changes once you’re done.
Step 4: Go Back to Search Console & Click “Verify”
Finally, return to the Search Console and click on Verify:

You’ll then receive a success message, and you can now use this tool with your website.
DNS TXT Record
If you don’t want to add an extra plugin to your site, this method may be a better fit.
Step 1: Get the TXT Record
In Google Search Console, click on Alternate methods and select Domain name provider. In the drop-down menu, choose your domain registrar.
Next copy the TXT record that’s provided:

Step 2: Add the TXT Record to Your DNS Provider
This step will vary, based on your DNS provider. In a nutshell, what you want to do is add the TXT record to your DNS server (being sure to choose TXT as the record type), and verify its addition.
Step 3: Go Back to the Search Console & Click “Verify”
Finally, return to Google Search Console and click on Verify.
Google Analytics
If you’re already using Google Analytics on your site (or you’re planning to), you can verify it with Google Search Console using this method. If you don’t have Google Analytics set up, you’ll want to do that first.
Step 1: Select “Google Analytics” As Your Verification Method
As before, start by clicking on Alternate methods in Google Search Console, and this time choose Google Analytics from the list.
Step 2: Click “Verify”
All you have to do next is click on Verify, and Google Search Console will use the Asynchronous Tracking Code to connect to your website.
Google Tag Manager
Similar to Google Analytics, you can use the code added to your website through Google Tag Manager to verify your site with Google Search Console.
If you haven’t already, you’ll first need to add the Google Tag Manager code to your website.
Step 1: Choose “Google Tag Manager” As Your Verification Method
After that, select Google Tag Manager from the list of Alternate methods in Google Search Console.
Step 2: Click “Verify”
Then click on Verify, and the Tag Manager code will be used to connect your website and get Google Search Console up and running.
Get Support for More Common WordPress Questions from WP Engine
WordPress is a popular Content Management System (CMS), and for good reason. It offers a wide array of features and functionality, and even beginners can use the platform with ease. However, even the most advanced users may find themselves needing assistance from time to time.
That’s where WP Engine comes in. Our stellar support team and reliable service ensures that you can always get the answers you need. To learn more about WordPress and all it can do, check out WP Engine’s Resource Center or visit WP Engine to learn more about our fully managed hosting for WordPress.