Get Started


Key Takeaways
Optimizing images is crucial for website speed and user engagement. Large images can slow down page loading times, leading to a 90% increase in user bounce rate for pages taking 5 seconds or more to load.
Choose image formats wisely for quality and speed. Understanding when to use JPEGs (for smaller file sizes) and PNGs (for higher quality) can significantly impact website performance.
Scale images appropriately to reduce unnecessary pixels. Delivering scaled images can prevent shipping extra pixels and improve site speed across different devices.
Effective image compression is key to faster page loading. Optimized images are 40% lighter on average, reducing bandwidth usage and enhancing user experience.
There are many reasons why you would (and should) include images in your WordPress content. Images help keep your readers engaged. They’re also a way to break up long pieces of content and improve Search Engine Optimization (SEO). However, they can also slow your website down.
Fortunately, there are quite a few resources available that can help you optimize your images. This means you’ll be more likely to overcome slow page speeds that can be detrimental to the overall success of your website.
In this article, we’ll look at why large images might be dragging your site down. Then we’ll explore how to effectively compress your media files, along with some fundamental image optimization tips that can improve your site’s SEO.
Why You Should Be Optimizing Your Images for WordPress
Images are a valuable and important piece of any content strategy. However, they can also be one of the main causes of slow page loading times.
A slow website is a problem, because it can drive users away. In fact, pages that take five seconds or more to load see on average a 90 percent increase in the probability of a user bouncing (leaving after only viewing a single page).
While there are multiple factors that can slow down your site, images and media files take up a hefty 63 percent of bandwidth on modern websites. Consequently, it’s important to optimize the images you upload to your site.
It’s also worth noting that site speed is a Google ranking factor. This means that how fast or slow your page loads will dictate, to some extent, how well it ranks in search results. There are many factors that influence your PageRank, and images fall under the “Usability of web pages” category.
Image optimization is really about improving two things:
- The number of bytes used to encode each image pixel
- The total number of pixels used.
In other words, optimizing means you are getting the best quality you can out of the least pixels and bytes. This reduces your media file sizes, and can have a significant impact on your site’s speed overall.
Optimize Images for WordPress Before Uploading to Your Site
Ultimately, the best case scenario for your website is that you optimize your images before you upload them. This is so you don’t end up with duplicates or multiple versions of one image. That would defeat the purpose of lightening your website’s load through image optimization.
With that in mind, let’s look at some of the considerations you’ll need to make when deciding how to optimize your site’s media.
Image File Formats
To get started, let’s take a look at the various kinds of image formats that exist. Understanding how each of them is different and when it’s best to use them can help you build towards a more streamlined use of images.
The two most common image formats used online are JPEGs and PNGs. Both of these formats are made up of pixels. Pixels stretch when you change the size of an image, which can sometimes make it blurry. However, these image types have different strengths and weaknesses.
When to Use JPEGs
JPEG files are a good choice for both print and web content. This kind of image file uses what’s called a ‘lossy’ format. When a larger image is converted to a JPEG, some of the information contained in its file is lost.
That information isn’t needed for simply displaying the image. However, what it does mean is that converting to a JPEG results in a smaller file size, but there can be some sacrifice in overall image quality. Fortunately, the reduction in quality isn’t too noticeable, especially for smaller images.
When to Use PNGs
PNG files are also useful for web content, just like JPEGs, but in a different way. Since PNGs can have transparent backgrounds, for example, they are more versatile and handy for designing web graphics.
PNGs use a ‘lossless’ file format. This means that all the information about the image is retained when the file is compressed. As a result, they tend to be of higher quality, but offer a smaller improvement in file sizes and page speeds. They’re a good option for graphics and icons, and for very high-quality images.
Image Size
It’s time to cut the bloat. Delivering scaled images is one of the simplest and most effective ways to optimize your images. Why so effective? Image scaling will ensure that you’re not shipping any more pixels than needed to display the asset at its intended size in the browser.
Many sites try to deliver large, unscaled images and rely on the browser to resize them, which results in the use of extra resources and slower site speed. If the image’s natural size is 820×820 pixels, and it is displayed by the browser as 400×400 pixels…that’s 32,400 unnecessary pixels!
The clarity and speed at which a page loads has a lot to do with the device on which the image is displayed (mobile, desktop, etc). For example, a 4k image may look nice on your 27 inch monitor.
However, when a visitor loads a page with that image, the browser will render the file at its full resolution first, and then scale it down to fit on their screen. If they are using a mobile device not capable of anything larger than 400 pixels, they’ll likely miss out on your content.
With that in mind, some best practices when exporting your images include:
- Keep your image’s file sizes under a couple hundred kilobytes, by saving them as ‘web optimized’ JPEGs or PNGs.
- The web standard for images is 72 dots per inch (dpi), which can be achieved by saving images in the format prescribed above.
You can use Photoshop, Lightroom, or a similar editor to reduce the image size to around 1,500 pixels or less in width. In Photoshop, simply go to Image > Image Size to manually adjust the dimensions and resolution of your image. You can also go to File > Export > Save for Web to optimize your images for web upload :
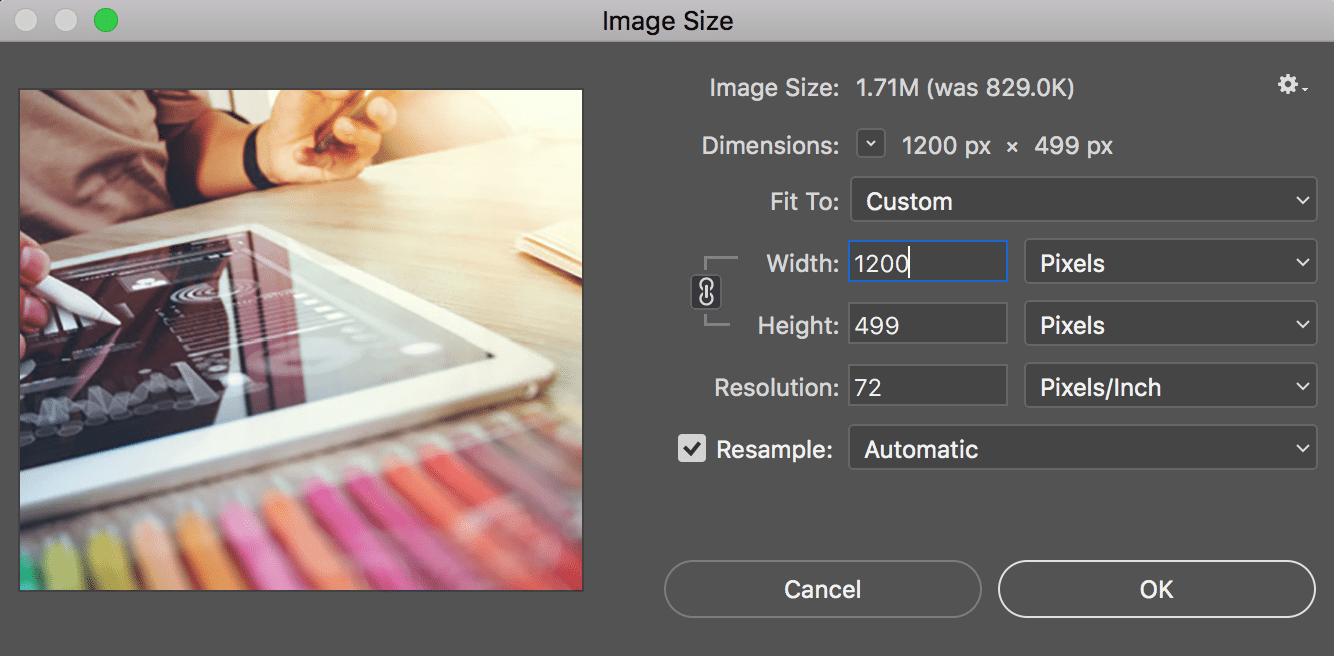
If you’re not aiming to display sharp and vivid photos on a larger monitor, you can size the image down even further.
If working with Lightroom, go to File > Export to manually adjust the image size upon exporting it:
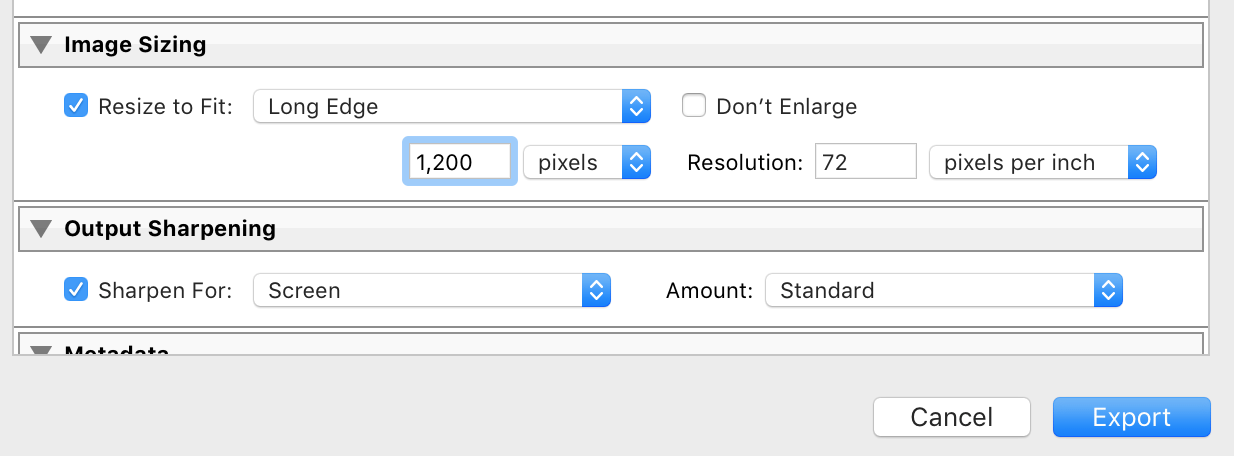
Image size and resolution are just one part of the puzzle. When it comes to optimizing your images, you’ll also want to understand compression and use it effectively.
Image Compression
In a nutshell, image compression is a way of minimizing the size (in bytes) of a graphic file, without degrading the quality of the image to an unacceptable level. As we’ve discussed, high-resolution images that are unnecessarily large in file size can dramatically affect page speed.
On the other hand, optimized images are 40 percent lighter than unoptimized images on average. As a general rule, you’ll want to optimize all images and other media that you upload to your website, either before or during the upload process.
Lossy vs Lossless Compression
As we mentioned earlier, JPEGs and PNGs use two different types of image compression. Lossless compression preserves all of the data from the original file, without sacrificing quality.
With lossless compression, you are typically breaking a file into a ‘smaller’ form for transmission or storage. Then the information is put back together on the other end, so it can be used again.
On the other hand, lossy compression removes some of the data contained in the image file. This can result in a larger drop in quality, but also a more significant improvement in page speeds. You can even customize the amount of compression, in order to achieve a balance between quality and performance.
Image Compression Plugins
Fast loaded images mean a speedier site and better SEO. Here are some various image optimization plugins to help you with image compression.
Smush Image Compression and Optimization
Smush’s image compression plugin works to resize, optimize, and compress all of your images for the web, so they load faster than before. If your site is photo-rich, then this plugin is a must-have.
ShortPixel Image Optimizer
ShortPixel’s Image Optimizer plugin compresses all past and future images and PDFs uploaded to your media library. The plugin provides both lossy and lossless compression for most file types. If you’re a photographer, you might opt for the glossy JPEG compression, which uses a high-quality lossy optimization algorithm.
Compress JPEG & PNG images
Looking to just optimize JPEGs and PNGs? This plugin uses image compression services TinyJPG and TinyPNG to help you with image compression. On average, JPEG images are compressed by 40-60 percent, and PNG images by 50-80 percent, without a visible loss in quality.
EWWW Image Optimizer
EWWW Image Optimizer does double-duty. It both optimizes existing images on your site, and takes care of new ones you upload as well. In addition, it provides you with a lot of control over how (and how much) your images are compressed.
Kraken.io Image Optimizer
Last but not least, Kraken.io Image Optimizer is also handy for optimizing both new and existing media. It supports lossless and ‘intelligent’ lossy compression, making it easier to achieve high-quality images with lower file sizes.
Featured Image
The featured image isn’t inserted into the body of a WordPress post, but is used structurally throughout your theme. It may appear as a thumbnail next to the post’s title, for example, or in the header when viewing a particular post.
Most themes and widgets rely on featured images, so it’s not something you’ll want to skip out on. Featured images allow for greater customization; you will have the ability to display unique custom header images for specific posts and pages, or set thumbnails for special features of your theme.
Once you’ve decided on the size you want your featured image to be, that size will remain set for all future featured images. The size you should select depends on the theme of your WordPress site and the layout of your posts.
Featured images are usually wider than then are high, ranging anywhere from 500 to 900 pixels wide. It’s also best to choose a high-resolution image and not one that’s pixelated.
Pro-tip: To control the media that’s displayed whenever a post or page is shared to Facebook or Twitter, install the Yoast SEO plugin. You’ll not only be able to customize the title and description, but also upload the correct image sizes for each social channel.
Optimize Images for WordPress After Uploading to Your Site
We do recommend optimizing your images prior to uploading them. However, if that’s not possible, or you want to optimize the images that are already on your site, you can still do that. There are a few methods that can help you optimize your live content.
Lazy Load Images
Normally when someone visits a web page, all of its content begins to load. This means that, for a content-heavy page, it can take a while for everything to show up.
‘Lazy loading’ involves tweaking the way your site loads content. It instructs your site to focus on first loading the text, images, and other elements that are immediately visible. Only after that will it start to load content that’s only accessible by scrolling down the page. This is a great way to speed up your site and improve your visitors’ experience.
The easiest way to add lazy loading to your site is through a plugin such as Lazy Load.
This is a tool from WP Rocket that helps to reduce the volume of requests sent to your site’s web server at one time. It even substitutes placeholder images for YouTube videos, so that the actual video will only load as needed.
Cache Images
Another way to improve speed on your site is via ‘caching’. This involves saving some of your site’s data in a place that’s easier and quicker for a visitor to access,- often either on a third-party server closer to where they’re located, or in their browser.
There are a lot of ways to accomplish caching through coding, plugins, and other tools. Here at WP Engine, we implement robust caching on all of our sites by default. This is beneficial for reducing the impact all of your content has on page speeds, not just your images.
Remove EXIF Data
EXIF data is stored as part of an image file, and contains information about where and how a picture was taken. It’s automatically added to images by cameras, and isn’t generally necessary for your web files.
Therefore, removing this data from your images can speed up your pages, although the impact isn’t likely to be huge. There are currently no updated plugins that can help you do this, unfortunately. So if you use a lot of photographs on your site and are concerned about EXIF data, you’ll want to reach out to a developer for help.
Avoid Image URL Redirects
Finally, another element that can slow down your pages is when your images are causing redirects. This most commonly happens when they’re linking somewhere else.
For that reason, you should avoid embedding images from external sources on your site. Instead, save and upload each image or peice of media directly to your site if possible. You may also want to ensure that your images don’t link out to anything, such as a separate media page.
Optimizing Images for Search Engines
Formatting image titles is another important step in image optimization. This means the image file name is relevant to its content. When you do this, it’s more likely that they’ll show up in related image search results via search engines.
This will increase the visibility and accessibility of your brand, as well as traffic to your site by having your site’s images listed more frequently in Google Image searches. Image optimization takes very little time and can make a huge difference in your site’s traffic.
Here are a few additional tips to help your images rank higher.
Alt Text
Alternative text, otherwise known as ‘alt text’ or an ‘alt tag’, is an attribute added to an image in HTML. Alt text helps search engines understand what your image is about, by describing what it includes and what its purpose is.
Google relies on alt text to determine what an image is since all it ‘sees’ is what’s in the HTML tag. When you use strong, descriptive alternative text for your images, you’re more likely to see your site listed appropriately in search results.
In WordPress, you can add alt text to your images two ways. First, you can add it to images that have been placed in posts, by clicking on the image and using the Image Settings option on the right side of the screen.
Alternatively, you can also add alt text to an image by visiting Media > Library and choosing the image you want. Then, simply add your alt text to the Alternative Text field for that image.
Title Tags
Title tags are similar to alt tags, but they are for human readers, not search engine bots. Good title tag optimization can help visually-impaired users access your website.
Create XML Image Sitemaps
Another way to get your images noticed by Google is to create a sitemap and submit it. This is a good option for images that can’t be crawled by search engines.
We’re talking about images loaded by JavaScript, for example. Sitemaps give search engines more information about the images available on your site, so they can understand and index your content more accurately.
In WordPress, the following plugins can help you create a sitemap:
For non-WordPress websites, there are also tools that can assist in creating a sitemap, including Screaming Frog, Dynomapper, and more. Once you’ve created a sitemap, you’ll then want to submit it through Google’s webmaster tools.
Image Placement and Captions
Last but not least, let’s look at the placement of visuals within a blog post or web page. Where you put your images within a post can have a significant impact on how it ranks on Google.
For example, if you place an image closer to your keyword phrases, it is likely to rank better. Also, note that adding a keyword-rich caption to your image counts as search text, and can help with better image SEO.
Optimize Your Images and Your WordPress Site with WP Engine
Image optimization covers a lot of ground when it comes to improving your website. Optimizing can help elevate user experiences, and keep your loading times under that five-second mark. Here at WP Engine, we understand the value that image optimization brings to your website. That’s why we offer specialized managed hosting for WordPress environments. This means you’ll have expert support and comprehensive optimization tools and resources at your fingertips!