


A Guide to Adding Schema Markup with WordPress
The way your website appears in search results certainly influences how many and what types of visitors you receive. Consequently, it’s important to seek out ways to enhance how your site is represented by search engines to drive more high-quality traffic your way.
Schema markup can help search engines determine how to index your content accurately. This can help prevent your site from ending up on Search Engine Results Pages (SERPs) for irrelevant searches. In this way you can drive more high-quality traffic to your website.
In this article, we’ll explore what Schema is, how to implement it for your WordPress site, and what related resources are available to you. Let’s dive in!
What is Schema Markup?
Think of Schema markup as your ‘business card’ for search engines. It provides context to your content to help crawlers determine what it’s about. In the same way a business card tells potential clients your job title, Schema markup tells search engines what things are so they can be properly indexed.
For example, say you reference a name like “Jon Snow” in the text on your page. Schema markup tells search engines what this data means: is it the name of the post’s Author or a character in a television series? By clearly defining the structure of this data, you can present a more representative ‘business card’.
Additionally, Schema metadata is displayed beneath your headlines on Google’s SERPs. This lets searchers know how your content can provide the information they’re seeking. In the example above, Schema markup would help assure loyal readers of the writer Jon Snow that they’re not about to click on a pop culture article.
Schema vocabulary, or contextual data structures embedded in your page, can be used within several different formats, including JSON-LD, Microdata, and RDFa. We’ll cover each in more detail later in this post.
What Are the Benefits of Adding Schema Markup to Your WordPress Site?
When you add Schema markup code to your WordPress site, you increase the accuracy with which search engines display your site. Take the Jon Snow example above—Schema markup keeps your Game of Thrones fansite from appearing in a search for new authors.
Similarly, you can leverage Schema to signify your organization’s location. This strategy is especially helpful for brick-and-mortar businesses.
Another benefit of adding Schema markup is improving your site’s chance of appearing in a rich snippet or Google knowledge panel. These are the “fast facts” that searchers see when using search engines, and they help increase site traffic.
So, what is Schema in website terms? It’s a tool for driving conversions and pageviews—and everyone should use it.
Schema Markup for SEO
Schema can often be misconstrued as an element that helps boost your website’s Search Engine Optimization (SEO). While it is true that Schema does optimize how your site appears on Google’s SERPs and how closely your content matches what was typed into the search engine, it does not inherently increase your rankings.
However, when users can see relevant contextual information about your website more clearly than others on the page, it may influence them to visit your website. You can use Schema markup to show features such as ratings, reviews, and related subpages all within the search engine results:

Above we can see an example of the Fandango app on the App Store/iTunes. It shows how many reviews the app has received, its rating, price, category, and on which devices (iOS) it is supported.
Here’s another example from a Bar-B-Q restaurant that hosts regular events:

Since the website for Stubb’s Bar-B-Q uses itemprop=”event” tags, when we search for “events stubbs” we see a nice list of events, dates, and titles as the first search result.
Remember, while websites using Schema do not get preferential treatment by search engines, they might receive more attention from actual users. The additional data structure helps a user to easily see whether the information on the page will be relevant to what they need or not.
Schema Markup Vocabulary Formats
Schema vocabulary can be used to encode data within HTML frameworks. To get a better idea of how some of them work, we’ll go over three in detail: JSON-LD, RFDa, and Microdata.
In order to standardize Schema vocabulary sets, teams from Google, Yahoo, and Bing came together to create consistency in their structure and terminology, and launched Schema.org. It is a valuable resource and repository that documents these agreed-upon sets of terms.
This means, regardless of which schema type or format you use to generate your markup, search engines will understand it. Below are multiple schema types.
JSON-LD Schema
While Schema vocabulary is supported in several formats, JavaScript Object Notation for Linked Data (JSON-LD) tends to be the most commonly used. In fact, Google explicitly recommends the use of JSON-LD in their documentation.
JSON-LD is a way to embed Linked Data using strictly JSON as a script on your webpages. An example of this format can be found when searching for “homemade apple pie recipe”:

JSON-LD schema markup type is what enables all the useful metadata – the rating, number of reviews, cook time, and calorie count—to appear in the search result. If you use the ‘View Page Source’ function on this recipe page, you can see the JSON-LD used to display this information:
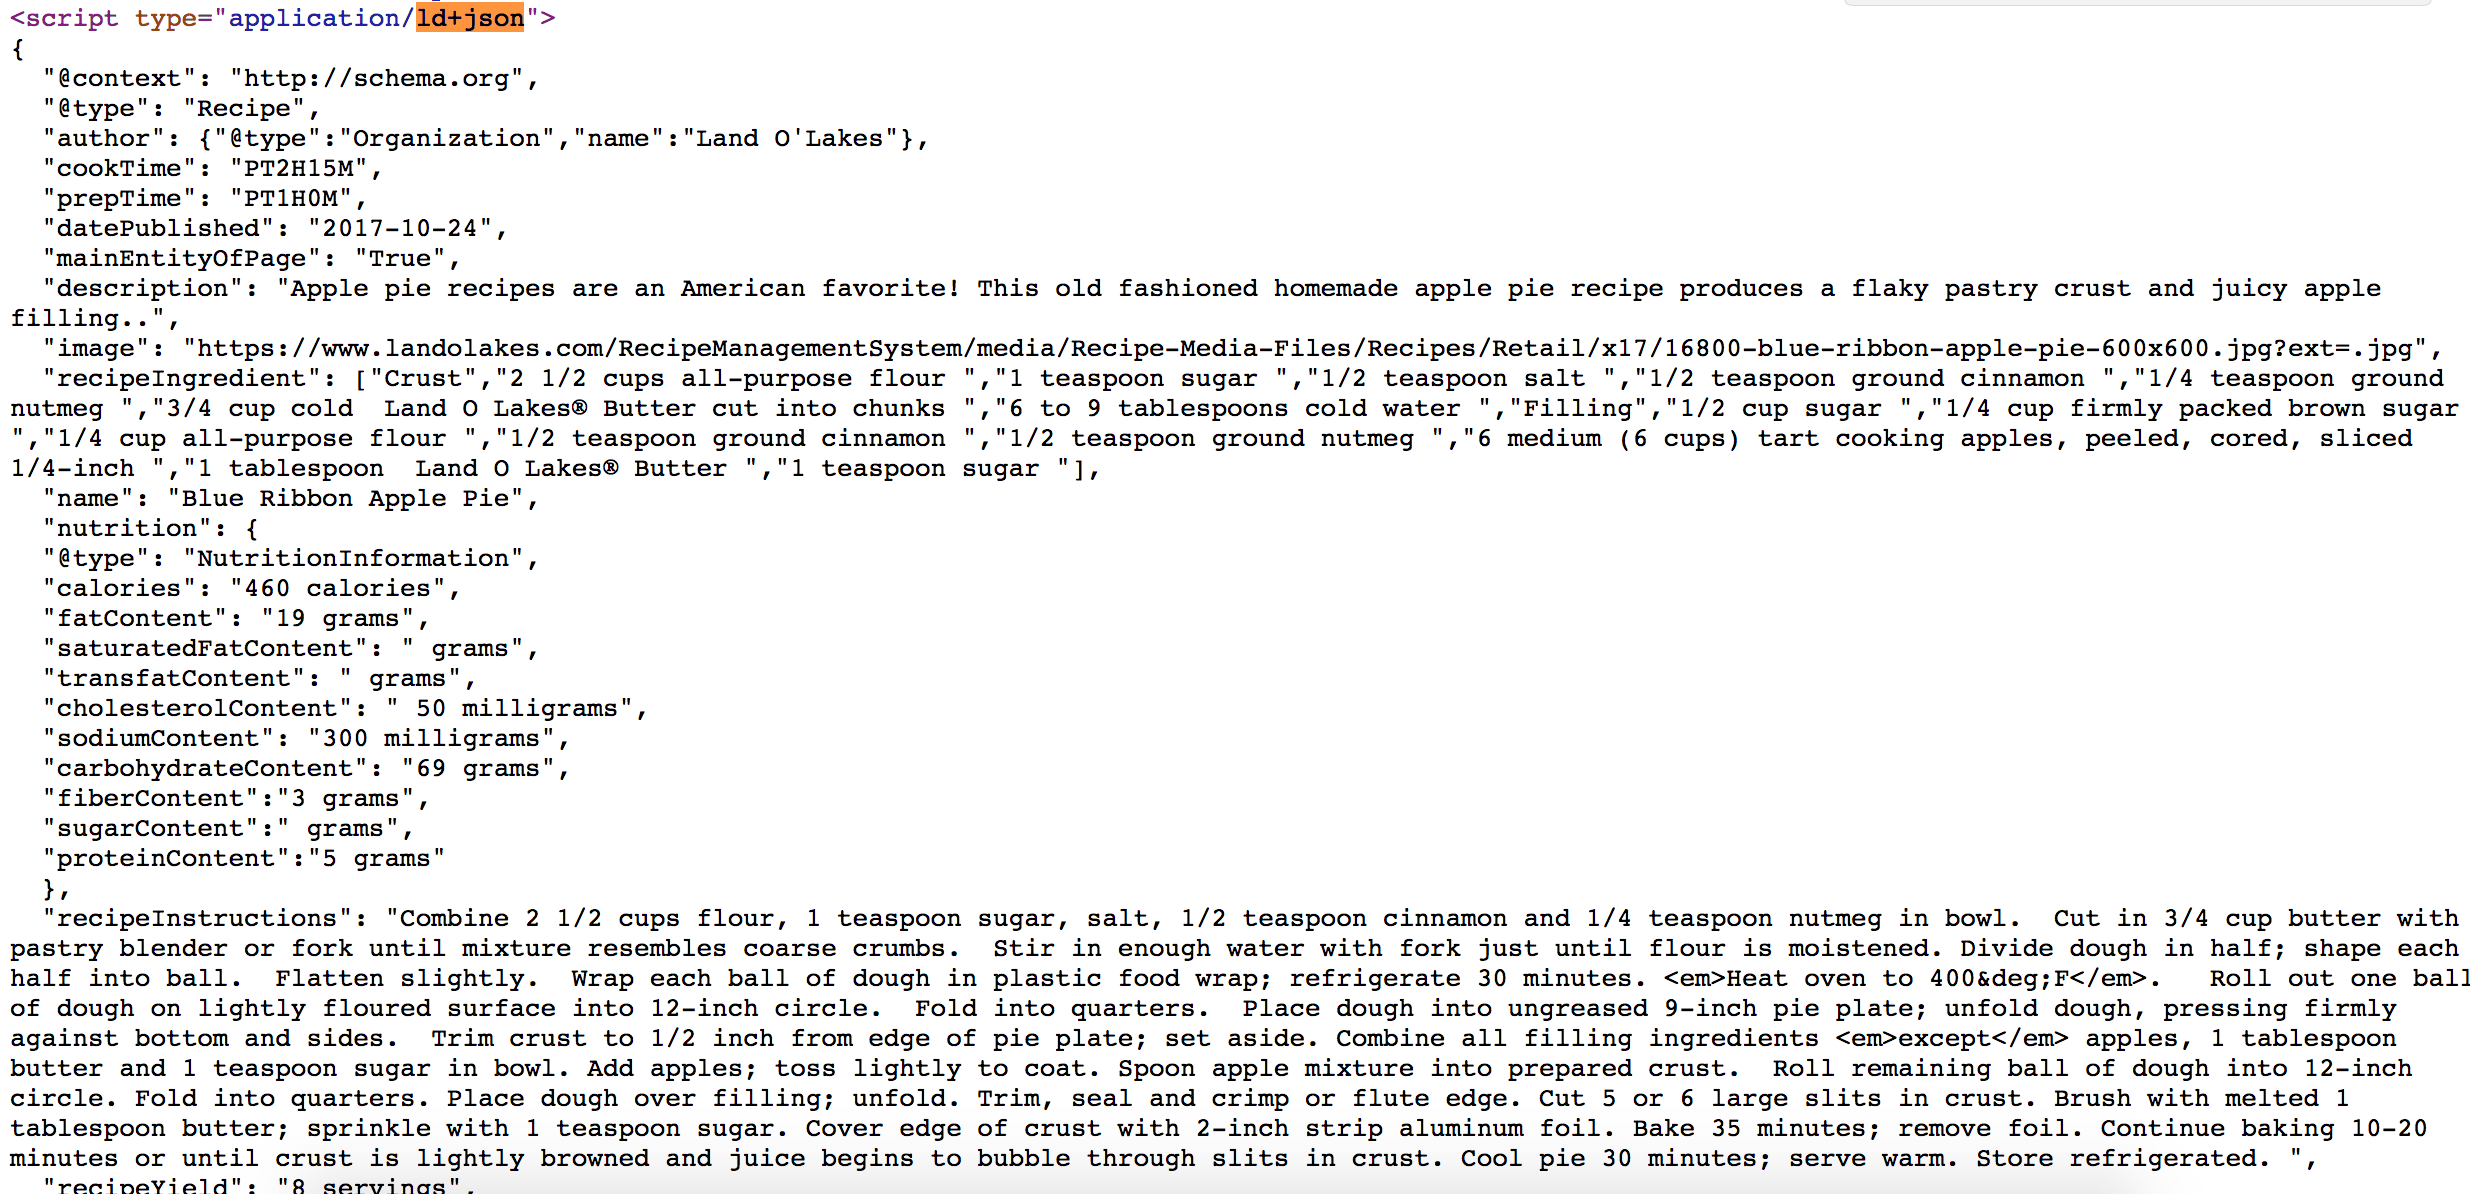
Tags such as @type inform us this is a Recipe, and the author tag tells us it’s made by a @type that is an Organization named Land O’ Lakes. Further bits of data such as preparation time, calories, featured image, and rating are also assigned with tags.
JSON-LD Schema Generators
It can be difficult for those unfamiliar with JSON, JavaScript, or HTML to learn how to create snippets containing the metadata they want to display. Fortunately, there are generator tools you can use to create the JSON-LD Schema snippets for your website. Below are some of the best resources for JSON-LD markup:
- Webcode.tools has a comprehensive generator tool that enables you to add tags for many types of web content and metadata fields.
- Migrodatagenerator.org has a markup generator tool that works for both Microdata and the JSON LD format.
- Hall Analysis has created a step-by-step tool that shows the visual JSON-LD markup and how it changes as you add more information.
JSON-LD markup can greatly enhance the information delivered by search engines to your potential web site visitors and search engine crawlers. These resources can make it easier to create any rich content type.
Microdata
Microdata is another way to nest metadata within an HTML page. It can be used to give more context to site elements by creating a simpler tagging and inferencing system out of the HTML elements already present on your site’s pages.
The goal of microdata is to make these HTML elements more machine-readable. Its basic approach is to outline the scope of each tagged item, tag the property within the item, and then state the value. Let’s take a look at an example of a simple piece of HTML:
<p>My favorite animal is a giraffe.</p>
This would produce a simple new line of text on a web page, with the sentence “My favorite animal is a giraffe.” In order to demonstrate how microdata works, we’ll add an attribute to define the scope:
<div itemscope>
 <p>My favorite animal is a giraffe.</p>
</div>
Now we know that everything within the itemscope attribute is the ‘item’ we are dealing with. Next, we’ll add another attribute to tag the property of the item:
<div itemscope>
 <p>My favorite animal is a
   <span itemprop=”animal”>giraffe</span>.</p>
</div>
This example gives us a tagged representation of an item with the property animal which has the value giraffe. Also, it’s important to note that microdata attributes can be interrupted by other HTML attributes, such as font styles and links, without causing a problem with the reading of the microdata.
In terms of how microdata can impact your SEO, it’s important to remember that it’s not a magic pill that will increase your search engine rank. Microdata can, however, help define your content more efficiently and effectively for search engines to help it appear in more relevant searches.
RDFa Schema
Resource Description Framework in Attributes (RDFa) is a way for web developers to bridge the gap between what a human sees on a web page and what a browser or crawler sees. The framework does this by extending the usual HTML attributes without impacting what users see on the web page.
A browser reads web pages via attributes such as headline and text while you view the rich content in the browser as the post title and author name:
When you mark up your site code with RDFa you give the browser a deeper understanding of your content. Let’s look at an example of how RDFa can add machine-readable tags to human-readable content.
Here is a simple piece of HTML displaying blog post content geared toward human consumption:
<html>
<head>
  ...
</head>
<body>
  ...
  <h2>The Trouble with Bob</h2>
  <p>Date: 2011-09-10</p>
  ...
</body>
In order to help a machine gain some understanding of this information, we can add attributes beyond the standard HTML <head> and <body> tags by using RDFa. Keep in mind, RDFa uses full URL links to mark up HTML. This prevents any linguistic misunderstandings about an attribute, as any person or machine can click through and gain knowledge about the attribute.
Back to our example. Here it is with RDFa attributes added:
<html>
<head>
  ...
</head>
<body>
  <h2 property="http://purl.org/dc/terms/title">The Trouble with Bob</h2>
  <p>Date: <span
   property="http://purl.org/dc/terms/created">2011-09-10</span></p>
  ...
</body>
Now we can see that the post title is annotated with a link to the title and created attributes in a library of RDFa terms. Any browser or application can now gain an understanding of what a title is and that The Trouble with Bob is the title of this blog post.
How to Add Schema Markup to WordPress
Now that we have explored what schema markup looks like, you may be wondering how to embed it on your WordPress site. There are a few different ways you can accomplish this task.
If you want to go the manual route, Torque’s guide for developers can help you engage in some Do It Yourself (DIY) Schema markup. Otherwise, you can use a WordPress plugin that automatically embeds it for you.
Schema Markup WordPress Plugins
Using a plugin to configure your Schema markup is likely the most easy option for most users. There are a number of WordPress plugins to help you create rich meta tag, descriptions, and formatting.
The All in One Rich Schema Snippets plugin enables users to select what each page and post is about for a more structured search engine appearance:
The Schema App Structured Data plugin takes it a step further and automatically configures Schema settings and data on your behalf, including a few high-level settings such as your logo, address, and type of company:
While this is certainly more powerful than many other plugins and much easier than marking up your code manually, the free version of Schema App Structured Data only supports snippets for ten pages. Unless your site is rather small, you may have to invest in the paid version to mark up your entire site.
There are also plugins centered around specific features that will add Schema markup to your site. For example, KK Star Rating enables users to rate your posts, then adds the Schema markup needed to display this information in the search engine results page:
These plugins can help put Schema markup on your WordPress website automatically after a few simple configuration settings are saved. This will help you take advantage of the benefits of using Schema without requiring hours of time and effort to implement it.
How to Add Schema Markup Manually
If you’ve decided against using a Schema plugin or Schema theme, it’s possible to add Schema to your WordPress site manually, page by page, as follows:
Step 1: Enable Custom Fields
From your WordPress Dashboard, access the page or post you intend to add Schema to. Next, click the three vertical dots in the top right corner, scroll to the bottom of the new sidebar, and click Options. Ensure the Custom fields option is checked under Advanced panels. Now you can add your Schema in WordPress.
Step 2: Generate Your Code
You can create your Schema markup code via Google’s Structured Data Markup Helper. Enter the topic of your webpage and the URL, then press Start Tagging.
From the next screen, you can generate Schema markup by clicking on different elements. For example, you can highlight the post’s author and select “Author” from the dropdown menu.
When finished, click Create HTML in the top right corner and copy the JSON-LD snippet that follows.
Step 3: Insert the Code
Go back to your WordPress post and scroll to the bottom to find the Custom Fields area. Click Enter New, name your markup, and paste your code into the Value field.
To save this change, click Add Custom Field under the Name box, then scroll to the top of the page and hit Update.
Step 4: Update Your Header File
From your Dashboard, navigate to Appearance > Header. Then, under Theme Files, open header.php. In the window that opens, paste the following code before the tag:
Press Update File, refresh the page, and you’re all set!
Schema.org
Schema.org is an agreed-upon set of vocabulary terms used to describe WordPress website structure and data. Professional teams from Google, Yahoo, and Bing came together to create consistency in their structure and terminology. This means regardless of which format you use to generate your structured data markup, search engines will know what it means because there is common language used in all of them. Head to Schema.org to learn more about the core vocabulary used in Schema markup.
How to Test Schema Markup
After using a plugin to set Schema markup or manually configuring it yourself, you may want to test and make sure the search results for your website are appearing as you intended. Fortunately, Google has created the Structured Data Testing Tool for exactly this purpose:
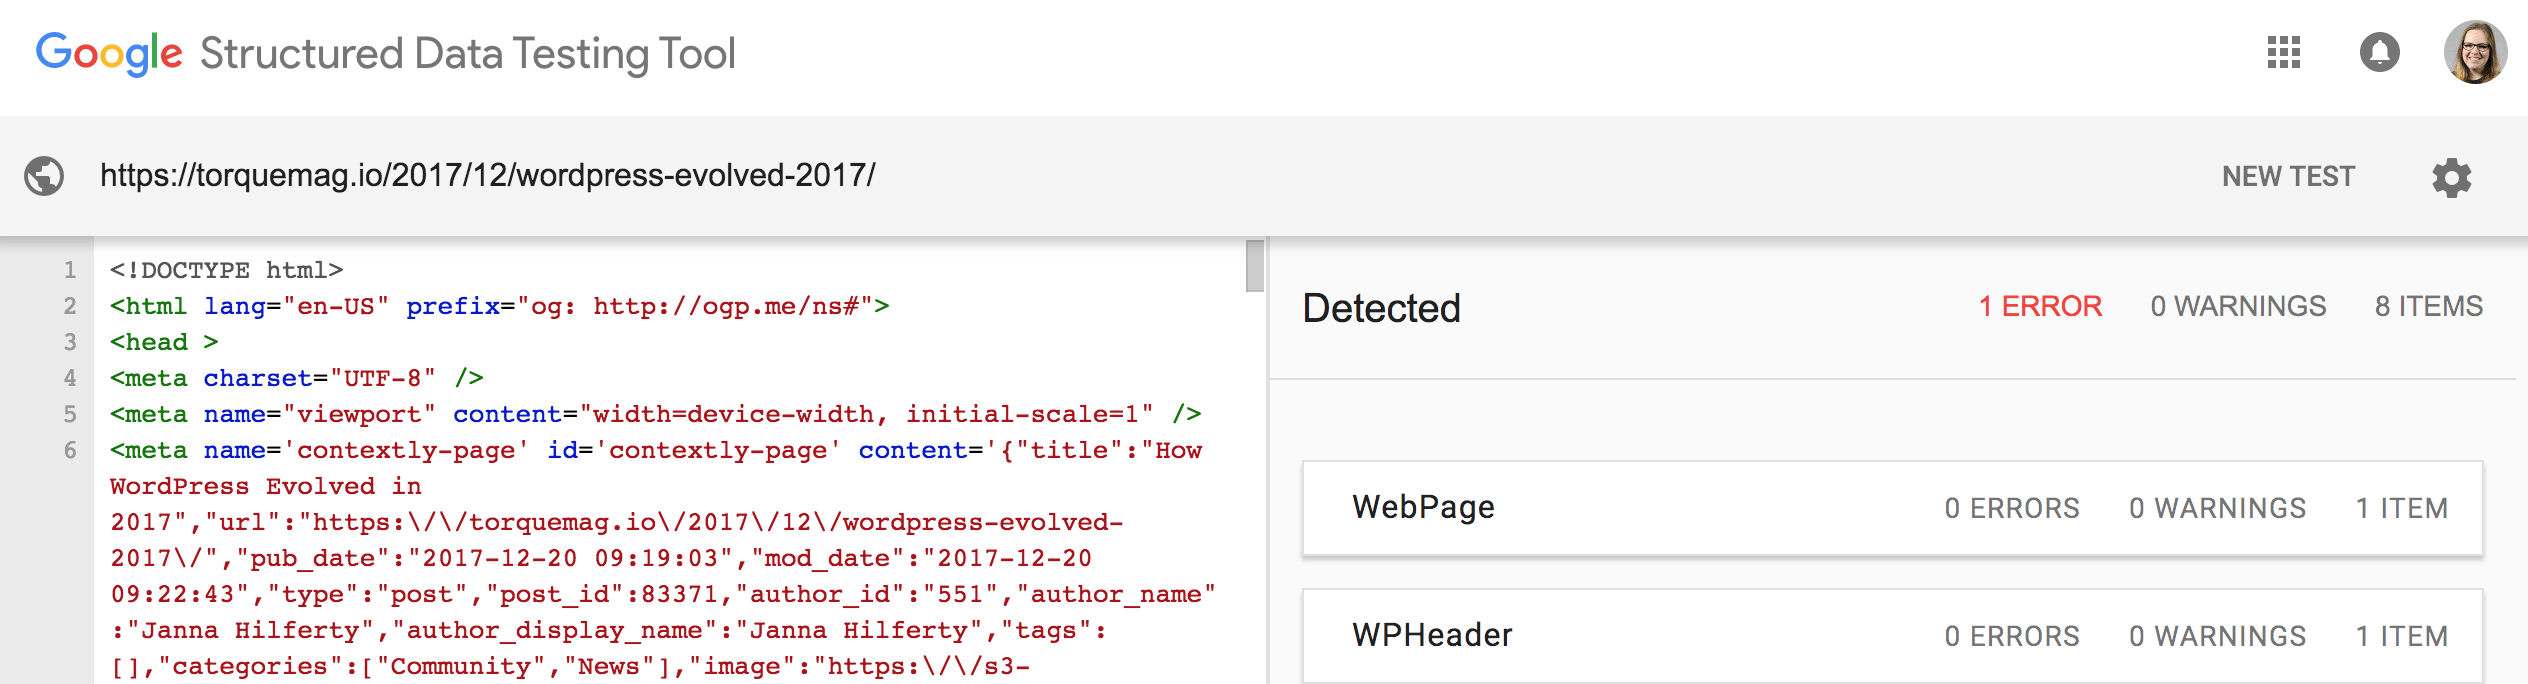
You can either enter a URL to test existing Schema markup, or enter a code snippet to test it before using it on your website. We recommend using the code snippet tester to ensure all works as intended without errors or warnings before embedding the markup on your website.
WP Engine and Schema Markup
Here at WP Engine, our WordPress hosting platform is finely tuned for your success. Our servers are built for superior site performance to provide the best experience for your users and give your SEO a boost. Ready to get started? Explore our WP Engine plans today!