
How to Migrate from Kinsta to WP Engine
For many business leaders, the decision to undertake a site migration comes down to one simple question: Is my current host built for the next stage of growth?
Migrating from Kinsta to WP Engine not only optimizes site performance but also offers strategic advantages that are non-negotiable in today’s dynamic digital space.
If you’re ready to migrate from Kinsta to WP Engine, you need to know exactly how to navigate the migration process without disrupting your business. At WP Engine, we offer the tools and team you need for a smooth and worry-free transition.
In this guide, we’ll provide a step-by-step walkthrough to migrate from Kinsta to WP Engine in minutes.
Key takeaways
- Businesses migrate from Kinsta to WP Engine for more predictable pricing, enhanced security, tailored site experiences, and 24/7/365 expert human support.
- The fastest and easiest way to migrate from Kinsta to WP Engine is with our WP Engine Site Migration plugin. Securely migrate your site in just a few clicks.
- Follow our step-by-step guide to execute a seamless site transfer using either our automated plugin or a manual migration workflow.
- Leverage WP Engine’s proprietary, end-to-end performance optimizations to scale confidently and accelerate revenue growth.
Why businesses move from Kinsta to WP Engine
While Kinsta is a well-known name in the WordPressⓇ managed hosting space, scaling businesses often outgrow its one-size-fits-all infrastructure. Businesses that move from Kinsta to WP Engine trade technical overhead for predictable costs, tailored site experiences, award-winning support, and security built to scale with you.
Custom-tailored plans and predictable pricing
Kinsta uses the same core infrastructure for all plans and site types. In contrast, WP Engine offers proprietary tooling and custom-tailored plans for specific use cases. Our Essential plans are designed for leaner budgets and fewer needs, while enterprise-grade features and tailored solutions are built into specific Headless, eCommerce, and Agency plans.
Pricing predictability is also a major concern for Kinsta users. Kinsta recently changed its resource-based billing structure, allowing customers to choose between being billed by visits or bandwidth. The problem? Both metrics can be easily inflated by bot traffic. If your site is targeted by bots, your Kinsta bill goes up, forcing you to pay for traffic that generates no revenue.
Bot mitigation and visibility
WP Engine provides built-in bot mitigation at the edge, so all customers benefit from protection against malicious requests by default. In 2025 alone, we blocked over 75 billion malicious requests for our customers. WP Engine also provides detailed performance and usage insights so customers can identify areas of bottleneck in order to improve performance and balance their resources.
Kinsta does not offer this level of insight or protection and does not publicize a standard bot mitigation effort for its users at this time. They do provide certain analytics within the MyKinsta dashboard that show top client IPs and request sources, which constitutes basic bot visibility. The company introduced a bandwidth-based pricing model to offset some of the inflated costs associated with its traffic-based pricing, allowing customers to pay based on bandwidth usage instead of traffic. However, that pricing model still requires customers to buy more bandwidth to account for bot traffic instead of mitigating bot activity for customers.
Support you can count on when it matters
When a site goes down, chat support isn’t enough. Kinsta uses a chat/ticket hybrid system and does not offer 24/7 phone support. If you have a critical issue during off-hours, sometimes, you simply need a human’s help.
WP Engine has employees delivering award-winning support globally. This includes chat for all plans and 24/7 phone support for all plans except for entry-level Startup plans. With an average response time of less than 3 minutes, we are ready to help whenever you need us.
What you need before starting your migration
Migrating a WordPress site from Kinsta to WP Engine is quick and straightforward. We provide a free site migration plugin and expert human support to handle the heavy lifting and help you if you get stuck. Before you get started, gather the following site credentials.
Kinsta account access and SFTP credentials
You’ll need administrative access to your Kinsta dashboard to start the process. Additionally, be sure to locate your SFTP credentials (host, username, password, and port) within the MyKinsta dashboard.
WP Engine account and destination environment
If you haven’t already, get in touch with our team to activate your new WP Engine plan. Use your account information to log in to the WP Engine User Portal and create a new destination environment. Need help adding an environment? Learn how here.
DNS access
To go live at the end of this process, you will need access to your DNS provider (e.g., Cloudflare) to point the DNS to WP Engine. Learn how to point DNS here.
The easiest way: Use WP Engine’s site migration plugin
Utilizing our free WP Engine Site Migration plugin is the easiest and fastest way to get your new site live. Follow along with this video or use these steps below to migrate from Kinsta to WP Engine in a few clicks.
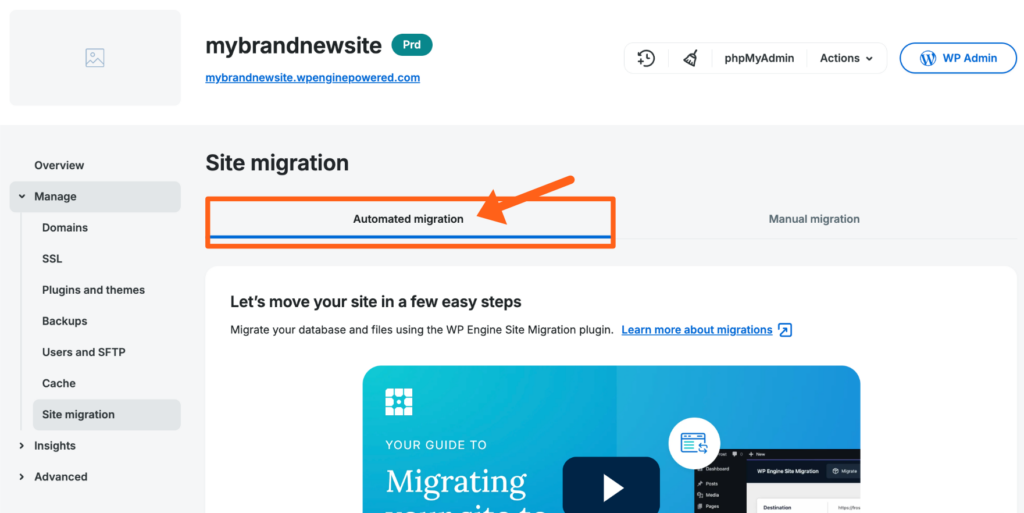
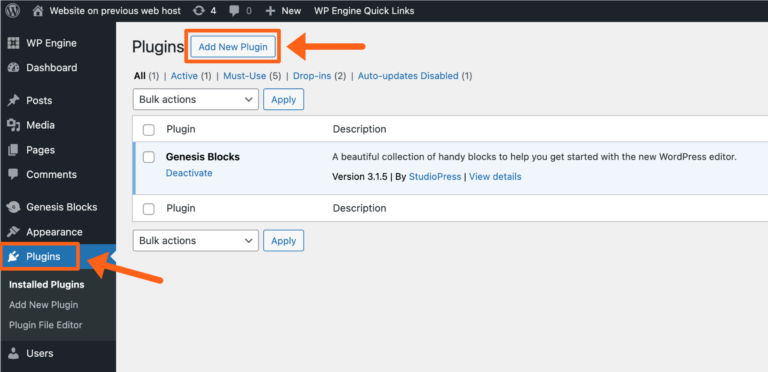
Step 1: Install the WP Engine Site Migration plugin in your WP Engine User Portal
Your first step in migrating a site from Kinsta to WP Engine is to install the WP Engine site migration plugin in your new WP Engine environment.
First, open the Sites page in the WP Engine User Portal, then click your new destination environment. In the left-hand menu, select Site migration under the Manage dropdown section.
Select the Automated Migration tab, and scroll down to click Install plugin.
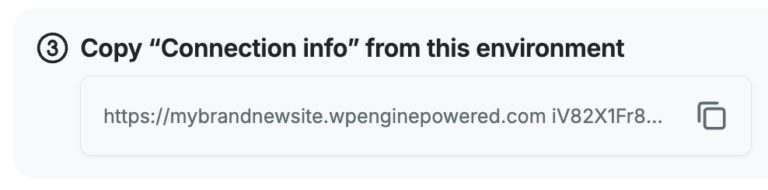
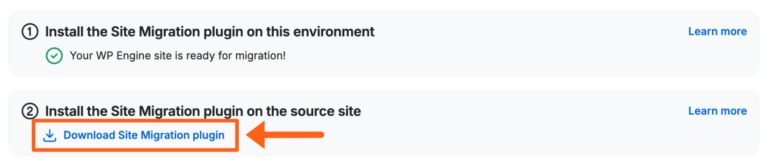
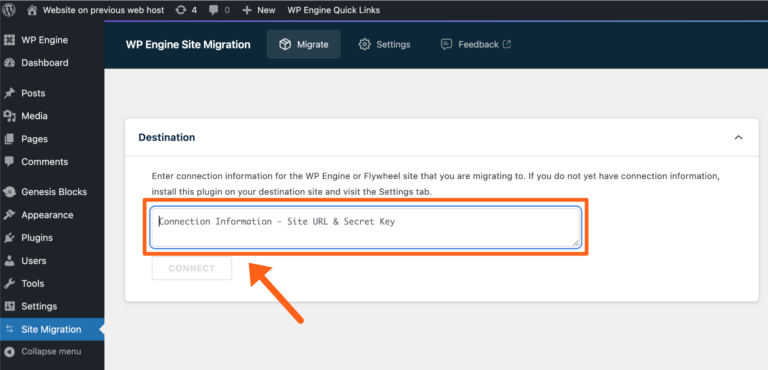
Once it’s successfully installed on your WP Engine environment, you will see a green check mark along with the message “Your WP Engine site is ready for migration!“ You will also see that “Connection info” has been generated. Leave the window open with this connection information visible, because it includes a URL and a secret key that will be entered on your Kinsta installation later in the process.
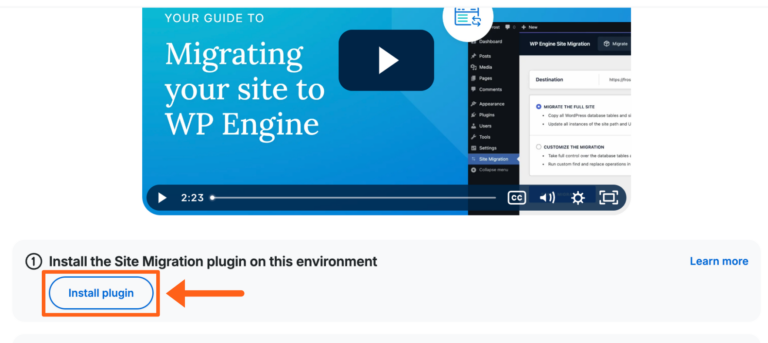
Step 2: Install the WP Engine site migration plugin on your Kinsta-hosted website
Next, you’ll need to install the migration plugin on your Kinsta site.
Start in your WP Engine User Portal and click Download Site Migration plugin. Make sure you know where this file is saved on your computer, as you’ll need it in the following steps.
Now open your wp-admin dashboard on your current Kinsta site. Navigate to Plugins > Add New Plugin.
Click Upload Plugin > Choose File, locate the plugin ZIP file you just downloaded.
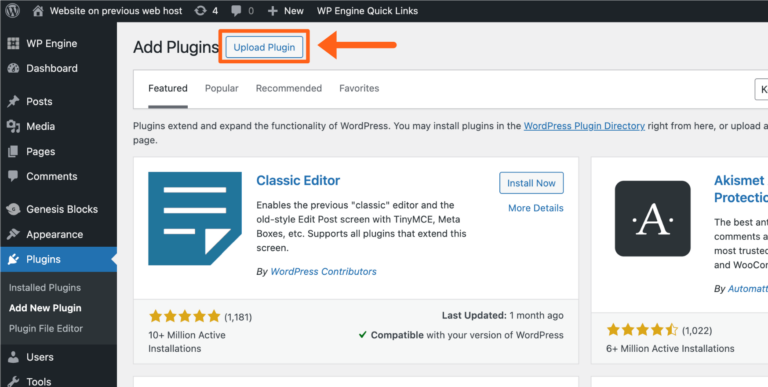
Then, click Install Now. Click Activate Plugin, and you’re ready to start the migration.
Step 3: Start the migration and allow for the transfer
To complete the migration from Kinsta to WP Engine, you’ll input your connection information, adjust the migration settings, and initiate the migration.
On your Kinsta dashboard, select the Site Migration plugin page from the sidebar. Click the button labeled START A NEW MIGRATION. Now paste the connection information from step one and click CONNECT.
You’ll be asked to choose from two migration options. For your first run, we recommend selecting MIGRATE THE FULL WORDPRESS SITE.
A full site migration will copy all database tables and files in your site’s wp-content directory, excluding disallowed plugins and files like logs, backups, and caches that can slow down the migration or cause issues on our platform. It will also automatically update all instances of the domain name in the database through our Automated Search and Replace process.
If you choose CUSTOMIZE THE MIGRATION, you’ll have the ability to include or exclude specific files and directories before migration begins.
We also encourage you to enter an email address where you can receive migration status notifications.
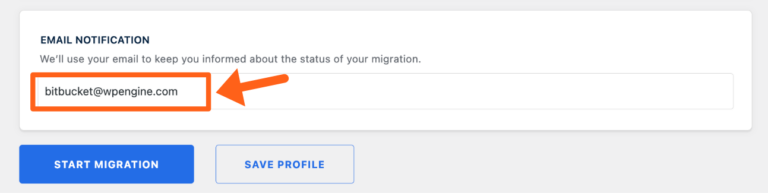
Once you click START MIGRATION, a status page will appear. You’ll receive a migration completion (or failure) notification to your inbox once the process is complete.
Review your migrated site in the staging environment
Once your site has migrated successfully, we recommend testing the new site on WP Engine and confirming that everything loads as expected before going live.
How to update DNS and go live on WP Engine
The final and most important step is to connect your domain name to your website by pointing DNS. This is what will direct all traffic to your new WP Engine-hosted environment.
WP Engine supports both automatic and manual options for configuring your DNS, depending on which DNS provider you use.
Automatic DNS configuration
WP Engine partners with Entri Connect to help users automatically update DNS records on their behalf if they are using a supported DNS provider. If you add a domain to the User Portal that was registered with a supported provider, you will be given the option to use Entri to automatically point your domain to WP Engine.
Simply select the “Automatic” option and click Connect with Entri.
Click Continue, and you’ll see a Detected DNS Provider message if the provider is identified and supported. If Entri can’t detect your DNS provider, you will see a list titled “Select your domain provider.”
Find your provider, and you should then see a button to Authorize with your specific domain provider’s name. From there, you click the Authorize button to complete the automatic connection.
Once the DNS is updated, you will be returned to the WP Engine Domains page, where you will see a message that your new domain has been configured.
Manual DNS configuration
If your DNS provider is not supported by Entri Connect, you can point your domain manually. You’ll need to add specific DNS records, including your A records and CNAME records, at your domain registrar. Instructions should be made available through your registrar’s support documentation.
If you need help manually configuring DNS records, we recommend contacting your DNS provider directly and giving them your WP Engine DNS record values.
Because all DNS configuration is managed through a third-party provider, our Support team cannot log into a DNS provider’s dashboard on your behalf.
Add your domain to WP Engine
In the WP Engine User Portal, navigate to Sites, select the Environment with the domain you need to work with, and head to the Domains page (within the Manage dropdown on the left-hand side).
Click Add Domain. Enter your production URL (e.g., example.com). This tells our servers to listen for traffic coming from that domain.
Update A records/CNAME
If you haven’t done so already, you will need to add your domain to the User Portal before you can point your domain name. In the same Domains tab, open the three-dot menu next to the domain you’re working on and select View DNS details.
This will open a window that shows the required DNS values (CNAME or A record). Then, log in to your domain provider account, find your DNS editor, and update your records to match these values. Be sure to delete any old A records or CNAME records within your domain provider account. Now, you just have to wait for the DNS changes to propagate. You can check the status of your DNS propagation at WhatsMyDNS.net.
Add SSL
When pointing DNS to our advanced network or Global Edge Security, WP Engine automatically adds SSL and CDN. Learn more in this guide. To add additional third-party SSL, follow these steps.
Manual migration from Kinsta to WP Engine
If you’re unable to use our site migration plugin or simply prefer to do it manually, our manual migration guide has everything you need to start the process. Here is an overview of the process.
Export your site’s content from Kinsta
First, you’ll need to export two sets of data from your Kinsta site: database and wp-content. This process creates a copy of your existing site’s content and saves it to your local machine.
Export database
Log in to MyKinsta and navigate to Sites > Info. Click on the link to open the phpMyAdmin tool. Select your database name, click the Export tab, choose the “Quick” export method, and click Go to download your .sql file. Learn how to configure a custom export here.
Export wp-content
After you’ve exported your database, you will need to transfer the wp-content folder containing your plugins, themes, and media. Start by downloading the wp-content folder to your computer. These folders are typically quite large, so this part may take a while. Learn more about accessing and downloading your Kinsta site files here.
Import your site’s content to WP Engine
Now that you’ve exported your site’s content from Kinsta to your local machine, it’s time to load them onto WP Engine’s servers.
Import database
Before you can import the database, you’ll first need to clear your default WordPress database on the WP Engine environment where your new website will live. Follow these steps to import your database to WP Engine.
Import wp-content
To import your wp-content folder into WP Engine, simply upload the wp-content directory as a .zip file using the form on the page. Once the file is uploaded, you’ll see a success notification on the screen confirming that we’ve received it. We’ll unzip it and let you know when it’s time for the next step.
Search-and-replace URLs if needed
If you are moving to a staging URL first or changing domains, you may need to update the database links. While WP Engine handles this automatically when you add a domain in the portal, you can also use WP-CLI commands or a plugin like Better Search Replace to run a search-and-replace operation.
Post-migration checklist: Maximize your performance
Migrating your site from Kinsta to WP Engine is the first of many wins for your organization. With your new site live, you can now leverage our proprietary ecosystem of tools designed for the performance and reliability that growing enterprises demand.
Enable EverCache for WooCommerce® for peak speed
Scalability is the key to thriving in unpredictable traffic conditions. As your business grows, your infrastructure needs to handle traffic spikes without pause.
Our proprietary caching technology, EverCache®, is an industry-leading solution built specifically for WordPress that is included on all WP Engine-hosted sites. Unlike generic server caching, EverCache is finely tuned to serve cached content at scale, ensuring your site stays lightning-fast for visitors even during peak demand.
While our standard EverCache offering comes baked into every WP Engine-hosted site environment, WooCommerce store owners who have purchased WP Engine’s eCommerce Performance Pack add-on can easily enable EverCache for WooCommerce in your User Portal using these instructions.
Activate Smart Plugin Manager for automatic updates
Plugin vulnerabilities are known entry points for cyber attacks, but safely updating plugins is a tedious, time-consuming task. At Kinsta, you are largely on your own, managing updates manually for every site.
We solve this manual headache with our Smart Plugin Manager, a tool that incorporates artificial intelligence to automatically check and update your plugins every 24 hours. It runs visual regression tests before and after every update. If the AI detects that an update broke your site’s visual appearance, it automatically rolls back the change, ensuring your site remains secure and functional.
Run Page Speed Boost to improve Core Web Vitals
Google has over 100 code-level recommendations for improving PageSpeed scores, which can be time-consuming to implement. Page Speed Boost simplifies this with a one-click, set-and-forget activation that instantly boosts your scores.
Once enabled, it applies 30+ code-level optimizations instantly, including advanced image optimization, code minification, and intelligent lazy loading. On average, customers see a 30% increase in speed on desktop and 128% on mobile, directly improving your Core Web Vitals and SEO rankings, no code required.
Set up backups, staging, and monitoring
WP Engine plans include daily automated backups and let you create 1-click staging environments. This enables you to test changes safely in an isolated clone of your site before pushing them to production. You can also enable Site Monitoring in your User Portal to receive proactive alerts regarding site availability and page speed performance 24/7/365.
Why WP Engine is built for your next stage of growth
Your hosting should be an engine for growth, not a source of friction.
With WP Engine, you’ll spend less time and money managing your site, and more time focusing on what matters most – your business. Experience the difference of a platform that combines enterprise-grade solutions with the peace of mind of having true WordPress experts in your corner.
Move your site to WP Engine without the stress and start enjoying superior speed, security, and award-winning support. Try a WP Engine demo today and see the difference.
FAQs about migrating from Kinsta to WP Engine
How do I migrate my WordPress site from Kinsta to WP Engine?
There are two methods for migrating a WordPress site from Kinsta to WP Engine. You can use our free site migration plugin, which walks you through the process step by step. Alternatively, if you prefer not to use the plugin, you can perform a manual migration.
Does WP Engine handle the migration from Kinsta for me?
Our site migration plugin is designed to make the migration process as easy as possible, but if you get stuck, we’re here to help. We offer free managed migration services to qualified users who want our expert team to handle every step of the process. Whether you choose to use the plugin or our white-glove service, our Technical Support is available 24/7/365 to help.
Will my site experience downtime when switching from Kinsta to WP Engine?
No, your site will not experience downtime during the migration. The migration process creates a copy of your website on WP Engine’s servers while your live site remains active on Kinsta. Once you are ready, you simply update your DNS records, and traffic will seamlessly redirect to its new destination.