
Using WordPress for Podcasting
Podcasting offers a way to connect with listeners, improve communications, and potentially monetize content through sponsorships or ads.
When it comes to building a podcast website, WordPress is a popular choice thanks to its flexibility, customizability, and cost-effectiveness. WordPress allows podcasters to create a comprehensive online presence beyond just hosting audio files, including blog posts, show notes, and eCommerce options.
In this article, we’ll take a look at how to configure your WordPress website for podcasting—planning your podcast, the equipment you’ll need, editing your episodes, and how to distribute your podcast to ensure maximum reach.
Why use WordPress for your podcast
WordPress is already the world’s most popular CMS for websites, but how does that translate into successful podcasting?
There are a few key reasons podcasters are turning to WordPress to spread their message and house their content:
- Podcast-specific plugins: WordPress offers powerful plugins like Seriously Simple Podcasting and PowerPress that allow for easy podcast publishing, RSS feed generation, and integration with platforms like Apple Podcasts and Spotify.
- Full control and customization: Unlike third-party podcasting platforms, WordPress gives podcasters complete control over their website, branding, and monetization strategies, with themes, plugins, and page builders making customization simple and seamless.
- SEO and discoverability: WordPress has excellent SEO capabilities, helping podcasts rank on Google through optimized blog posts, transcripts, and metadata—and more visibility means more listeners.
- Monetization options: Podcasters can monetize their content through ad placements, memberships, or selling merchandise using eCommerce or subscription plugins.
- Ownership and independence: Unlike hosted podcasting services that control distribution, WordPress ensures full ownership of content and audience data, and a low total cost of ownership for it.
- Integration with marketing tools: Podcasters can connect email marketing services (Mailchimp, HubSpot, etc.), social media automation, and analytics tools to grow and engage their audience effectively.
Together, these factors make WordPress one of the most fertile grounds for podcasters who wish to grow their audience and monetize their content to further their podcasting careers.
Configuring your WordPress site for podcasting
If you’re creating a dedicated website for your podcast, it’s a good idea to set up a custom post type for your episodes. This will provide you more flexibility over how you display, organize, and promote your show.
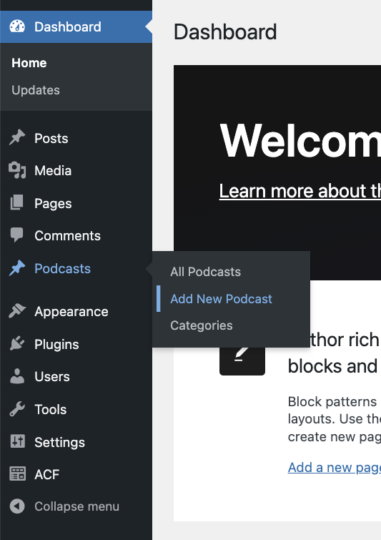
Step 1: Add a new custom post
Depending on how you’ve set up your custom podcast post type, you’ll likely have a special Podcasts menu option where you can directly add a new podcast post. In our example, we’ll navigate to Podcasts > Add New Podcast:
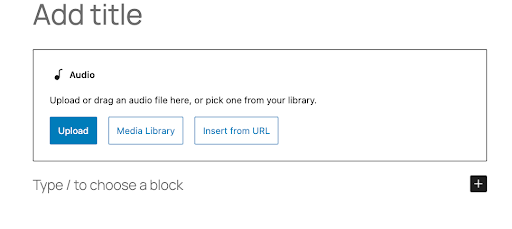
Step 2: Add an audio block
There are a couple of different ways to display your audio files (i.e., podcast episodes) in your new custom post type.
Alternatively, you can click on the ‘+’ icon to add a standard WordPress audio block. You’ll find the audio block under “Media” in the block inserter:
This will bring up the settings for the native WordPress block. Here you can either upload an audio file from your computer, select one from your Media Library, or paste in the URL of an audio file:
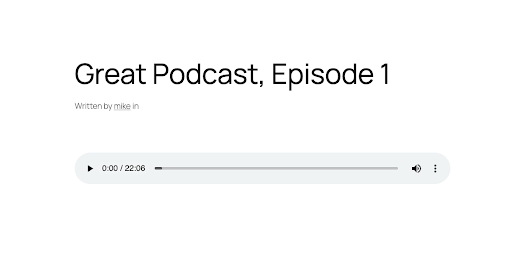
If you choose to upload your podcast file directly to WordPress, it will display in an elegant but simple player:
We don’t recommend using your Media Library as the primary storage for your podcast episodes, however. This can bog down your website and cause slow loading times. We’ll talk about specific podcast hosting options later in this article.
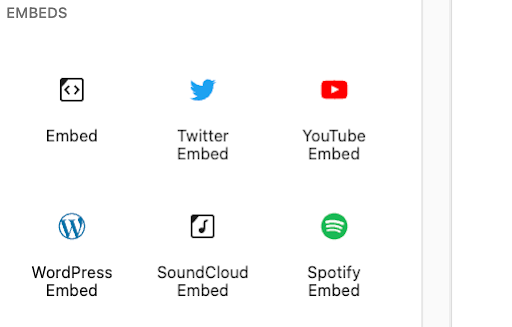
If you already have your files on another platform like SoundCloud, you can add them to your podcast posts easily as well. Click the ‘+’ icon again, and find the Embeds category of block options. There you can choose from many available blocks. For this example, let’s select the SoundCloud option, which you can see is right next to another popular block for Spotify:
Once you add the SoundCloud block to your post, you’ll have a simple interface where you can paste in the shareable URL provided by SoundCloud.
When you use this block to embed a sound file, you’ll be adding a more stylized player to your post. It will bring in information from your SoundCloud account, such as your profile picture.
Planning your podcast
There’s an initial rush of excitement when starting any new project. However, it’s important to do some planning before you start recording your first episode. Planning allows you to create a content calendar and schedule, ensuring you consistently release new episodes. This helps build and retain an audience who knows when to expect new content.
Planning will also result in better content, as you take the time to research topics, prepare scripts, and organize your thoughts, rather than “shooting from the hip” on every episode. It also helps to streamline the production process, making recording, editing, and publishing more manageable and less stressful.
Here are some key steps to plan before you start recording:
- Define your podcast’s purpose and topic. Choose a subject you’re passionate about and knowledgeable in. This will help you create engaging content consistently.
- Identify your target audience. Determine who you want to reach with your podcast. Be as specific as possible about their demographics, interests, and needs.
- Choose a format. Decide if you’ll do solo episodes, interviews, co-hosted shows, or a mix. This will influence your equipment needs and production process.
- Develop your podcast’s structure. Plan out the elements of your show, including your intro, segments, and outro. Create a basic outline or script template to follow.
- Plan your content. Brainstorm episode ideas, create a content calendar, and outline your first few episodes. This will help you stay organized and consistent.
- Set up your recording space. Choose a quiet location and gather the necessary equipment. We discuss equipment in the next section, but at minimum, you’ll need a good microphone, headphones, and recording/editing software.
- Create podcast artwork. Design eye-catching cover art that represents your show and looks good in various sizes on podcast platforms.
- Decide on your publishing schedule. Determine how often you’ll release episodes and stick to a consistent schedule.
Podcasting equipment
It’s possible to record and distribute a podcast using nothing but a laptop or smart phone. Possible, but not necessarily wise. The onboard microphones in these items are meant for casual use, not for recording broadcast-quality audio.
A good USB microphone is practically essential for recording your podcast. We also recommend closed-back headphones for monitoring audio while recording, rather than earbuds or onboard speakers.
For recording and editing, you’ll need software. There are free options like Audacity, or paid software such as Adobe Audition.
A good mic, headphones, and audio software are enough to get started. You might also consider getting a pop filter or windscreen for your microphone, as this will help reduce plosive sounds (i.e., “popping your Ps”). A mic stand or boom arm can also be helpful for making sure your microphone is properly positioned.
For more advanced setups, you might want to consider additional equipment. An audio interface is necessary if you use XLR microphones instead of USB. A mixer can be useful for recording multiple audio sources or adding live sound effects. If you plan to record on-the-go or want a backup option, a portable digital recorder is handy.
You likely don’t need to invest in an advanced setup right away. Start with the basics (microphone, computer, headphones, and software), and upgrade as your podcast grows.
Audio file formats
There are several options when it comes to choosing an audio file format, but MP3 remains the mostly commonly used and recommended format, at least when it comes to distribution.
MP3 files are widely supported by almost all devices and platforms, and they’re relatively small in terms of file size, making it easier to upload, download, and stream.
Most podcast hosting platforms and listening apps recommend using MP3 files with a bit rate between 128 kbps and 160 kbps. This provides a good balance between audio quality and file size, ensuring your podcast is easy to stream and download while maintaining clear sound.
The primary disadvantage of MP3s is that they use lossy compression, which means slightly lower audio quality compared to uncompressed formats.
For editing and production purposes, you might want to record in WAV. These files are uncompressed and have higher audio quality than MP3 files, but they tend to be much larger. If you record and edit in WAV, make sure to convert the file to MP3 for distribution. This will significantly reduce file size without noticeably impacting audio quality for most listeners.
Editing your podcast
The exact process you use will depend on the nature of your podcast and the software you’re using. The goal of editing is to enhance the listening experience while maintaining the authenticity of the conversation.
As you gain more experience, you’ll develop your own style and workflow. Don’t be afraid to experiment and find what works best for you and your podcast. With that said, there are some general tips you should follow.
- Listen through the entire recording before you start editing. Take notes on sections that need work or areas you want to highlight.
- Create a backup of your raw recording before you start editing.
- Use headphones for editing to catch subtle audio issues.
- Keep your script or outline nearby as a guide while editing.
- Focus on creating a compelling narrative and maintaining a natural flow.
- Be ruthless in cutting unnecessary content, but be careful not to “over-edit” and lose the feel of a natural conversation.
Once you’re ready to begin editing, you can use this checklist to make sure you’ve completed every step.
- Import audio files into your editing software.
- Remove background noise and unwanted sounds.
- Cut out long pauses, filler words (um, uh), and irrelevant tangents.
- Adjust volume levels for consistency throughout the episode. This is especially important if you’re using tracks from various sources, such as prerecorded interviews.
- Apply equalization (EQ) to improve clarity and remove harsh frequencies.
- Add compression to even out volume levels if necessary.
- Insert intro and outro music, fading in and out smoothly.
- Add any necessary sound effects or additional audio elements.
- Ensure smooth transitions between different segments or speakers.
- Export your final file in the appropriate format (usually MP3) and listen to the entire episode one last time for quality control.
Once you’ve completed the editing checklist, you’re nearly ready to publish your podcast episode. Make sure to write a compelling episode title and description, create show notes or a transcript, and prepare any additional marketing materials you may need such as social media posts, a blog post, or newsletter.
Distributing your podcast
Setting up distribution for your podcast involves choosing a hosting platform, uploading episodes, generating an RSS feed, and then submitting that RSS feed to the major podcast directories.
Once your RSS feed has been submitted, new episodes will automatically appear in the directories when you upload them to your hosting platform. This makes the ongoing distribution process much simpler after the initial setup.
The first step is to choose a platform to host your podcasts. As we mentioned earlier, it’s not a good idea to store your podcasts in your Media Library.
The hosting platform you choose matters, as different services offer varying features, analytics, and distribution capabilities. We strongly recommend researching various platforms and making your determination based on the capabilities you need.
The ease of use and quality of customer support can vary between platforms, and certain hosts offer additional features like website building, monetization tools, or dynamic ad insertion. Some popular options include Podbean, Buzzsprout, Castos, and Libsyn.
Once you’ve picked a hosting platform, you can upload your first episode and add metadata like the episode’s title, description, and show notes. The next step is to generate an RSS feed that you can submit to the major podcast directories. Most hosting platforms will automatically create this for you when you upload your episode.
Generating an RSS feed
As we mentioned earlier, most podcast hosts will automatically generate the RSS feed for you. Of course, it’s possible to do this manually, and we’ve provided a basic structure below. However, you should be aware that this is a basic structure only, and podcast directories may require additional tags or have specific requirements. Always check the guidelines of the platforms where you plan to submit your podcast.
- Create an XML file: RSS feeds use XML format. Start by creating a new XML file using a text or code editor.
- Add the XML declaration: Begin your file with the XML declaration:
<?xml version="1.0" encoding="UTF-8"?>
- Add the RSS element: This is the root element of your feed:
<rss version="2.0" xmlns:itunes="http://www.itunes.com/dtds/podcast-1.0.dtd">
- Add the channel element: This contains all the information about your podcast:
<channel>
<title>Your Podcast Title</title>
<link>https://yourwebsite.com</link>
<language>en-us</language>
<copyright>Copyright 2025</copyright>
<itunes:author>Your Name</itunes:author>
<description>Your podcast description</description>
<itunes:image href="https://yourwebsite.com/podcastimage.jpg"/>
</channel>
- Add item elements: Each episode is represented by an item element within the channel:
<item>
<title>Episode Title</title>
<itunes:author>Author Name</itunes:author>
<description>Episode description</description>
<enclosure url="https://yoursite.com/episode1.mp3" length="34216300" type="audio/mpeg"/>
<guid>https://yoursite.com/episode1</guid>
<pubDate>Tue, 28 Jan 2025 12:00:00 GMT</pubDate>
<itunes:duration>34:23</itunes:duration>
</item>
- Close the RSS element: End your file with:
</rss>
- Save the file: Save your XML file with a .xml extension (e.g., podcast_feed.xml).
- Host the file: Upload this XML file to your web server.
- Validate your feed: Use a feed validator to ensure your RSS feed is correctly formatted.
Once you have an RSS feed generated by your host or created manually, you can submit it to the major podcast directories. The most important ones are Apple Podcasts, Spotify, and Pocket Casts. Your hosting platform may be able to automate this process for you.
Finally, you must promote your episode through your website, social media channels, and any other marketing avenues you have.
Conclusion
Podcasting with WordPress offers a powerful and flexible platform for content creators to share their voice with the world. By following the steps outlined in this article, you can effectively set up your WordPress site for podcasting, plan your content strategy, choose the right equipment, edit your episodes professionally, and distribute your podcast to reach a wide audience.
The key to success in podcasting lies in consistent, high-quality content creation and effective promotion. Remember that building an audience takes time and patience. Stay committed to your publishing schedule, engage with your listeners, and continuously seek ways to improve your podcast.
As you grow your podcast, don’t be afraid to experiment with different formats, topics, or guest speakers. The beauty of podcasting is its flexibility, allowing you to adapt and evolve your content based on audience feedback and your own creative instincts.
Technology and best practices in podcasting are constantly evolving. Stay informed about industry trends, new distribution channels, and emerging technologies that could enhance your podcast. With dedication, creativity, and the right tools, your WordPress-powered podcast has the potential to inform, entertain, and inspire listeners around the globe.
Make your voice heard with WP Engine
Creating a podcast can be a great way to share your stories, market your brand, or just have fun with friends. At WP Engine, we understand how the right developer tools can make a huge difference when you’re working on a new project.
Find out more about our hosting services, which offer a perfect way to manage and coordinate your podcast, or speak to a representative today!