
Website Migration Tips for Small Businesses
Migrating your website doesn’t have to be overwhelming. Whether you’re upgrading your hosting for improved speed or switching platforms to access better tools, a smooth migration is key to setting your site up for growth.
With the right planning and support, you can minimize downtime, preserve SEO, and ensure your site continues driving leads and sales.
This guide will help you navigate the migration process with confidence, covering the essentials to make sure everything goes smoothly from start to finish.
Pre-migration planning
A stress-free migration starts with preparation. Lay the groundwork with these steps before touching a single file:
- Backup everything: Export your website’s files, databases, and emails. If your current platform lacks built-in tools, use third-party plugins or manual downloads via SFTP.
- Audit your current site: Document every page, plugin, form, integration (e.g., payment gateways), and custom code. This helps to ensure nothing gets lost in transit.
- Choose the right host: Prioritize providers with WordPress-optimized servers, 24/7 support, and scalability.
WordPress-to-WordPress migration tips
Moving an existing WordPress site to a new host is the simpler scenario, but there are still some things you have to consider before you make the move:
- Compare hosting environments: Ensure the new host supports your site’s PHP version, database type (e.g., MySQL), and server resources (RAM, storage).
- Test on a staging site: Some hosts offer staging environments. You can use a staging site to trial the migration and catch issues like plugin conflicts or broken themes before going live. WP Engine includes staging sites with every hosting plan.
Non-WordPress to WordPress migration tips
Migrating from platforms like Wix, Squarespace, or a custom CMS is a steeper hill to climb than moving a WordPress site to a different host. Focus on:
- Export compatibility: Check if your current platform allows XML/CSV exports (common in Squarespace or Shopify). For static HTML sites, manually copy text and images.
- URL structure strategy: WordPress uses customizable permalinks (Settings > Permalinks). Plan how to mirror existing URLs or set up redirects if changes are unavoidable.
- Email hosting: If emails are tied to your old host, migrate them to a dedicated service (e.g., Amazon SES) before switching DNS settings.
Content migration strategies
Whether you’re moving an existing WordPress site or transitioning from another platform, these tools and methods will streamline the process while minimizing downtime.
WordPress-to-WordPress content migrations
It’s entirely possible to migrate a WordPress site manually, but it’s a complicated process with a lot of steps, and therefore, a lot of different ways it can go wrong. It’s easier to use a plugin like WP Migrate. This powerful plugin simplifies moving databases, themes, plugins, and media between WordPress installations. Its “push/pull” feature lets you sync content directly between the old and new sites, making it ideal for partial or full migrations.
Your new host may have a tool that simplifies site migration. For example, the WP Engine Automated Migration plugin not only automates the migration process, but it also allows you to verify everything before you change your DNS, ensuring users don’t experience any roadblocks in visiting your site. The plugin also gives you updates as the migration progresses. Depending on the size of your site, the migration process can take less than an hour.
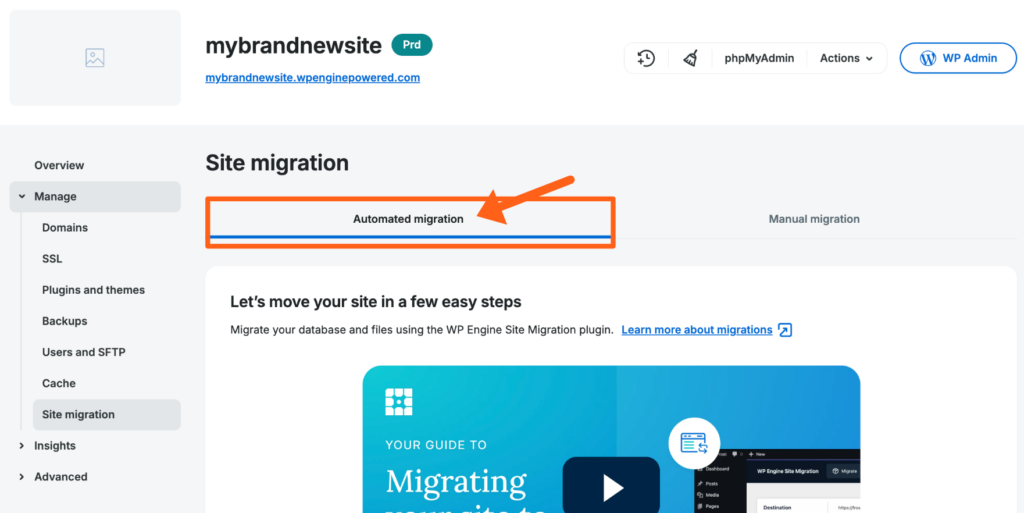
WP Engine also offers free, fully managed migrations for qualifying customers. This process removes the burden completely, providing peace of mind and letting you focus on running your business. The big advantage of a managed migration is that WP Engine handles all of the technical details, from planning to execution. This gets you to market faster while minimizing risk.
Non-WordPress to WordPress content migrations
Moving to WordPress from platforms like Wix, Squarespace, or a custom CMS requires some additional work. In general, you should follow something like this framework:
- Export your content. Use your current platform’s native export tools (e.g., Squarespace’s “Export” feature or Wix’s “Download Site” option) to save pages, blogs, and product data. For static HTML sites, manually copy text and download images.
- Import into WordPress. For blog posts or pages, you can use WordPress’s built-in Tools > Import feature for XML/CSV files. For media files, you can bulk-upload images via the WordPress Media Library or use a plugin to auto-import images from old URLs.
- Migrate to your new host. This step depends significantly on your host. Some hosts, including WP Engine, have automated migration tools to transfer the newly built WordPress site.
Design and functionality setup
With your content successfully migrated, the next step is to ensure your site’s design aligns with your brand and that all critical features work as intended. Next, we’ll look at how to streamline this process without compromising user experience or security.
Choosing a WordPress theme
Select a theme that balances aesthetics with performance. In general, lightweight, mobile-responsive themes are good choices, as they load quickly and adapt well to different devices. Prioritize themes with built-in customization options through the WordPress Customizer or popular page builders, which allow you to tweak layouts, colors, and fonts without coding. Avoid overly complex themes that could slow down your site or clash with plugins.
Handling redirects and links
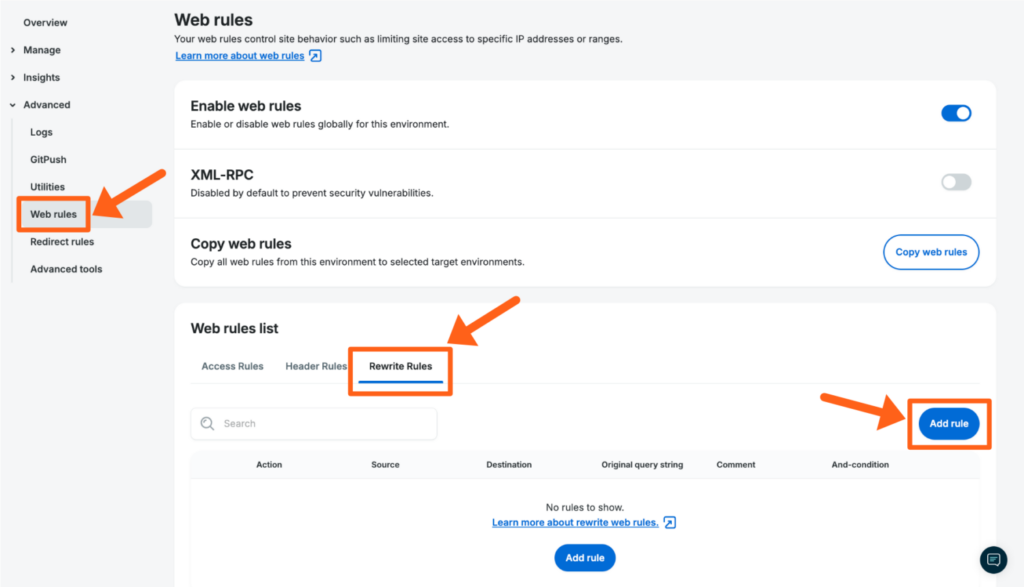
If your migration involves changes to URLs, you will need to set up 301 redirects. This prevents visitors from encountering broken links and preserves your SEO rankings. After launching, conduct a thorough audit of internal links using tools like Broken Link Checker, and update any paths that no longer align with your new structure.
This is another area where the right host saves you time and energy. The WP Engine User Portal gives you access to the Web Rules Engine, allowing you to set site rules, including rewrite rules for 301 redirects.
Integrating third-party tools
Reconnect tools like email marketing platforms, analytics software, or payment gateways by installing compatible WordPress plugins. Test each integration on a staging site first to identify conflicts with your theme or hosting environment. For example, ensure that any tracking codes are properly reinstalled and that eCommerce plugins function smoothly during checkout.
SEO preservation checklist
Migrating your site without preserving SEO is like moving to a new house but neglecting to update your address—customers (and search engines) won’t know where to find you. Follow the steps below to safeguard your rankings and traffic.
Conduct a pre-migration audit
Before making changes, crawl your existing site using tools like Screaming Frog. Document critical details such as URLs, meta titles, descriptions, backlinks, and high-performing pages. This audit serves as a baseline to identify what needs protection, ensuring no crucial SEO elements are overlooked during the transition.
Plan URL structure consistency
As we mentioned earlier, WordPress allows you to customize permalinks via Settings > Permalinks. Aim to mirror your old URL structure to maintain search engine recognition. If changes are unavoidable, implement 301 redirects immediately. This ensures users and search engines are guided to the new pages.
Update internal links
Internal links pointing to outdated URLs can fragment user experience and harm SEO. You can use something like WP Migrate’s Find & Replace function to update links within posts, pages, and menus. For larger sites, consider consulting a developer to safely execute database queries.
Submit a new sitemap
Generate an updated XML sitemap using a plugin such as Yoast SEO or Rank Math, or create it manually. Submit the new sitemap to search engines to expedite re-indexing and ensure search engines quickly recognize your new site structure.
Monitor post-launch performance
After migration, monitor Google Search Console for crawl errors and traffic fluctuations. Tools like Google Analytics or Ahrefs can track keyword rankings and backlink health. Address 404 errors promptly by adding redirects or updating internal links. Keep a close eye for 2–4 weeks to catch any lingering issues.
Launch and post-migration best practices
The final steps of your migration are critical to ensuring a smooth transition. Follow these strategies to minimize disruptions, maintain performance, and address issues before they impact your business.
Final testing
Conduct rigorous testing before launching your new site. Start with a staging environment to verify that all pages render correctly across browsers and devices. Test interactive elements like contact forms, checkout flows, and login portals to ensure they function as expected. If your site uses third-party services—such as payment gateways or appointment schedulers—confirm they’re properly connected and processing data.
DNS cutover strategy
DNS changes are made through your DNS provider’s website (e.g., GoDaddy, Cloudflare), not your hosting account’s dashboard. Follow these steps to direct your domain to the new host:
1. Prepare in advance
24–48 hours before the cutover, lower your domain’s TTL (Time to Live) in your DNS provider’s dashboard. Look for “DNS Settings” or “Advanced DNS.” TTL determines how long DNS information is cached. Lowering it (e.g., to 300 seconds) ensures faster updates after the final switch.
2. Pick the right time
Schedule the DNS change during low-traffic hours (e.g., weekends, late nights). Check analytics tools to identify quiet periods.
3. Update DNS records
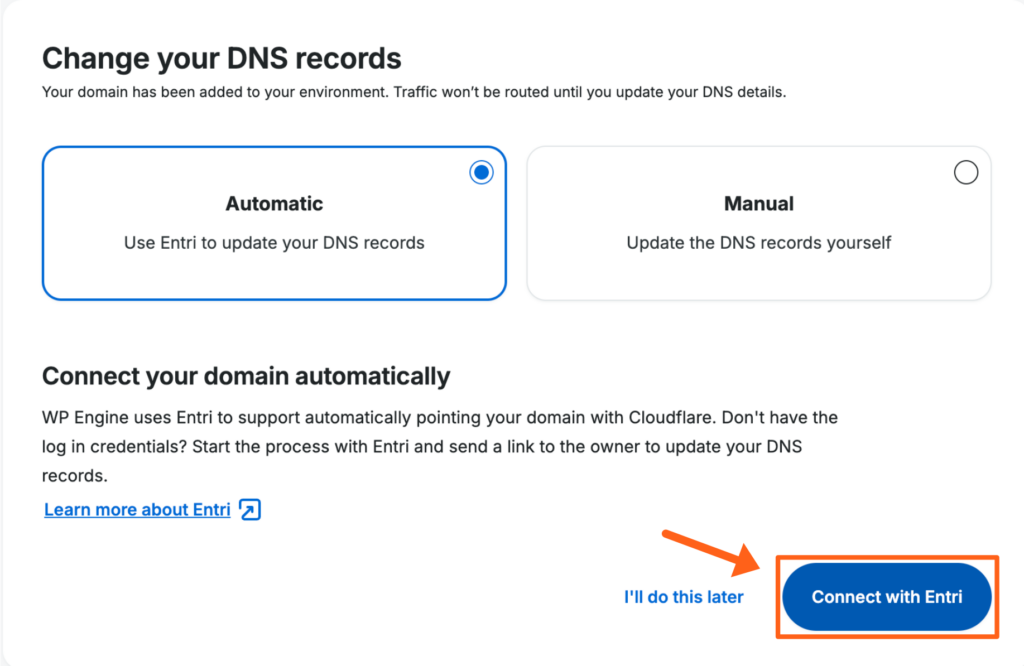
In your DNS provider’s dashboard, update the A Record (to point to your new host’s IP address) or use CNAME flattening. Your hosting provider will usually specify which method to use. WP Engine recommends CNAME flattening, but only if it’s supported by your DNS provider. If you’re hosting with WP Engine, you may also be able to use Entri Connect to automatically point your domain to WP Engine.
4. Wait for propagation
DNS changes can take up to 48 hours to propagate globally. During this time, some visitors may see the old site, others the new one. Avoid making additional changes to prevent confusion.
5. Confirm the change
Use tools like WhatsMyDNS.net to verify global propagation. Enter your domain—most locations should show the new host’s IP.
Critical Note: Email Hosting
If email is hosted separately (e.g., Google Workspace), update MX records in your DNS provider’s dashboard using instructions from your email service. Skipping this may disrupt email delivery.
Ongoing maintenance
- Backups: Enable automated backups through your host or plugins. Store backups offsite (e.g., cloud storage) for disaster recovery.
- Updates: Regularly update WordPress core, themes, and plugins to patch security vulnerabilities. Test updates on staging first to avoid conflicts. WP Engine’s Core and Enterprise hosting plans include automated plugin and theme management.
Tip: If your migration involves a large or complex site, consider an incremental launch. For example, migrate non-critical pages first, test them, then move high-traffic sections. This reduces risk and lets you address issues in phases.
Conclusion
Migrating your small business website isn’t just a technical task—it’s an opportunity to future-proof your online presence. By prioritizing careful planning, meticulous testing, and post-launch vigilance, you’ll ensure your site emerges faster, more secure, and better equipped to serve your customers.
At WP Engine, we understand the technical details of migration can be overwhelming. We offer free (very simple) DIY migration steps, as well as white-glove, stress-free migrations handled by trusted experts. We handle the heavy lifting, so you can focus on what really matters—growing your business.