Insecure and Mixed Content Warnings
If you’ve recently added an SSL certificate you may expect to see a secured padlock symbol in the URL bar when visiting your site. However, in some cases you can run into an issue called “mixed content”, “insecure content” or show scripts have been blocked. These issues mean that the site is being requested over secured URL, but some individual assets on the page aren’t being loaded securely over an SSL.
About Mixed Content
A common example of mixed content would be when an image is loaded as insecure (http://mydomain.com/image.jpg), but the page was requested with SSL (https://mydomain.com). This can have one of two effects on your site:
- The secured padlock symbol does not appear, or is broken
- The secured padlock symbol does appear, but an image or resource does not
You can confirm if your site is being affected by mixed content errors by checking the Inspect Element console. You will see yellow warnings if the insecure content is causing the padlock to not show, and red warnings if the content has been blocked from displaying because it is insecure.
- In most browsers right-click or ctrl-click anywhere on your page and choose Inspect.
- Click on the Console tab. If your browser has flagged anything as insecure it will show here.

You can also use tools like Why No Padlock to help identify which content is not loaded over HTTPS or if there are any issues with your SSL.
Resolving Mixed Content Errors
To resolve the errors and show a fully secured site, you will need to change HTTP to HTTPS on all assets.
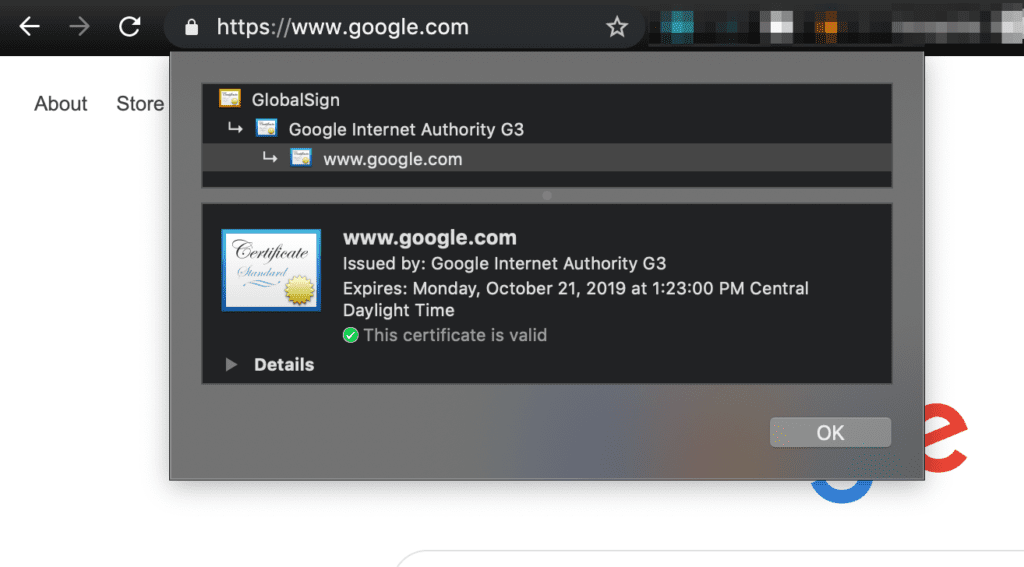
- Verify there is a valid SSL installed by clicking on the padlock icon.
- Check the date to confirm the certificate is not expired
- The domain should match the URL shown in your address bar
- Configure the page to force HTTPS requests:
- Open the SSL page from your User Portal
- Click the environment name
- Click SSL
- Secure All URLs — Each page loads over HTTPS by default. Do not use plugin settings to force HTTPS with this option or you will receive a redirect loop error.
- Secure Specific URLs — Specified pages load over HTTPS by default. Verify the page you are testing is secured.
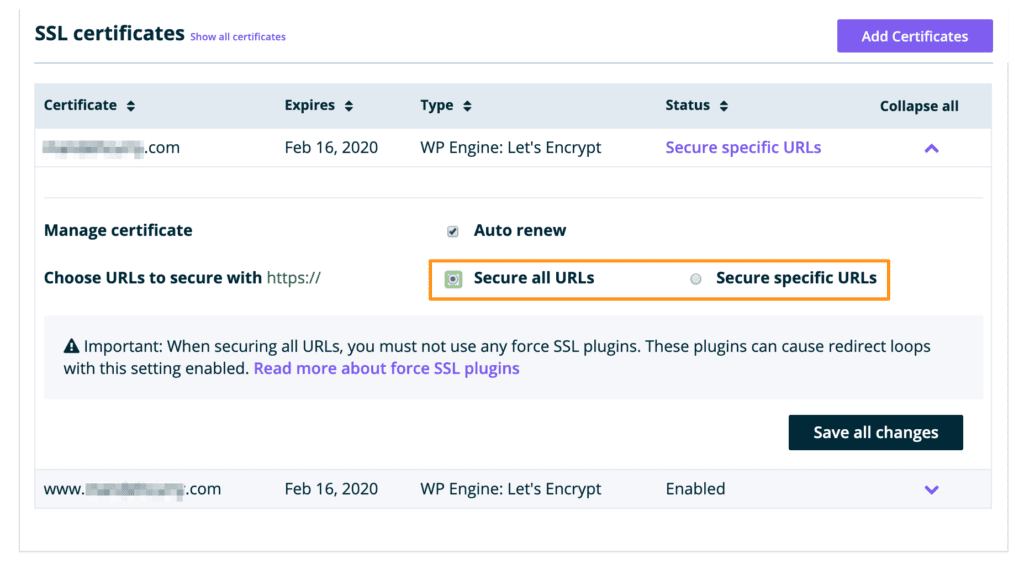
- Open the SSL page from your User Portal
- Change your site’s URL in the Settings > General page of your WordPress® Admin Dashboard from HTTP to HTTPS.1

- Purge WP Engine server caches
- Purge browser cache OR,
- Open the page in an incognito window, to help bypass local caching:
- With the page open, Press Ctrl + Shift + N (Windows, Linux, and Chrome OS) or ⌘ + Shift + N (Mac).
Additional Steps
If this has not resolved the issue, it means your site has some URLs hardcoded into the database or files. There are several methods to approach resolving this.
NOTE
Make a backup of your website before modifying content.
- Search your database for insecurely referenced assets and replace them with a secured version.
- Search:
http://yourdomainhere.com - Replace:
https://yourdomainhere.com
- Search:
NOTE
Be sure to replace with the correct www or non-www version of your domain. This should match what is set as your Primary Domain.

- Purge server caches
- Purge browser cache OR,
- Open the page in an incognito window, to help bypass local caching:
- With the page open, Press Ctrl + Shift + N (Windows, Linux, and Chrome OS) or ⌘ + Shift + N (Mac).
NOTE
Incognito browser sessions still carry cache for the duration of the session. Start a new incognito session for each test.
- Review your theme and plugin files:
- Check plugin or theme code in the WordPress Admin Dashboard, or over SFTP to see if there are any URLs which are hardcoded as HTTP in the files themselves.
NEXT STEP: Compare WP Engine’s network options to see how you can easily upgrade site performance