eCommerce Suite Features
Getting an online store set up and launched isn’t always an easy task. Now you can launch a store on WordPress® faster than ever before with WP Engine’s eCommerce solution.1
Note
As of Oct 15th 2025, eCommerce plans can no longer be purchased. Check out our new eCommerce Performance Pack instead. You can now add all of the great eCommerce features to individual sites.
Our eCommerce suite will set your store up for success with tools to help you start, optimize, manage, and sell more with WooCommerce®.1
It includes:
- One-click set-up
- Automated migrations for existing stores
- An eCommerce-ready theme
- Enhanced Cache and cart for WooCommerce
- AI-powered store search
- Integrated payment processing
- Automated Woo® updates with enhanced security 1
All of this while continuing to take advantage of the performance, security, and support that you know and love.
The eCommerce suite builds off of our existing plans but adds everything you need to quickly start and manage a store online.
To view more information and learn more about what options are included in our eCommerce plans, visit the pricing page. If you’d like to convert an existing plan, please contact our team.
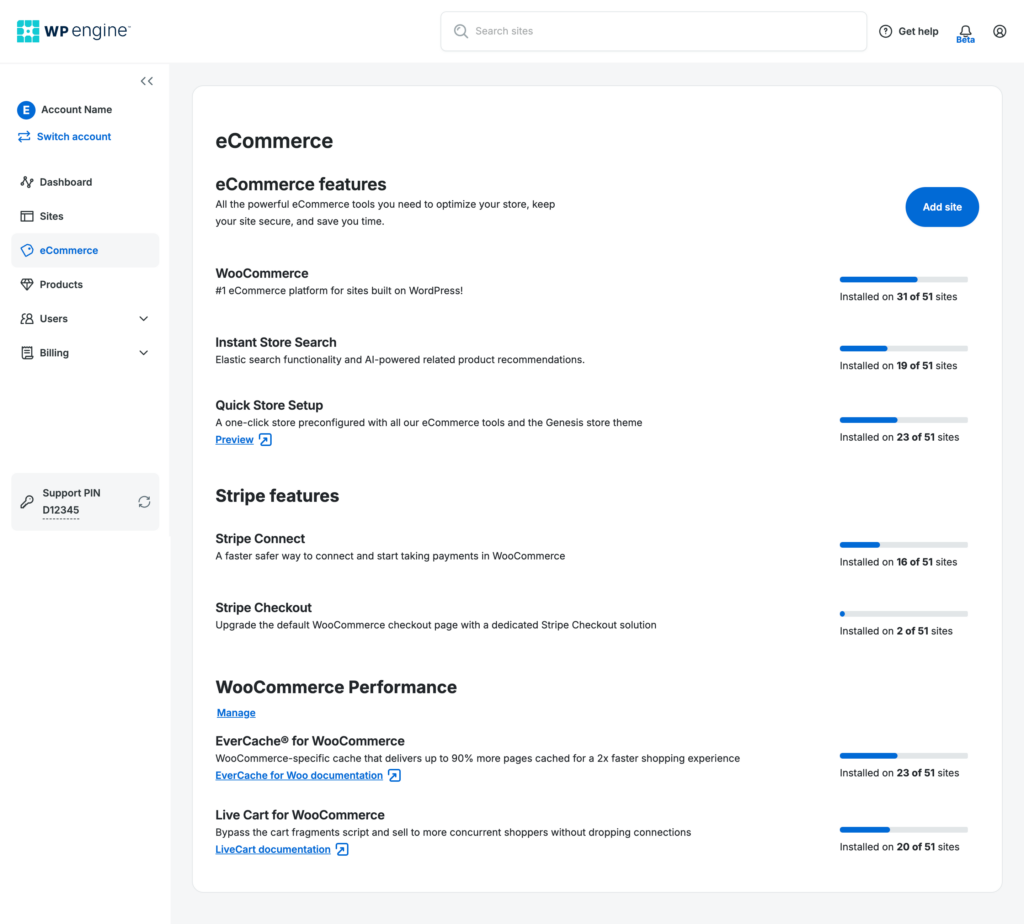
eCommerce Features
eCommerce features available to your plan can be easily accessed through the User Portal. From any page, simply click eCommerce in the lefthand menu.
Or, use this link to go directly to the eCommerce page: https://my.wpengine.com/ecommerce
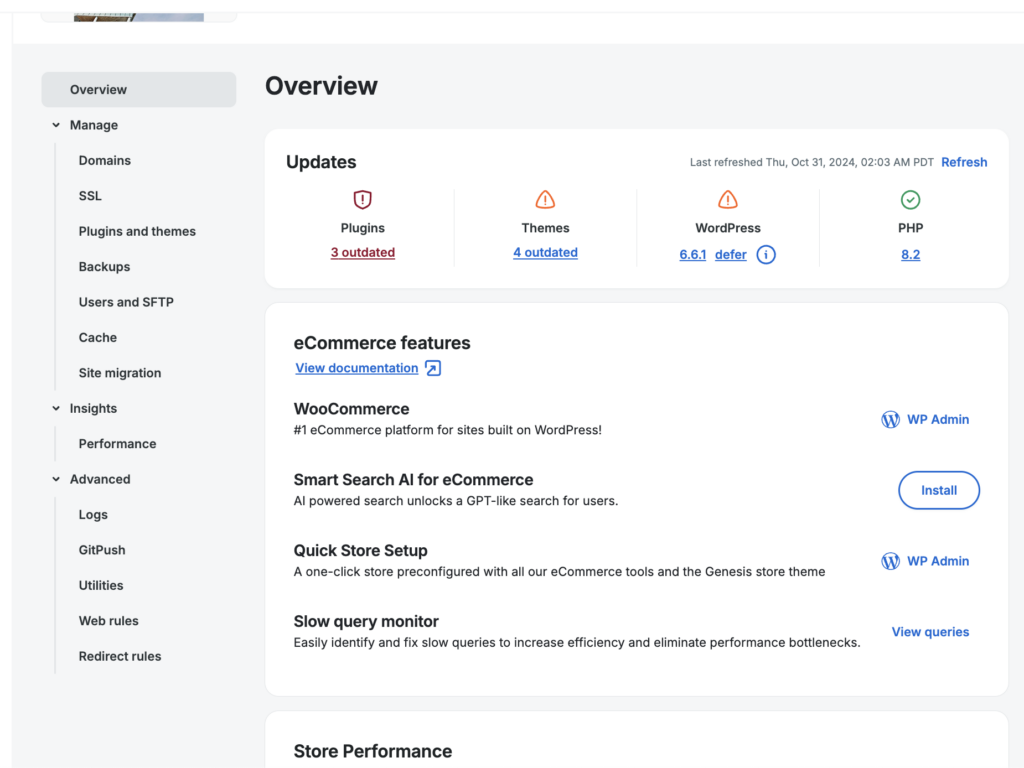
eCommerce Features by site can also be viewed by opening an environment’s Overview page.
Quick Store Setup
Quick Store Setup lets you launch a store faster by pre-installing the WooCommerce plugin and all of the features included in the WP Engine eCommerce Suite included in your plan.
If you have the WP Engine eCommerce Suite, you can access Quick Store Setup by going to the eCommerce page in your User Portal and clicking Add Site.

Note
If you choose not to use Quick Store Setup or if you are migrating an existing store, follow our guide to add features manually.
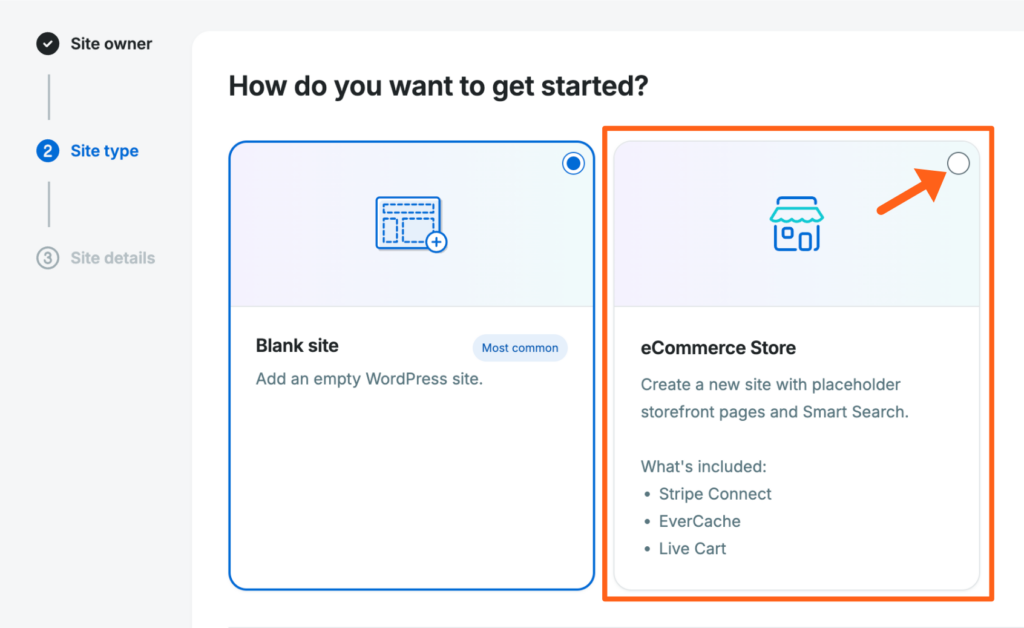
Alternatively, when adding a site or environment through the User Portal, simply select eCommerce Store for the Site Type option.
WooCommerce
WooCommerce is a customizable, open-source eCommerce plugin for WordPress sites. The WooCommerce plugin allows you to set up a new store in minutes. Securely take payments, configure shipping options, and more right in the WooCommerce plugin.
To learn more about setting up and using the WooCommerce plugin, check out the WooCommerce documentation.
Just like we added demo pages to your new store, we’ve also included demo products. View your demo products to understand how products work in WooCommerce, or edit an existing product to get a head start. You can see all your demo products in your wp-admin dashboard by going to the Products section.
We also have a helpful article on adding products to WooCommerce.
Smart Search AI
WooCommerce product details can now be indexed by WP Engine Smart Search. All new Core and Enterprise eCommerce plans will come with Smart Search and be able to access the new features for advanced product search.
Read more about indexing product data with WP Engine’s AI-assisted Smart Search.
Note
Some accounts may still be using Instant Store Search.
After February 2025, Instant Store Search will no longer be available for new or upgraded accounts. Instant Store Search will still work for accounts that can currently access it.
WP Engine Essential plans that cannot access Instant Store Search can still use ElasticPress by purchasing a 3rd-party license. WP Engine Core and Enterprise eCommerce plans will have access to use Smart Search AI.
Stripe Connect
Stripe Connect simplifies the process of setting up payment processing by integrating it with the Stripe payment processor. This feature allows you to quickly set up and process transactions, as well as perform test transactions.
Note
Stripe Connect is an integration with a third-party technology partner. While this feature involves financials and processing transactions, WP Engine is NOT part of the transaction flow. You will separately own your Stripe account and should interact directly with Stripe for any questions or payment issues outside of the Stripe Connect feature itself.
Stripe connect allows you to easily integrate Stripe into your store from the WP Engine User Portal. This feature requires two plugins that will be installed and configured automatically; the WooCommerce Stripe Gateway plugin and the eCommerce Configuration by WP Engine plugin. Additionally, Stripe can be placed into Test Mode, which will allow you to test the payments integration before going live, without having to make real purchases.
Stripe account and payment options can then be configured on the Settings page.
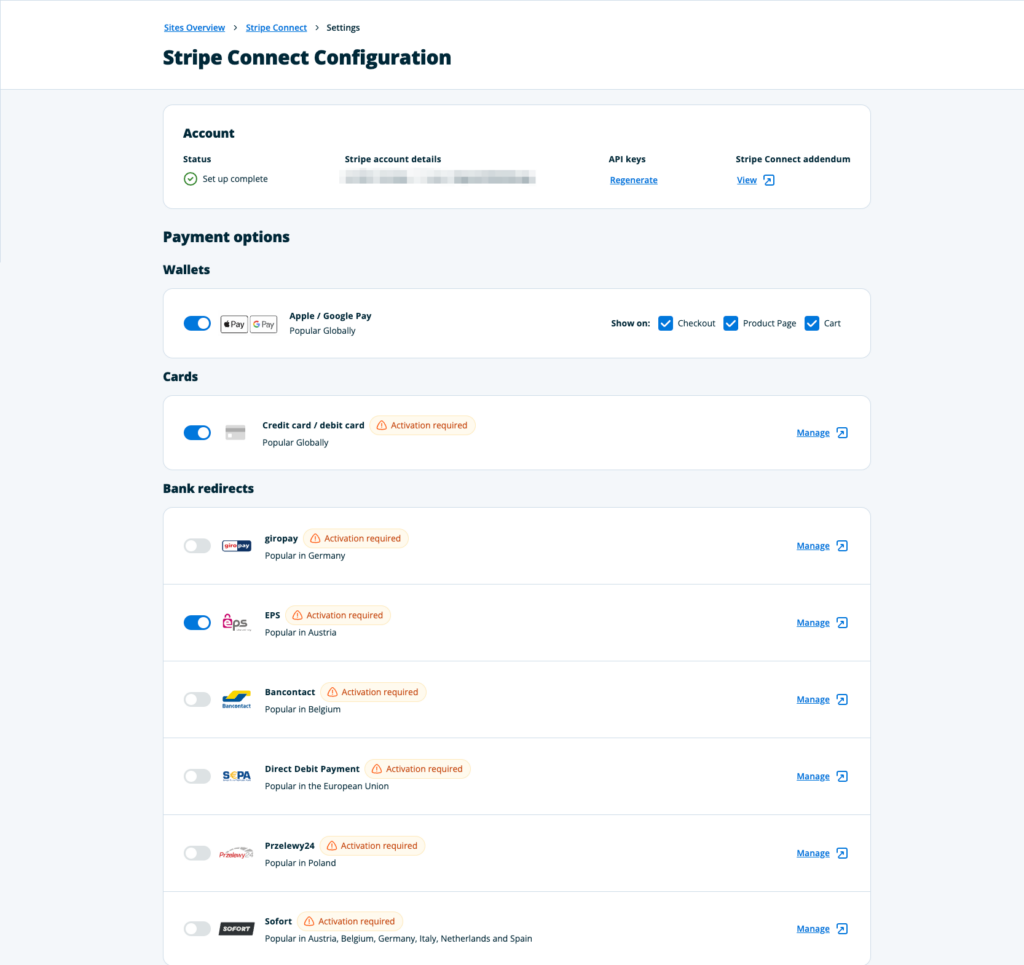
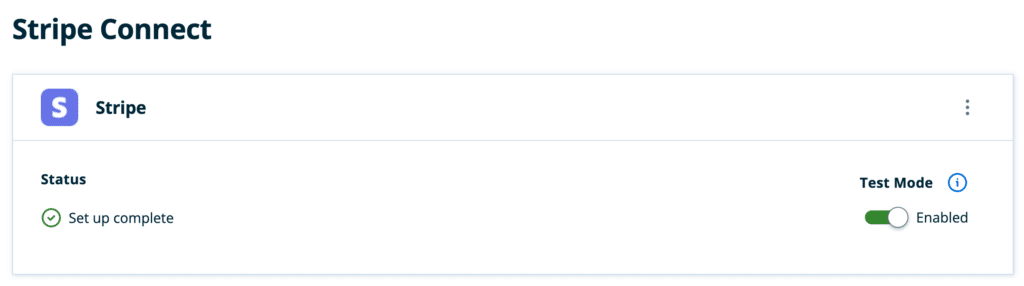
Once Stripe Connect is enabled, Test Mode can easily be toggled on or off.
Stripe Checkout
Once Stripe Connect is configured, Stripe Checkout can be enabled. This functionality will allow Stripe to take over the checkout process. Learn more from Stripe here.

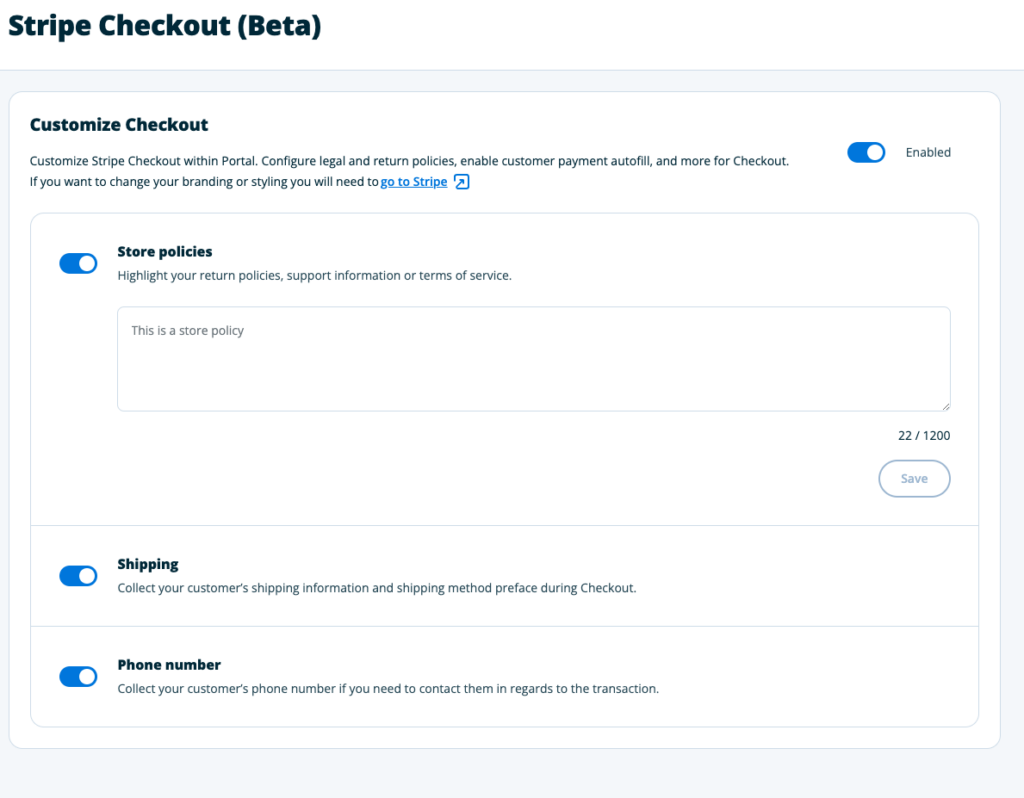
In order to see and change the Stripe Checkout settings, click on Customize my checkout features. These configurable features are:
- Store Policy
- Capture Shipping information
- Capture Phone Number
Stripe Checkout can easily be disabled by toggling it back to Disabled. Additional information:
- You can enable / disable Stripe Checkout as many times as you want.
- Disabling Stripe Checkout will mean that the WooCommerce Checkout will be used instead.
- Disabling Stripe Checkout won’t uninstall any plugin or remove any setting from WooCommerce.
- Disabling Stripe Checkout will only remove two settings that were initially created in the Database when it was enabled. Those 2 settings are owned and only used by Stripe Checkout.
Stripe Connection Errors
Stripe Connect leverages WordPress’ REST API to communicate with your environment’s Stripe configuration. This is done securely through the “eCommerce Configuration By WP Engine” plugin which is installed on your environment when Stripe Connect is installed from the User Portal. The eCommerce configuration plugin appends the “X-Wpe-Configuration-Version” header to each response it sends back to our cloud services. If you are seeing the Stripe Connect error “We were unable to reach your site” this is because a request to query the onboarding status does not contain that header. An unreachable store cannot onboard with Stripe Connect.
Common causes for this can include:
- SSL Errors
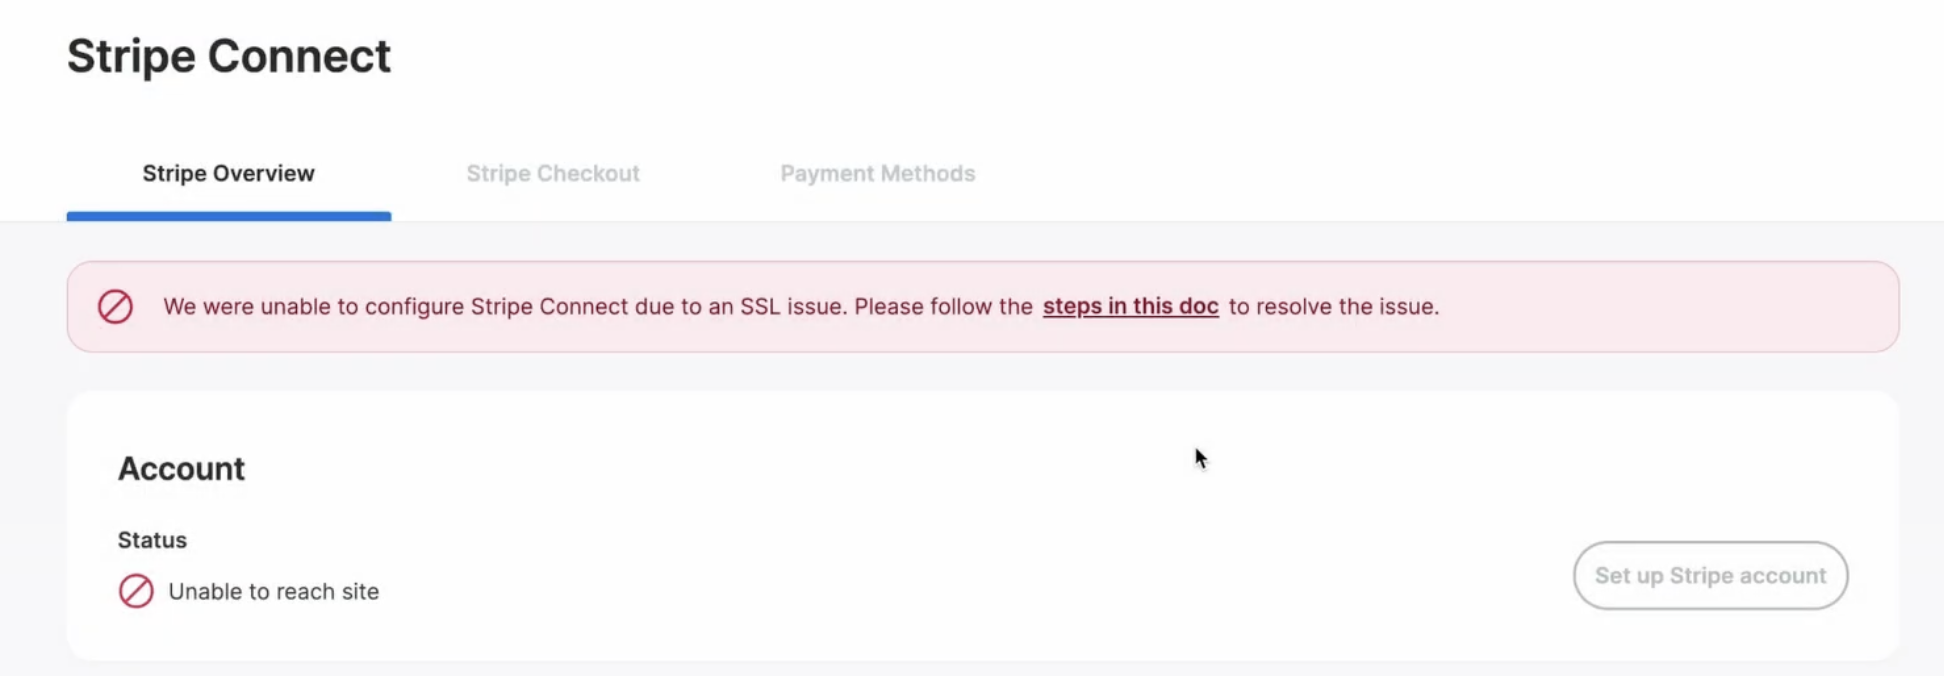
- This error occurs because Stripe was not able to establish a secure connection to the site. The error message links to this article to help you resolve any SSL issues before trying to configure Stripe Connect again.
- Firewall or security plugins that are set to block POST and GET requests from unspecified routes.
- Restrictive firewall configurations can block our cloud services from accessing the configuration plugin. Please double check your firewall’s settings and ensure the following routes are added to the allow list.
GET /wpe-configuration/v1/stripePOST /wpe-configuration/v1/stripeGET /wpe-configuration/v1/stripe/statusGET /wpe-configuration/v1/site
- Restrictive firewall configurations can block our cloud services from accessing the configuration plugin. Please double check your firewall’s settings and ensure the following routes are added to the allow list.
- Plugins that block non-specified user agents.
- Some site security solutions such as “All In One WP Security And Firewall” allow site admins to block certain user agents. Please make sure that the following user agent is allowed to reach the site:
wpengine/payments-v1.0
- Some site security solutions such as “All In One WP Security And Firewall” allow site admins to block certain user agents. Please make sure that the following user agent is allowed to reach the site:
- Plugins that enable ‘private’ stores or otherwise block non authenticated users from accessing the site.
- Plugins that disable public access to your store need an exception added for the REST routes above. If a private store plugin does not allow adding exceptions, it will need to be disabled for the duration of the onboarding process.
- If the store uses plugins that enable ‘maintenance mode’, temporarily disable it for the duration of the Stripe Connect onboarding process. Alternatively, if the plugin allows it, add exceptions for the REST routes above.
- IP blocking.
- If the store has been configured to block POST requests from non-whitelisted IP address, add exclusions for the following addresses.
34.75.210.1935.237.141.22
- If the store has been configured to block POST requests from non-whitelisted IP address, add exclusions for the following addresses.
- Plugin conflicts.
- Some plugins can override the REST routes used by WordPress and cause issues with other plugins that use the WordPress REST API.
- No valid payment method types for this Checkout Session.
No valid payment method types for this Checkout Session. Please ensure that you have activated payment methods compatible with your chosen currency in your dashboard.- This error is result from one or all of the following reasons:
- Test Mode Off (Live payments are enabled) and connected Stripe account is restricted by Stripe.
- Test Mode Off (Live payments are enabled) and connected Stripe account is inactive / disabled.
- Test Mode Off (Live payments are enabled) and haven’t selected at least one Payment method in Portal → Stripe Connect → Configuration → Payment Options.
Smart Plugin Manager
Smart Plugin Manager (SPM) is a WP Engine tool that keeps your environments secure by automatically updating all of your WordPress plugins to ensure that they’re always up-to-date. For WooCommerce users, we extended Smart Plugin Managers functionality beyond WordPress core to run an 18-point WooCommerce check that includes:
- Your store’s home page
- The Cart Page
- The WooCommerce Checkout Page
- The My Account Page
- Up to 3 Product Categories
- 12 Unique Product Types
- It also checks WooCommerce itself and any other WooCommerce plugin for updates
Additionally, Smart Plugin Manager will check to ensure that the updates are working as expected, and that the update did not cause any visual problems on your site. If a plugin update causes issues, SPM can even restore the site and notify you there was an issue. No more worrying about missing sales from botched plugin updates.
Learn more about Smart Plugin Manager in our Support article or read the press release.
Genesis Pro
When using the eCommerce Quick Store Setup we will automatically apply the Spend starter store theme. This theme has been built from the ground up to give you the best possible foundation for your online store. Start with Spend and then easily customize it for the unique needs of your business.
Spend is built on the Genesis Blocks framework, which is a powerful framework for helping you create compelling content faster, using pre-made design components that you can style to work with your unique store.
Getting the right look and feel is important. That is why we’ve made sure to include a few pages of demo content. These demo pages can be edited, duplicated, or removed easily in the Pages section of your wp-admin dashboard.
Your starter store will come with the following demo pages:
- Home
- Shop
- About
- Cart
- Checkout
- My account
- Privacy Policy
If you prefer a bit more customization, all eCommerce Suites also include Genesis Pro. Genesis Pro provides you with a collection of advanced tools to build and create a beautiful and optimized theme.
Genesis Pro includes Genesis Blocks Pro, Genesis Framework, and StudioPress themes. Here is a great article on how to use Genesis Blocks.
Performance Features for WooCommerce
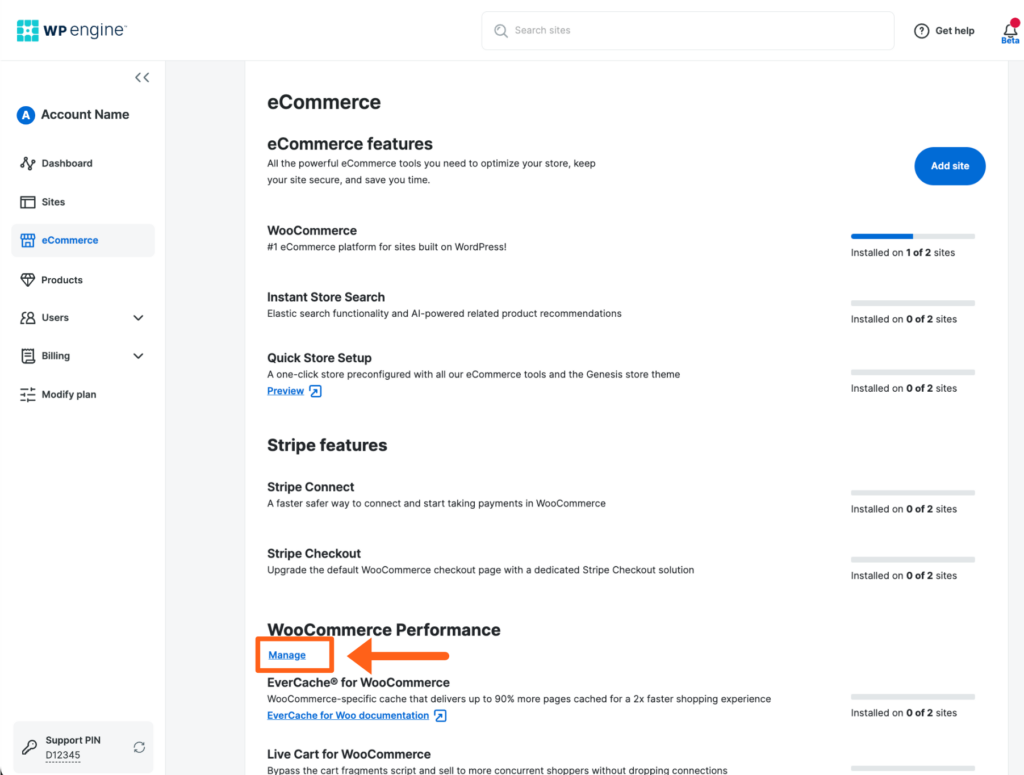
Our eCommerce suite includes tools specifically designed to improve the performance of WooCommerce. To manage performance features for WooCommerce:
- Open the eCommerce tab in the main menu
- Locate WooCommerce Performance and click Manage
- This page can be accessed directly at: https://my.wpengine.com/ecommerce_performance
Live Cart for WooCommerce
WooCommerce “Cart Fragments” is an admin AJAX script which makes the shopping cart dynamic, with real-time totals and product count, but without the need to refresh the page each time. Real-time cart totaling corrects many issues commonly seen with the default cart functionality and improves the user experience, lowers cart abandonment, and increases conversions.
Many of the top performance benchmarking tools regularly highlight AJAX requests, specifically the Cart Fragments call wc-ajax=get_refreshed_fragments, as the source of page speed delays and instability on high-traffic eCommerce sites. This is because, in WooCommerce, the Cart Fragments request is made all the time, even when completely unnecessary, including pages without add-to-cart functionality, like an About Us page, Blog Posts, or on the Terms & Conditions page.
The Cart Fragments script presents a tradeoff between performance and dynamic functionality. Both are important and research shows they both contribute to higher conversion rates. This presents a store owner who may be experiencing performance issues on their store with two options: Disable cart fragments and lose out on the dynamic functionality entirely, or enable WP Engine’s eCommerce Solution Live Cart feature and maintain the real-time cart while simultaneously improving performance.
Live Cart is a proprietary performance feature built into WP Engine eCommerce plans that eliminates the AJAX call from happening at unnecessary times, and improves the scalability of the cart and page speed across your entire store without losing dynamic cart functionality. The biggest benefit is seen when items are added to the cart and during high-traffic events, like a special promotion or event (like Black Friday). When a customer adds an item to the cart, Live Cart loads pages on average 1.5 seconds faster than with the default Cart Fragments script and helps keep your store from dropped connections under continuous load. Live Cart is not only faster, but it makes the server more stable and responsive in peak traffic.
Live Cart optimization is enabled on all newly created stores on an eCommerce Solution. If you are enabling Live Cart for the first time on an existing store, we recommend testing this out on a Staging or Development environment first, to ensure there are no unintended conflicts.
Note
Live Cart requires the WooCommerce plugin to be active on the website.
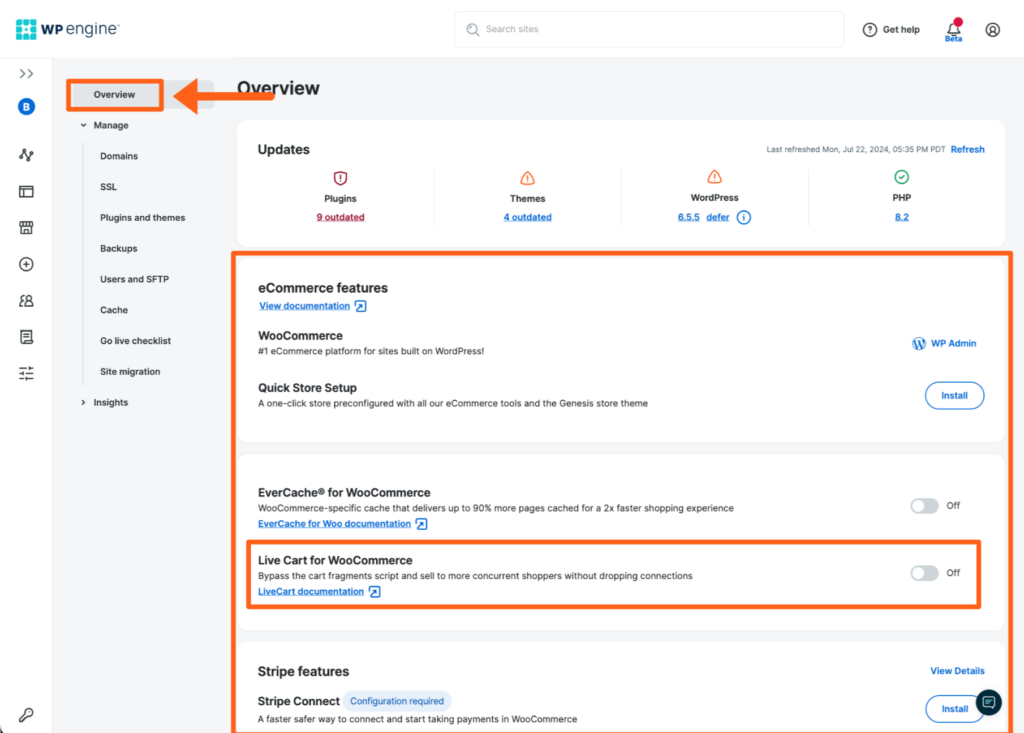
Enable or Disable Live Cart: Overview page
Visiting the Overview page for an individual environment will allow you to add or remove Live Cart for WooCommerce from the environment.
- Log in to the User Portal
- From the Sites Page, click on the name of your eCommerce site
- Scroll down to the Live Cart for WooCommerce section
- Click the toggle button to the right, to enable or disable Live Cart
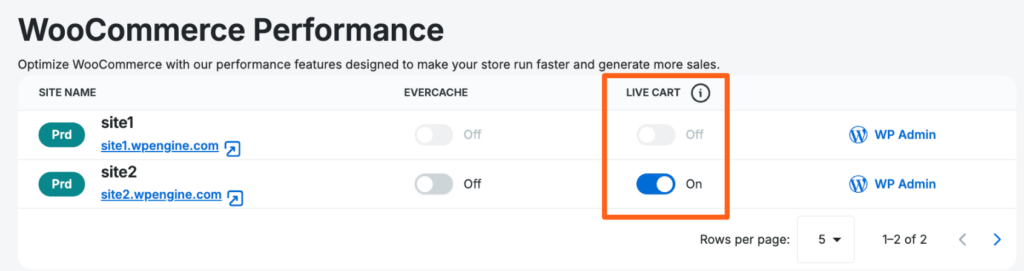
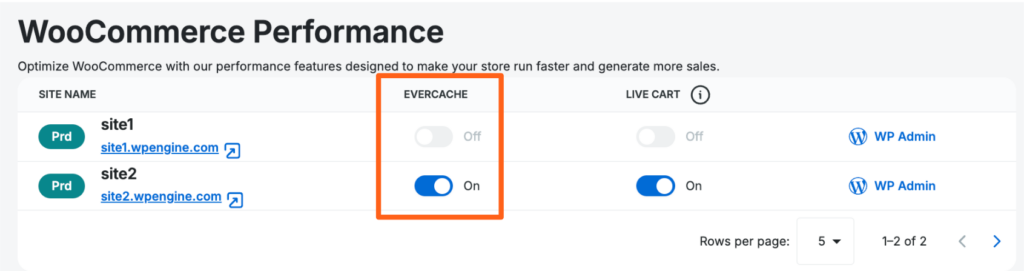
Enable or Disable Live Cart: Performance Features Page
Live Cart for WooCommerce can be added or removed in bulk on multiple environments at once from the Performance Features page in the User Portal.
- Log in to the User Portal
- Select eCommerce from the main sidebar menu
- Under WooCommerce Performance click Manage
- Toggle Live Cart for WooCommerce On or Off
EverCache® for WooCommerce
EverCache® for WooCommerce expands our proprietary cache engine to your store by leveraging cache in even more use cases. This custom caching configuration takes the guesswork out of delivering your pages at peak performance and is included with all eCommerce Solutions.
More specifically, EverCache® for WooCommerce optimizes the cache settings of your cart. When you enable this performance feature, we no longer exclude a page from cache if there is an item in the user’s cart, only on user-specific pages like the checkout. As a result, your store can leverage caching more often, increasing scalability and performance.
For sites that provide a great deal of dynamic content, have disabled cart fragments, or have custom carts we recommend testing this feature on a staging or development environment before enabling it on your live store. While EverCache® should not impact external items, such as API cart calls, we always recommend testing before applying updates to Production.
To utilize this feature you will need to have an eCommerce Solution plan and the WooCommerce plugin active on your website.
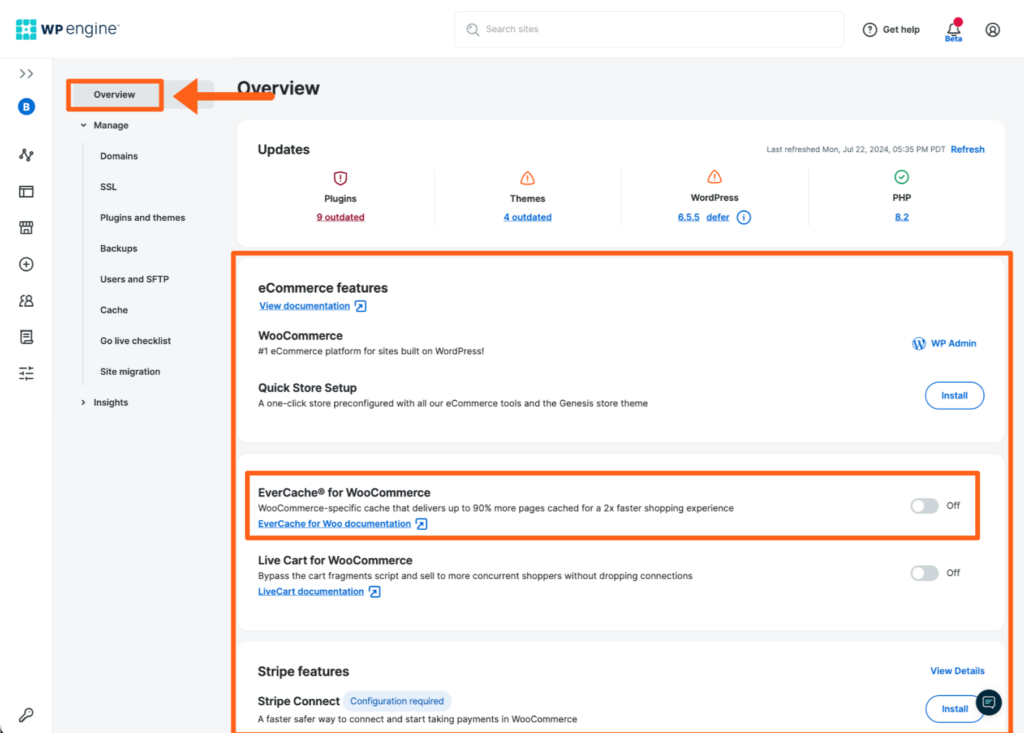
Enable/Disable EverCache® for WooCommerce: Overview Page
Visiting the Overview page for an individual environment will allow you to add or remove EverCache® for WooCommerce from the environment.
- Log in to the User Portal
- Select your eCommerce environment name
- Scroll down to the EverCache® for WooCommerce section
- Click the toggle button to the right, to enable or disable EverCache®
Enable/Disable EverCache® for WooCommerce: Performance Features Page
EverCache® for WooCommerce can be enabled or disabled in bulk from the Performance Features page in the User Portal.
- Log in to the User Portal
- Select eCommerce from the main sidebar menu
- Under WooCommerce Performance, click Manage
- Toggle EverCache® for WooCommerce On or Off
Note
WP Engine has a pre-existing set of cookies already excluded from our page cache when WooCommerce is installed. You can see the list here. Manually requesting for these to be excluded via our Support Team is not necessary. Doing so may negatively impact EverCache® functionality.
EverCache® for WooCommerce Limitations
Note
EverCache® for WooCommerce requires the WooCommerce plugin to be active on the website.
EverCache® for WooCommerce is not compatible with the following features and configurations:
- Disable cart fragments
- Custom carts that change the default functionality of WooCommerce
- WooCommerce Stripe Payment Gateway plugin (Note: this plugin is installed when using our Stripe Connect feature)
- Store Notice and Recently Viewed Product Features in WooCommerce
- Large amount of dynamic content
- Headless Platform for WordPress – Headless sites use a different server configuration where EverCache® for WooCommerce cannot be applied.
- EverCache® will be enabled automatically when using Quick Store Setup. If Quick Store Setup is not used, features must be enabled manually.
- Instant Store Search – This feature offloads search results to a specialized server for performance increases. EverCache® for WooCommerce cannot be applied to these search-specialized servers.
- Genesis Pro – Themes depend on UI elements for WordPress which are not included with EverCache® for WooCommerce.
Note
EverCache® for WooCommerce works with most caching plugins. If you do experience any conflicts, please reach out to our Support team.
Slow Query Monitor
WP Engine’s Slow Query Monitor helps you maintain and speed up your site’s performance with continuous identifying, analyzing, and recommendations for speeding up slow queries.
Why is query optimization important? Queries manage and retrieve information from your database. When queries run slowly, they can affect both front-end and back-end performance, leading to a poor user experience and directly impacting conversions.
Troubleshooting slow queries is often frustrating, tedious, and time-consuming. The Slow Query Monitor eliminates guesswork by identifying the exact page, source file, line, and queries that are slowing performance, all without exposing Personal Identifiable Information (PII).
Accessing Slow Query Monitor
From your site’s overview page, you’ll find slow query monitor. Clicking “View Queries” takes you to the slow queries overview pages with insights into queries taking longer than 5 seconds to run.
It includes:
- Up to 30 days of logs of all slow queries that show:
- The date the query was run
- The asset with the slow result (such as a plugin, theme, or script)
- How long the query lasted
- And, a link to a detailed report
- A Recommendations module with actionable insights for improving performance
- A graph that shows slow queries sorted by source type and duration
- And a list of the most problematic slow queries with a quick analysis of items that have the longest run time and are running the most.
Clicking more details on a slow query opens a detail report that includes:
- The Asset type
- Request URL – where the query was initiated
- And, most importantly, the source file, line and line of code – so you know exactly where the issue originated
With this information, you’re not just identifying a problem; you’re pointed directly to the place in your codebase where the issue lies.
In addition to the source identification, you have the actual query at your fingertips, along with other key metadata. This comprehensive view allows you to fully understand the context and a path to address the impact of the slow query.
Dynamic Plugin Loading
WordPress sites often load plugins on every page even if the functionality is not needed. This significantly slows page speed, negatively affecting conversion rates.
Dynamic plugin loading gives you the ability to customize which plugins load assets for each page. All accounts on WP Engine eCommerce plans can use the dynamic plugin loading feature for WooCommerce sites.
Enable
- Navigate to the Overview page for an environment.
- Scroll to the Dynamic Plugin Loading setting.
- Click Install to install the feature on your site.

- Toggle the button next to Dynamic Plugin Loading to the On position.
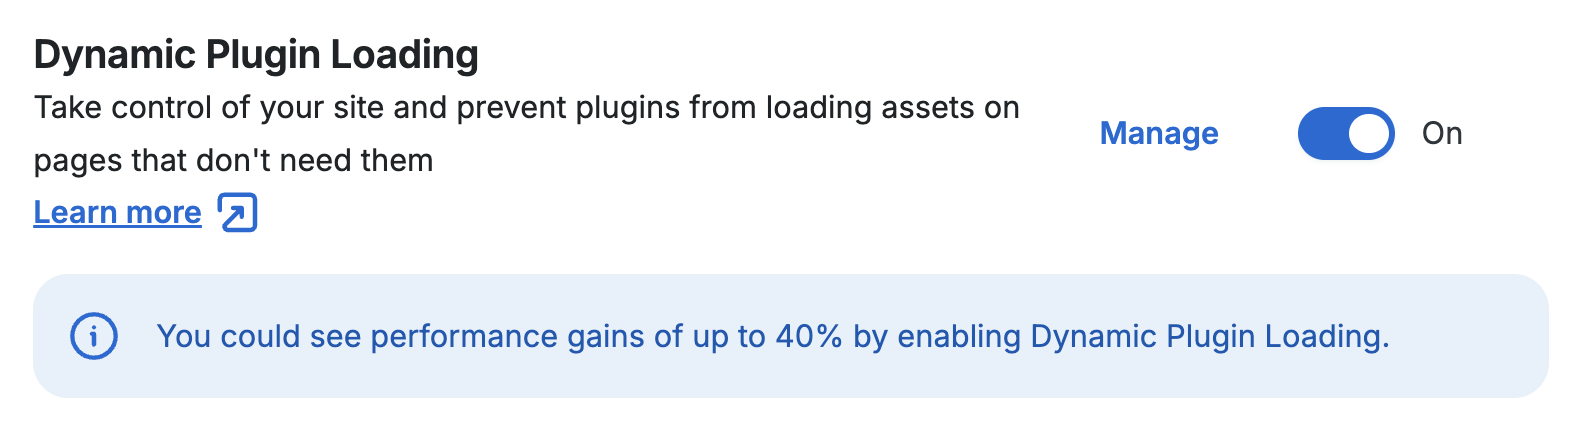
- Click Manage next to the toggle button to see the rules page.
Add Rules
You’ll notice a default rule here that we created to get you started. This rule stops eCommerce related plugins from loading assets on non-eCommerce related pages. If you do not want to utilize this rule, its status should be “Not applied“.
- Click Add rule on the top right of the rules page.
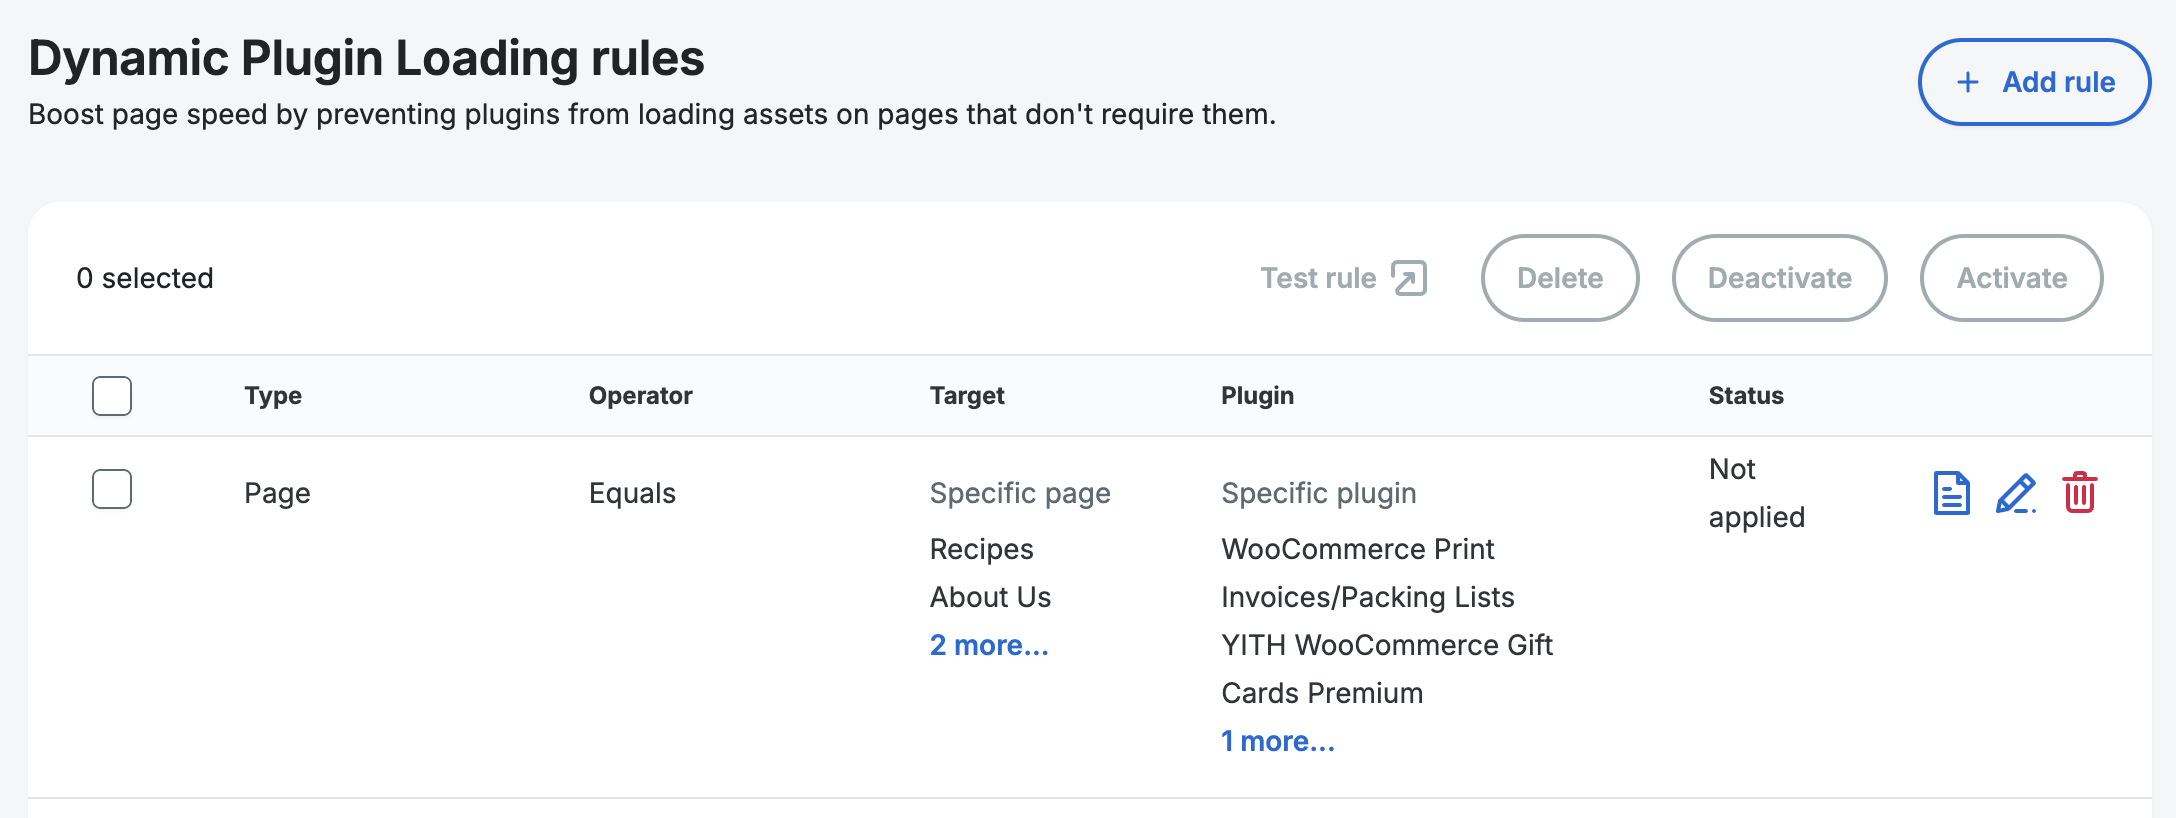
- Choose a page or pages on which to disable plugin assets.
- Choose plugins that you want to prevent from loading assets on the selected pages.
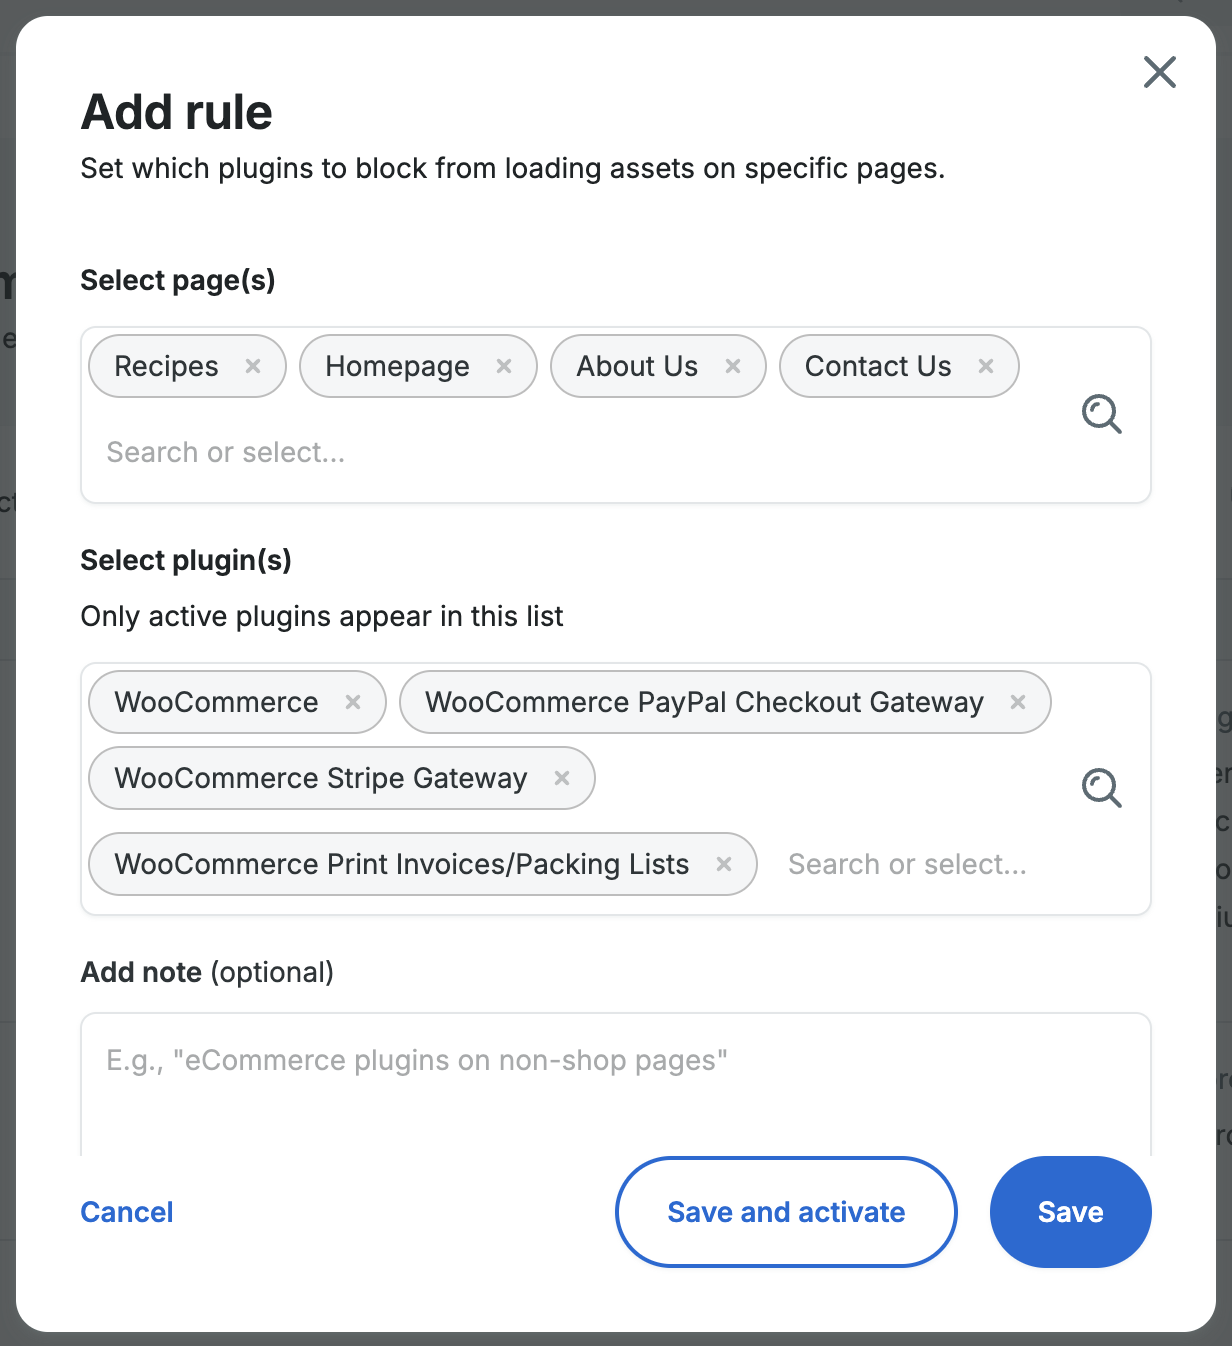
- Click Save and activate to activate immediately or click Save if you want to test the rule first before activating.
Note: Caching may result in a delay in seeing the impact of a rule on pages. To immediately view the impact of a rule, you may need to purge cache. We recommend validating new rules in development or staging environments where invalidating the cache will have less of an impact on site users.
For pages that do not get cached (e.g. pages viewed while logged in), cache invalidation is not required and rules will be effective immediately.
— - To test the rule, check the box to the left of the rule and then click the Test rule link in the top right of the table.
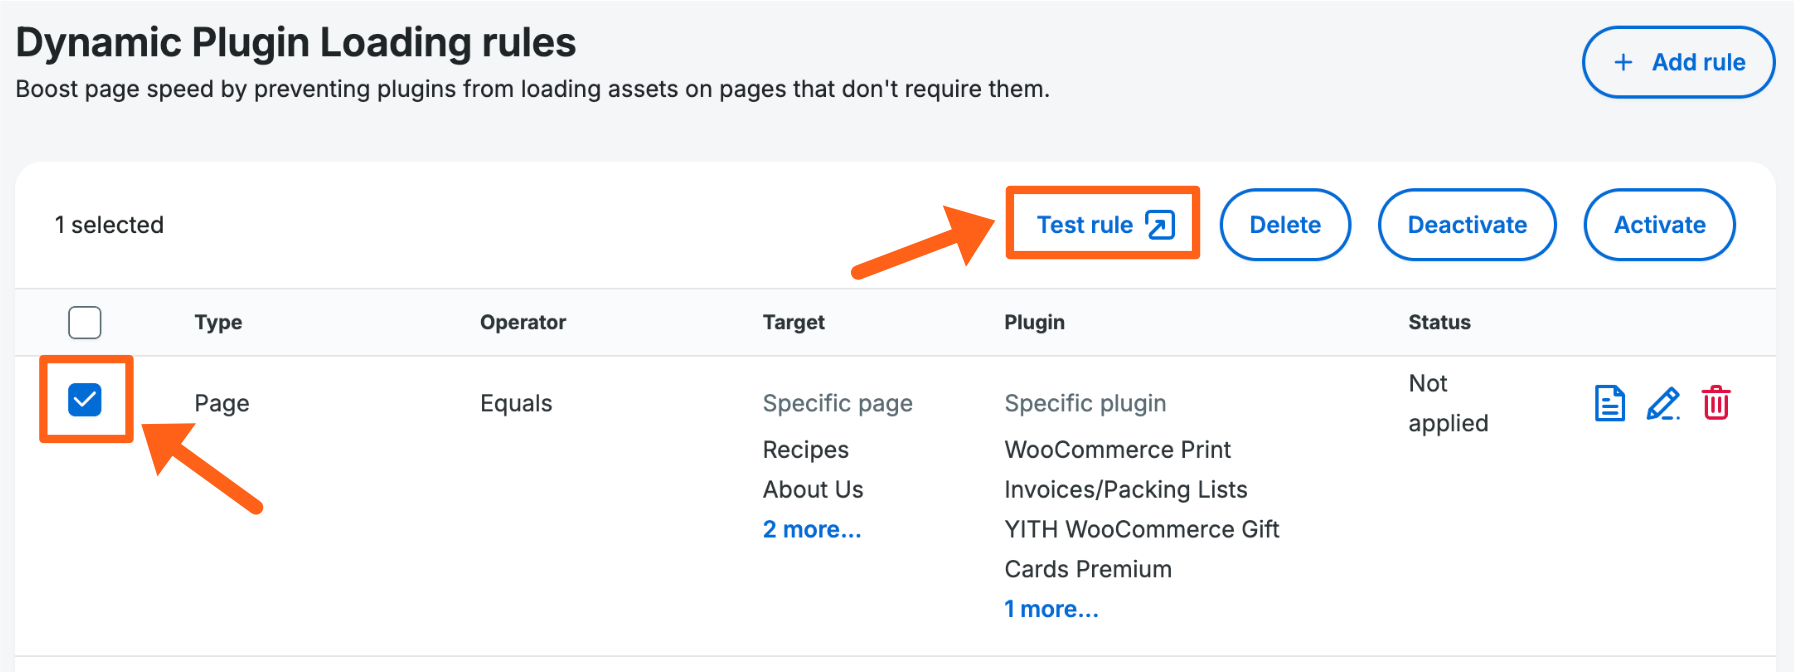
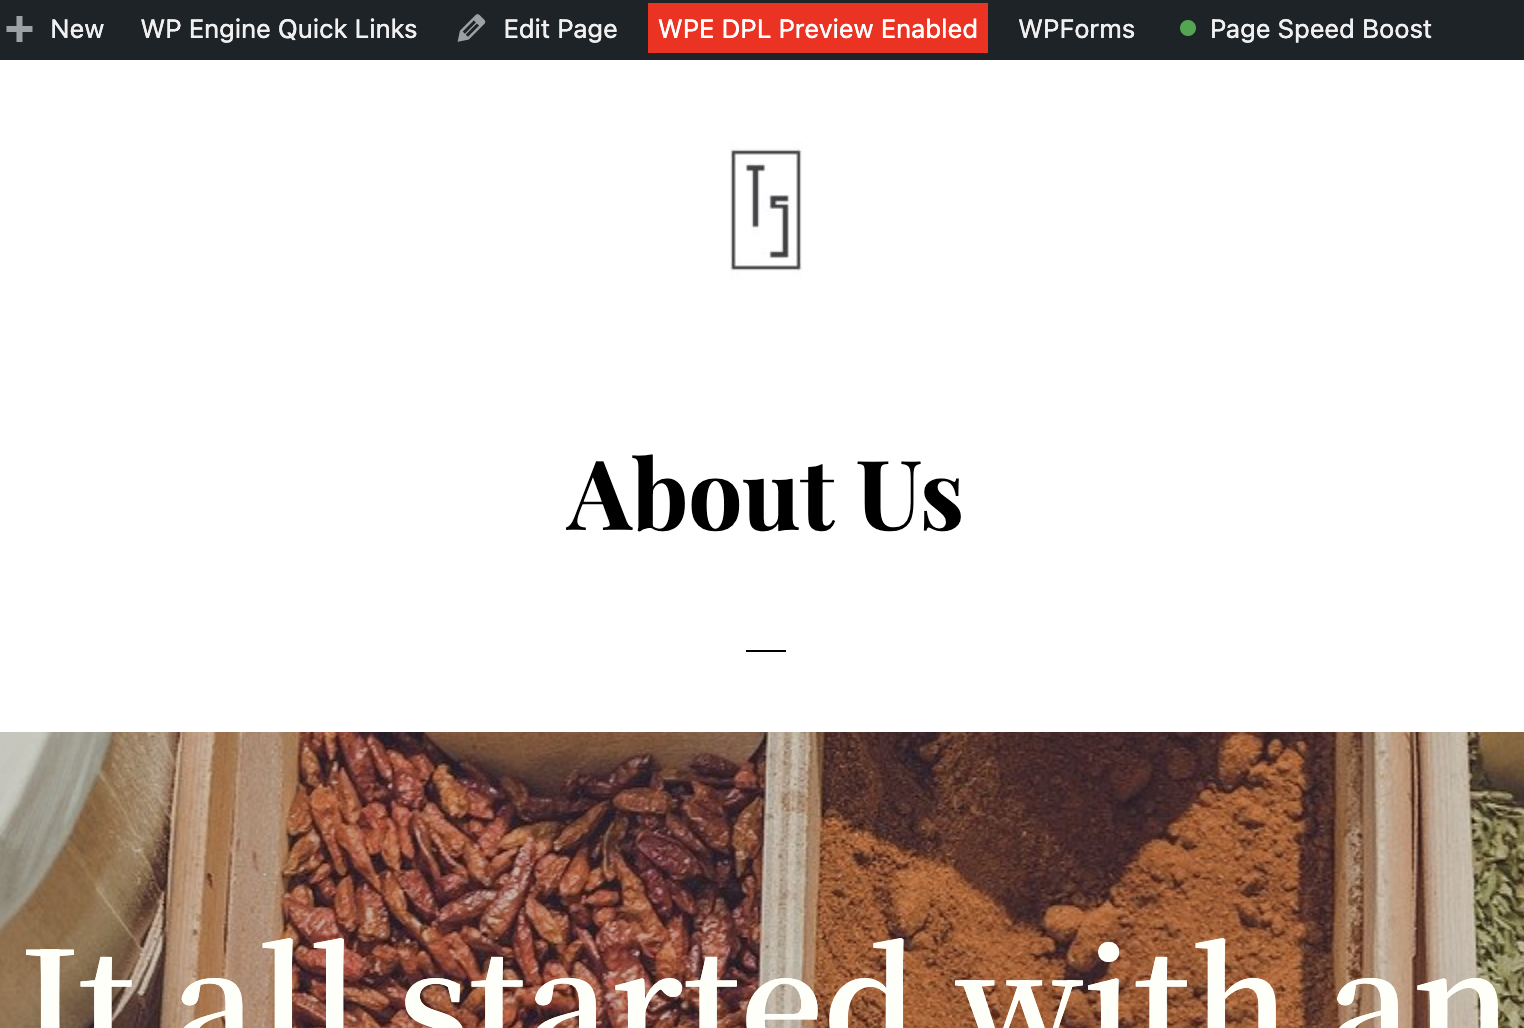
- After clicking the Test rule link you’ll be taken to your website and you’ll see a red indicator that says “WPE DPL Preview Enabled” in the WordPress top toolbar. Navigate to the pages you selected and check for any visual or functionality changes.
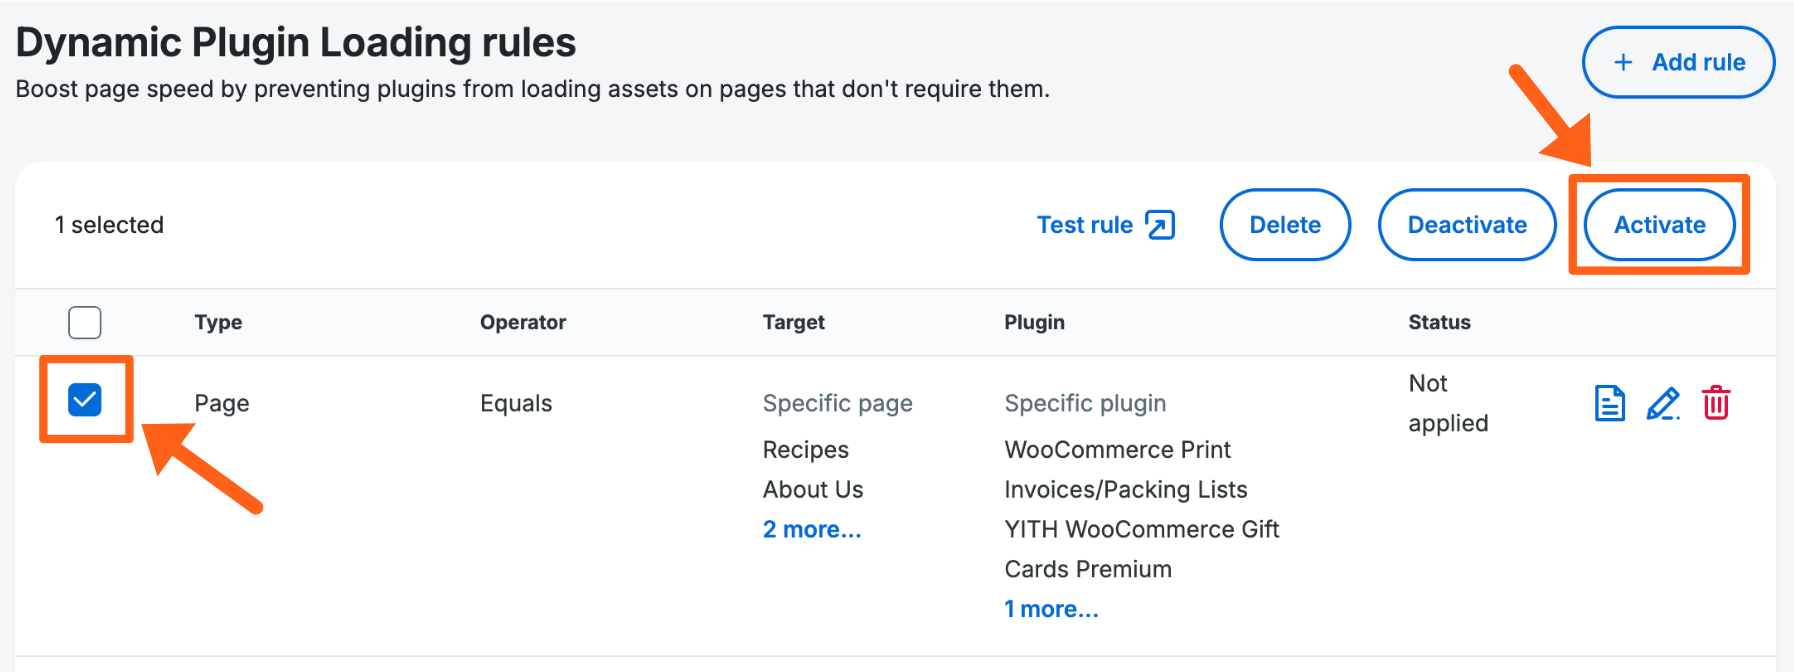
- If you’re happy with the test, then check the box to the right of the rule again, and click the Activate button in the top right above the table.
Dynamic Plugin Loading FAQ
Is Multisite supported?
No, currently the dynamic plugin loading feature is not supported for Multisite websites.
Will dynamic plugin loading work with my other optimization plugins or services like Nitro Pack/Page Speed Boost?
Yes, it is complementary to NitroPack. Basically smaller and fewer files are sent to NitroPack or Cloudflare for example, before they do their optimization which reduces the work they need to do.
Manage eCommerce Suite Features
Anyone with an eCommerce plan has access to the powerful tools you need to optimize your store, keep your store secure, and save you time. Current eCommerce features include:
- One-click installation of WooCommerce – Customizable, open-source eCommerce platform.
- Instant Store Search (Professional plan and above) – Incredibly fast search with AI-powered recommendations.
- Payment solution of choice, or:
- Stripe Connect – Easily integrate your Stripe payments processing from the WP Engine User Portal.
- Stripe Checkout Integration – Stripe’s prebuilt payment form that allows merchants to get all the advantages of Stripe Checkout using 1-click no-code activation.
- Smart Plugin Manager – Automatically keep your store & plugins up to date.
- Quick Store Setup – Includes “Spend” theme content block collection with demo content & products.
- Genesis Pro – Powerful block-based features for WordPress.
- Live Cart for WooCommerce – A proprietary feature to improve the scalability of the cart and page speed across your entire store without losing dynamic cart functionality. (Requires the WooCommerce plugin to be active.)
- EverCache® for WooCommerce – Leverage caching more often to increase scalability and performance. (Requires the WooCommerce plugin to be active.)
- Page Speed Boost – Increase product page speed instantly without configuration or technical expertise. (Included in Premium plans or as an add-on)
- Slow Query Monitor – Continuous, lightweight and actionable slow query identification and recommendations. (Included in Premium plans)
Install eCommerce Feature
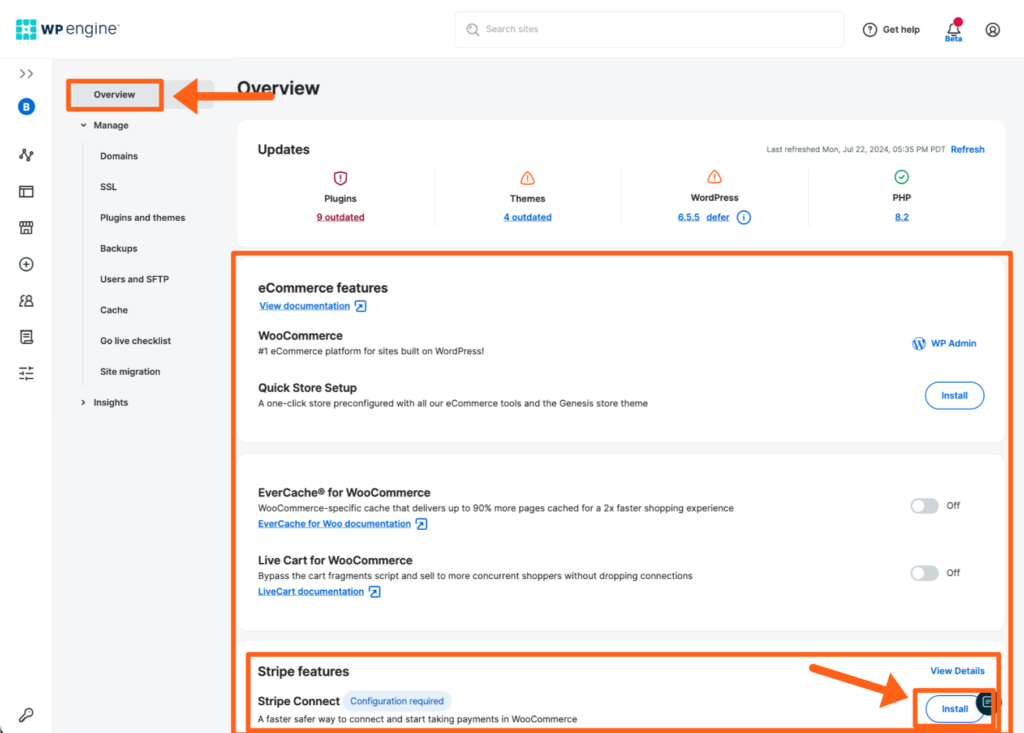
To use these features on any of your eCommerce sites, just go to the Site overview page for your desired site. From there you can select and install your desired features.
- Log in to the User Portal
- Select the environment name
- On the Overview page, locate an eCommerce Feature you’d like to use
- Click Install or toggle the button to the on position next to the feature
Uninstall eCommerce Feature
Each eCommerce feature serves a different function and therefore has its own method to safely and fully remove. Use the instructions below to remove a specific feature from your website.Be sure to make any necessary backups of the website before making any changes.
WooCommerce
To uninstall WooCommerce you will need to log in to the WP Admin dashboard of the website and remove the WooCommerce plugin like normal.
Keep in mind uninstalling WooCommerce will remove all of the products and order information for the selected site.
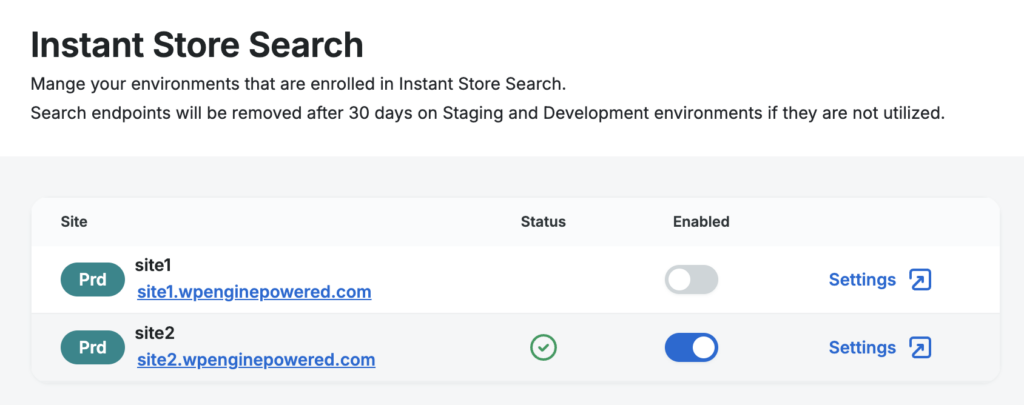
Instant Store Search
To remove Instant Store Search:
- Log in to the WP Engine User Portal
- Select Products from the main sidebar menu
- Click Instant Store Search under Your products
- This page can be accessed directly at: https://my.wpengine.com/products/instant_store_search
- Locate the environment name in the list
- Toggle the switch to Disabled to remove Instant Store Search
Smart Plugin Manager
To remove Smart Plugin Manager:
- Log in to the WP Engine User Portal
- Select Products from the main menu
- Click Smart Plugin Manager under Your products
- This page can be accessed directly at: https://my.wpengine.com/products/smart_plugin_manager
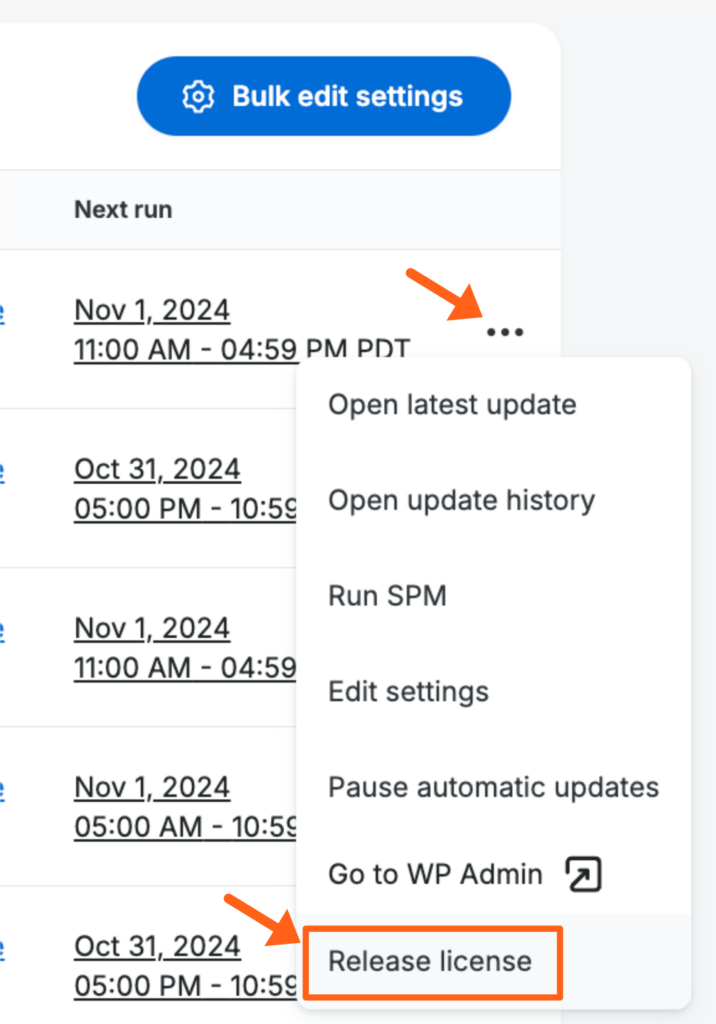
- Click the 3 dot button to the right of any environment, and select Release license
Alternatively you can remove Smart Plugin Manager licenses in bulk:
- Visit the Smart Manager Plugin product page listed above
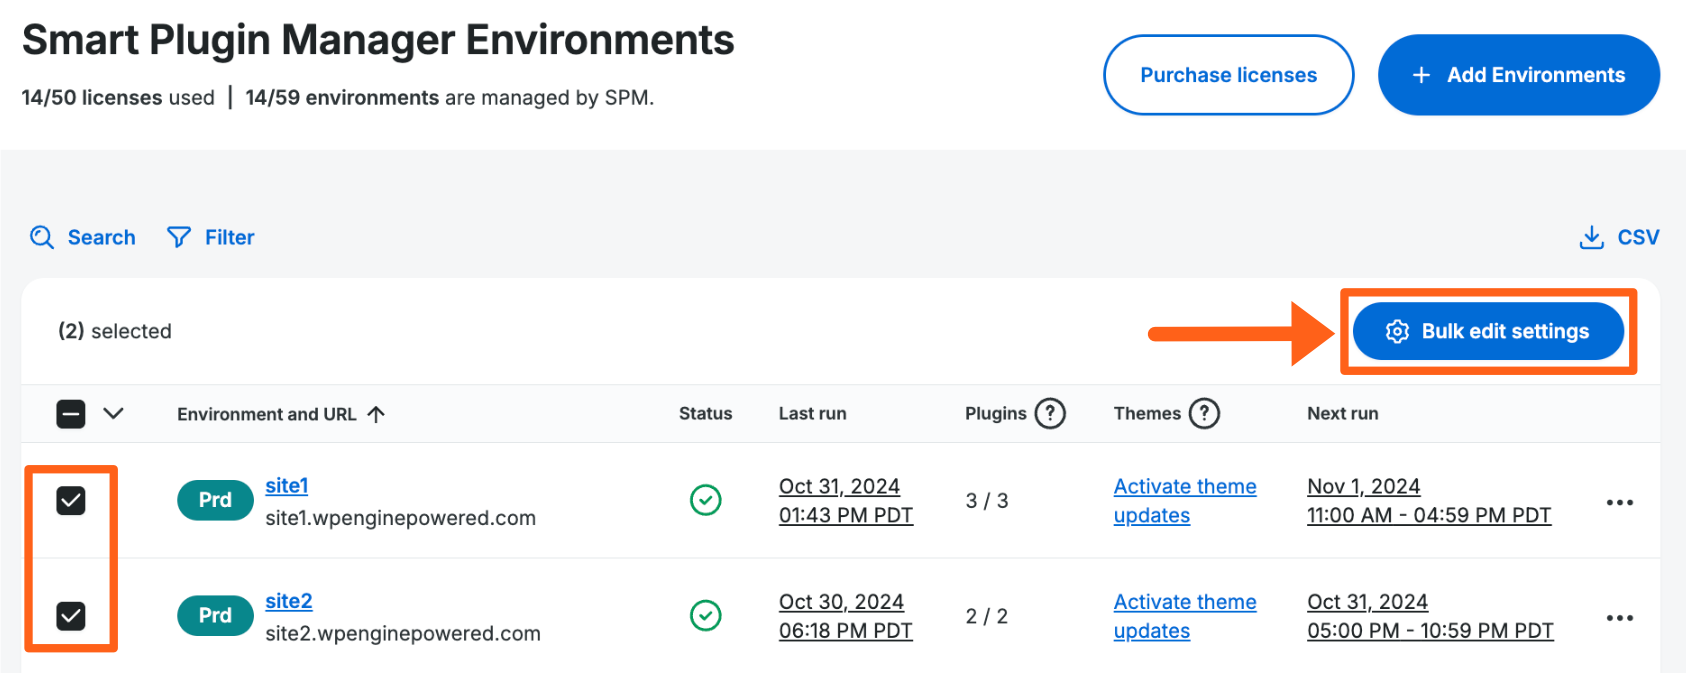
- Select the sites you wish to remove this feature from by checking the boxes next to each environment
- With the appropriate environments selected, click the Bulk edit settings button
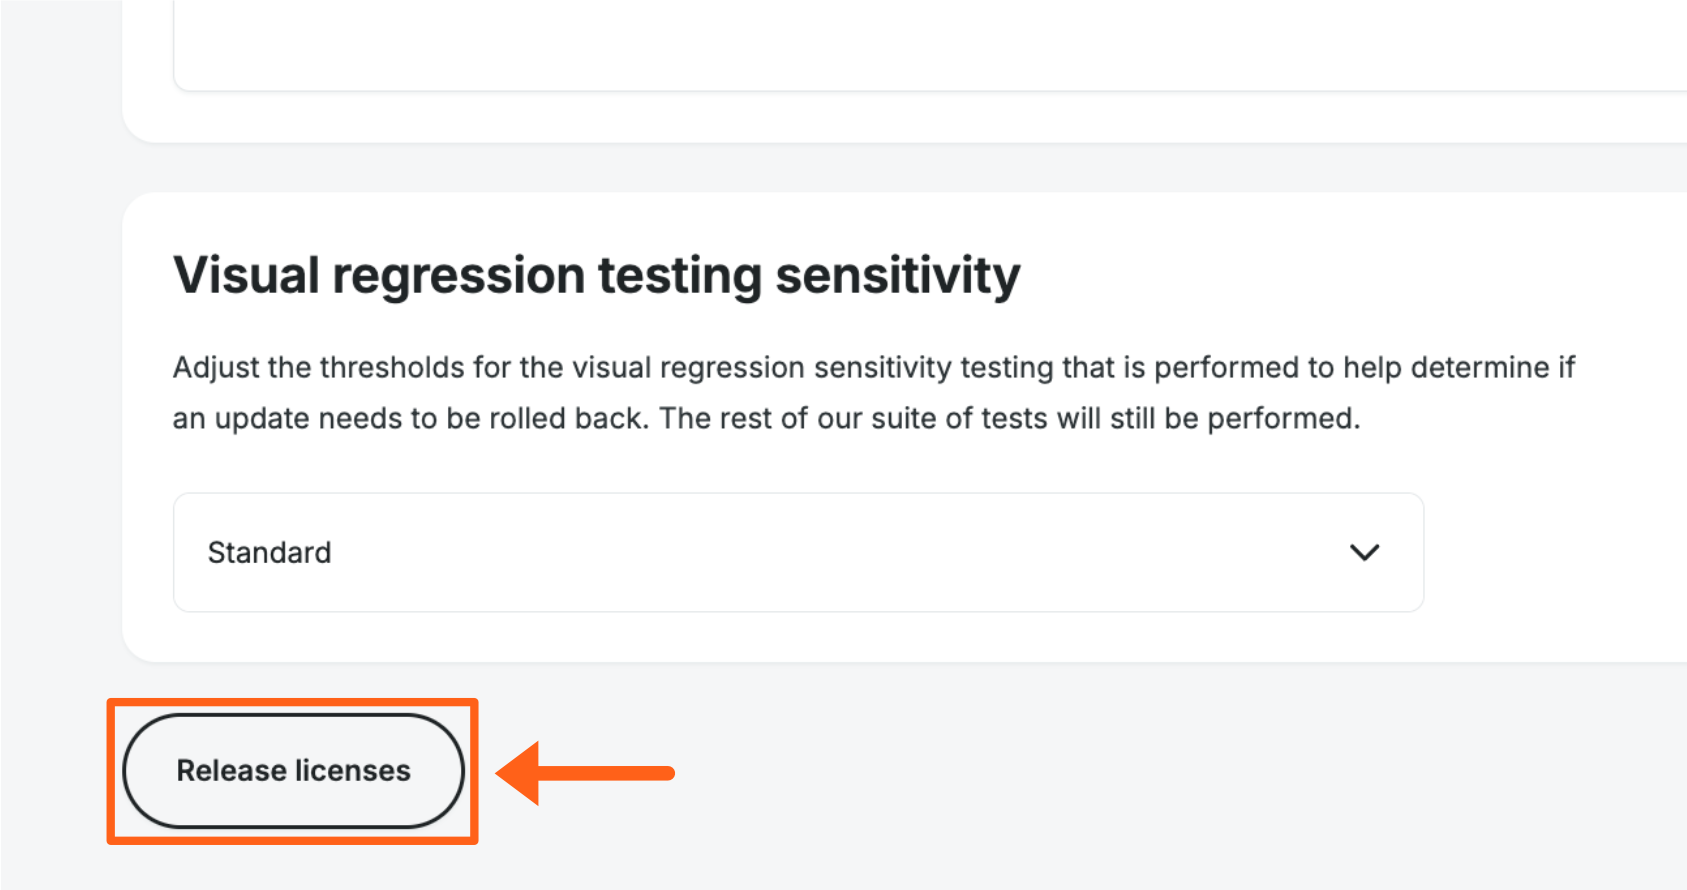
- From here you can Release licenses at the bottom of the page to remove the feature from the selected environments
Once a license has been released from an environment, it can then be applied to another environment on the account.
Stripe Connect
To remove Stripe Connect:
- Log-in to the user portal
- From the Sites Page click the site name
- From the site’s Overview page, click View Details in the Stripe features module
- In the Stripe Overview tab, click the Actions Menu (three dots)
- Click Remove Stripe Configuration and confirm
Stripe Checkout
To disable Stripe Checkout:
- Log-in to the user portal
- From the Sites Page click the site name
- From the site’s Overview page, click View Details in the Stripe Features module
- In the Stripe Checkout tab, toggle the slider that says Enabled to disable
Quick Store Setup
Removing quick store setup involves a few steps.
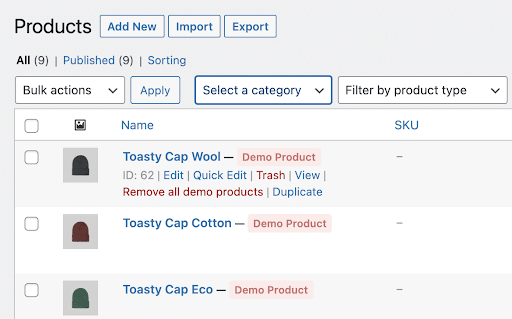
- Removing Demo Products
- In WP-Admin, find the Products tab under the WooCommerce side nav menu item. If you hover over one of your demo products (indicated by a Demo Product tag) you will have the option to remove all demo products.
- Removing Demo Content
- Find your Pages tab in WP Admin. You will see a list of all the pages created for your site. Any pages created as demo content will have the author name matching the name of your site in WP Engine. This is how you can tell which pages were created as part of your demo content. To remove these pages, select and move to trash all pages with the author name matching your site’s name.
Genesis
To uninstall Genesis, go to your plugins page in WP Admin, deactivate and uninstall the plugin like normal.
Keep in mind that removing Genesis will also remove any themes, blocks, and styling provided by Genesis.
Live Cart
- Log in to the WP Engine User Portal
- From the Sites page, select the environment name
- Under WooCommerce Performance, locate Live Cart for WooCommerce
- Toggle the switch off
The “Live Cart by WP Engine” plugin must also be deactivated and uninstalled from the wp-admin area of your website to completely disable the Live Cart functionality.

Additional Support
WP Engine provides limited support on requests regarding third-party plugins, including WooCommerce. We can help identify issues that occur server side or with features provided by the eCommerce Suit, and analyze logs or other errors that could be helpful in addressing WP Engine platform-related issues.
Learn how to find WooCommerce’s error logs here, for more information about errors on your store.
Inquiries around WooCommerce setup, functionality, bugs, and conflicts with WordPress core, or your custom code are outside of WP Engine’s scope of support. For more resources, see the following:
- WooCommerce help documentation can be found here.
- WooCommerce Support can be contacted here.
- Join the WooCommerce Community here.
- See WP Engine’s full Scope of Support here.
NEXT STEP: 5 Steps to take your store live